Updated on April 21, 2026
In 2026, conversational AI will become a baseline expectation in mobile applications. Integrating an AI chatbot into your Android app allows you to resolve support issues proactively, provide personalized recommendations, and answer user queries 24/7 within a native interface.
This article covers three architectural approaches, then walks through a complete, technically precise integration using the Kommunicate SDK — including all Gradle configuration, SDK initialization, permissions, ProGuard rules, conversation launch code, and UI customization.
The 3 Architectural Paths for Android AI Chatbots
There are three primary ways to build an AI chatbot for Android in 2026, each with distinct trade-offs in control and engineering effort.
- Build using LLM APIs like OpenAI, Anthropic, or Gemini
- Build a custom backend with orchestration (agents, memory, tools)
- Use a ready-made SDK like Kommunicate
| Method | Build Time | Control | Complexity | Best For |
| LLM APIs | Medium | High | Medium | AI-first apps |
| Custom Backend | Fast | Very High | High | Advanced AI systems |
| Kommunicate SDK | High | Medium | Low | Support, chat, fast deployment |
Method 1: Building AI Chatbot for Android Using LLM APIs
This approach involves connecting your app directly (via a middle-tier) to providers like OpenAI, Anthropic, or Gemini.
Instead of the Android app talking directly to the AI (which would expose your private API keys), the app communicates with an Endpoint “Middle Tier”. This server-side bridge handles the SDK Calls and Chat Responses between your frontend and the AI backend.
Architecture flow: Android App → Your Backend (Node/Python) → LLM Provider API → Response → App
- Pros: Full control over model prompts, temperature, and system instructions. Access to the latest model capabilities (function calling, vision, etc.)
- Cons: Requires a backend for security, manual handling of chat memory, and significant engineering effort. Manual implementation of chat memory and context windowing required.
- Best for: Developers building differentiated AI products or specialized agent platforms
Method 2: Building Custom AI Backend for AI Chatbot for Android App
This method is best for enterprise-grade systems, where you build a custom orchestration layer using tools like vector databases.
- Pros: Full multi-agent orchestration with tool usage and long-term memory. Custom vector store integration (e.g., Pinecone, Weaviate, pgvector)
- Cons: Very high engineering cost and long build timelines
- Best for: Serious AI infrastructure where differentiation is the primary goal.
Method 3: The Fastest Path — Ready-Made SDK
If your goal is to add a functional AI chatbot quickly without reinventing the wheel, using a platform like Kommunicate is the preferred choice.
Kommunicate provides a production-ready Android SDK with a built-in Chat UI, AI-to-human handoff, and bot platform integrations (OpenAI, Anthropic, Gemini, custom AI agent).
- Pros: It provides a built-in UI, handles AI-to-human handoff, and requires no custom backend.
- Cons: Compared to building with LLM APIs or a custom backend, you have less granular control over the underlying architecture.
- Best for: MVPs and apps needing immediate support capabilities.
So, your choice ultimately comes down to three options.
- If you want more control go with LLM APIs
- If you want more power and integrations go with custom backend AI chatbot
- And if you are looking to instantly add an AI chatbot to your Android App, go for a platform like Kommunicate
Let’s now find out how to add an ai chatbot to your android app using Kommunicate.
Step-by-Step Guide on How to Add an AI Chatbot to Android Using Kommunicate
Step 1: Create Your Free Account on Kommunicate
To integrate an AI chatbot on your Android app, you will need a Kommunicate account. To create a free AI chatbot on Kommunicate, you can watch this video or read this blog.
Once your ai chatbot is ready, you will need to integrate your android app with the ai chatbot which you just created.
Integrating Kommunicate AI Chatbot into your Android App
There are few pre-requisites that you need to maintain to integrate the Kommunicate AI chatbot into your Android app.
- Android 5.0 (API level 21) or higher
- Java 21 or higher
- Kotlin version: 2.0 or higher
- Android Gradle Plugin 8.0 or higher
Step 2: Adding Gradle Dependency to Your App
Launch Android Studio and open your project. If you’re used to working with external libraries or SDKs, adding the Kommunicate SDK is much simpler.
allprojects {
    repositories {
        maven { url 'https://kommunicate.jfrog.io/artifactory/kommunicate-android-sdk' }
    }
}
If you are using Gradle 6.8 or higher, add the following to your settings.gradle file:
dependencyResolutionManagement {
    repositories {
        maven { url 'https://kommunicate.jfrog.io/artifactory/kommunicate-android-sdk' }
    }
}
Next, for all Gradle versions, add the dependency to your module build.gradle file:
dependencies {
      implementation 'io.kommunicate.sdk:kommunicateui:2.14.5'
}
Once the build sync is done, you have installed Kommunicate on your app and can proceed to the next step.
Step 3: Initialize SDK
After the Gradle sync with the kommunicate dependency is complete, you can initialize the SDK by calling the following method:
| Kommunicate.init(context, APP_ID); |
You can initialize the SDK in your Activity’s onCreate() function. Just make sure it’s initialized before calling any Kommuniate SDK methods. The APP_ID parameter will be set to the application id (APP ID) you just got from the Kommunicate dashboard.
Step 4: Set up ProGuard Rules and Permissions
- Add these ProGuard rules to the proguard-rules.pro file. If you skip this step, then your app might crash if the minify enable is set to true.
-keep class net.sqlcipher.** { *; }
-keep class javax.crypto.** { *; }
-keepattributes *Annotation*
2. If you need to use \features like Camera, Storage, Location, then you need to add them to your own app’s AndroidManifest.xml file.
If you use the Camera and Gallery Storage feature, add these permissions:
<uses-permission
            android:name="android.permission.CAMERA"
            tools:node="merge" />

<uses-permission
        android:name="android.permission.WRITE_EXTERNAL_STORAGE"
        android:maxSdkVersion="32"
        tools:ignore="ScopedStorage"
        tools:node="merge" />
<uses-permission
        android:name="android.permission.READ_EXTERNAL_STORAGE"
        android:maxSdkVersion="32"
        tools:node="merge" />

        <!--Permissions to be used when your app targets API 33 or higher-->
<uses-permission android:name="android.permission.READ_MEDIA_IMAGES" />
<uses-permission android:name="android.permission.READ_MEDIA_VIDEO" />
<uses-permission android:name="android.permission.READ_MEDIA_AUDIO" />
If you use the Location feature, add these permissions:
        <uses-permission
            android:name="android.permission.ACCESS_COARSE_LOCATION"
            tools:node="merge" />
        <uses-permission
            android:name="android.permission.ACCESS_FINE_LOCATION"
            tools:node="merge" />
If you use the Audio record / Speech to text feature, add these permissions:
<uses-permission
            android:name="android.permission.RECORD_AUDIO"
            tools:node="merge" />
Step 5: Initialize Conversation With the Created Chatbot
Kommunicate includes a ready-to-use Chat UI, so the only thing left to do in this step is to launch the chat screen.
Here’s how you can start the conversation:
new KmConversationBuilder(activityContext)
    .setSingleConversation(false)
    .createConversation(new KmCallback() {
        @Override
        public void onSuccess(Object message) {
            String conversationId = message.toString();
        }

        @Override
        public void onFailure(Object error) {
            Log.d("ConversationTest", "Error : " + error);
        }
    });
Also, if you have a list of human agents and/or multiple bots and need to start a conversation with them, use the builder described below:
List<String> agentIds = new ArrayList<>();
agentIds.add("<AGENT_ID>");

List<String> botIds = new ArrayList<>();
botIds.add("<BOT_ID>");

new KmConversationBuilder(activityContext)
    .setSingleConversation(false)
    .setAgentIds(agentIds)
    .setBotIds(botIds)
    .createConversation(new KmCallback() {
        @Override
        public void onSuccess(Object message) {
            String conversationId = message.toString();
        }

        @Override
        public void onFailure(Object error) {
            Log.d("ConversationTest", "Error : " + error);
        }
    });
You’re finished! Launch the Android app and communicate with the chatbot. In a few simple steps, you can easily integrate a chatbot into your Android app. If you require any additional information, please review the Kommunicate documentation.
Step 6: Customization
The ability to brand the look and feel of the chat UI as well as customize the colors, strings, and fonts is granted. Kommunicate includes simple settings for customizing different elements and enabling or disabling specific features.
To accomplish this, Essentially, the setting file must be downloaded and the properties modified.
- Download the settings file from here (Right click -> Save as -> Save)
- Place the downloaded applozic-settings.json file under your app/src/main/assets/ folder.
Step 7: To Change the Background Color
Modify the hex color codes in the properties listed below in the applozic-settings.json file.
| “sentMessageBackgroundColor”: “#5c5aa7”,“receivedMessageBackgroundColor”: “#e6e5ec”,“sentMessageCreatedAtTimeColor”: “#ede6e6”,“receivedMessageCreatedAtTimeColor”: “#8a8686”,“sentMessageTextColor”: “#FFFFFFFF”,“receivedMessageTextColor”: “#646262” |
Step 8: To Change the Attachment Options
By changing the values in the applozic-settings.json file, you can hide or show the media attachments options such as camera, emoji, files, and location sharing.
| “attachmentOptions”: { “:location”: false, // Location sharing option will be disabled “:camera”: true, “:file”: true, “:audio”:true } |
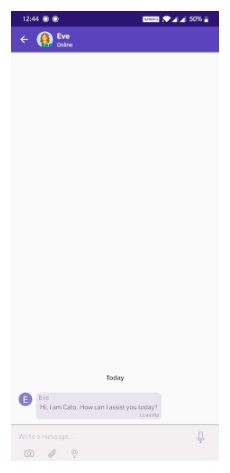
More customisation and configuration can be found in the kommunicate documentation. And this is how the bot’s first-screen interaction should look.
Conclusion:
You have now completed a full, production-grade integration of an AI chatbot into an Android application using the Kommunicate SDK. The key implementation points covered in this guide are:
- Middleware-layer security: never expose LLM API keys in client-side Android code
- Gradle configuration across both legacy (6.7-) and modern (6.8+) project structures
- ProGuard rules required to prevent crashes in minified release builds
- Scoped permission declarations aligned with Android 13+ (API 33) storage model
- KmConversationBuilder usage for both simple and multi-bot/agent deployments
- JSON-driven Chat UI customization via applozic-settings.json
For further reading, refer to the official Kommunicate Android SDK documentation.
At Kommunicate, we are envisioning a world-beating customer support solution to empower the new era of customer support. We would love to have you on board to have a first-hand experience of Kommunicate. You can signup for free and start delighting your customers right away.


