Updated on April 28, 2026

In the hyper competitive environment of 2024, Customer retention is the new Customer Acquisition. As traditional ways of keeping customers happy fail to impress, innovative solutions such as chatbots are stepping up to claim the mantle.
One of the most popular ways to build these chatbots is using React.JS. As an enterprise, training your team on React.JS to build chatbots can be one of the most critical decisions you take. And with good reason.
React.JS is one of the best ways to build engaging and interactive chatbots, because:
- Component based architecture: Enables to use modular and reusable code.
- Declarative syntax: This makes creation of interactive UI simple, which plays a crucial role in creating engaging user experiences.
- Virtual DOM: Enhances performance by minimizing unnecessary DOM operations, meaning smooth and responsive chatbot interactions.
- Robust community support and extensive documentation.

Chatbots thus built with React JS lead to improved customer satisfaction, increased lead generation and enhanced brand perception.
Interested in learning more about chatbots? You can read these articles:
- How to Create a Chatbot For Free? (No Coding)
- How to Build Chatbot with React Native – A Step-by-Step Tutorial
- Integrate Dialogflow Bot in ReactJS Websites
In this blog post, we will teach you how to make your React.js website stand out by adding a chatbot. Ready to give your project a conversational upgrade?
We’ll break down the process step by step and make it accessible for everyone.
Prerequisites
Before we dive into building a chatbot, make sure you have the following prerequisites in place:
- Basic knowledge of JavaScript and React JS.
- Node.js and npm (Node Package Manager) are installed on your development machine.
- A code editor of your choice (e.g., Visual Studio Code).
- A working React Native project set up.
Steps to Build Chatbot in React JS
We’ll break down the process of building a chatbot for your React JS website step by step and make it accessible for everyone. We’ll do the integration in 2 phases:
- Create a Kompose chatbot and set up the answers.
- Add the created chatbot to your React JS website.
Let’s jump right into it.
Phase 1: Create a chatbot in Kompose and setup the answers
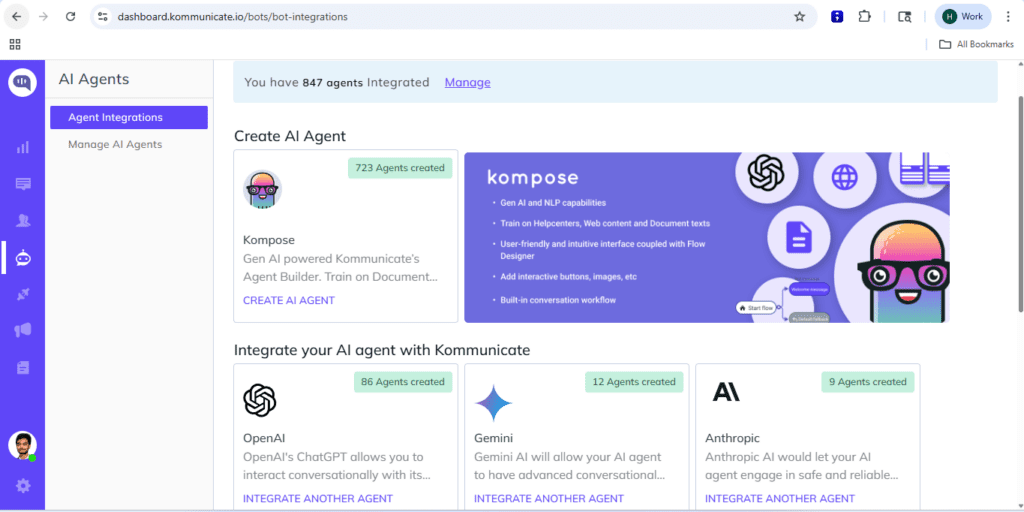
Step 1: Setup an account in Kommunicate
If you do not have an account in Kommunicate, you can create one here for free.
Next, log in to your Kommunicate dashboard and navigate to the Bot Integration section and choose Kompose.
Step 2: Create welcome messages & answers for your chatbot
You will automatically be taken to the Agent profile page, where you can name your chatbot.
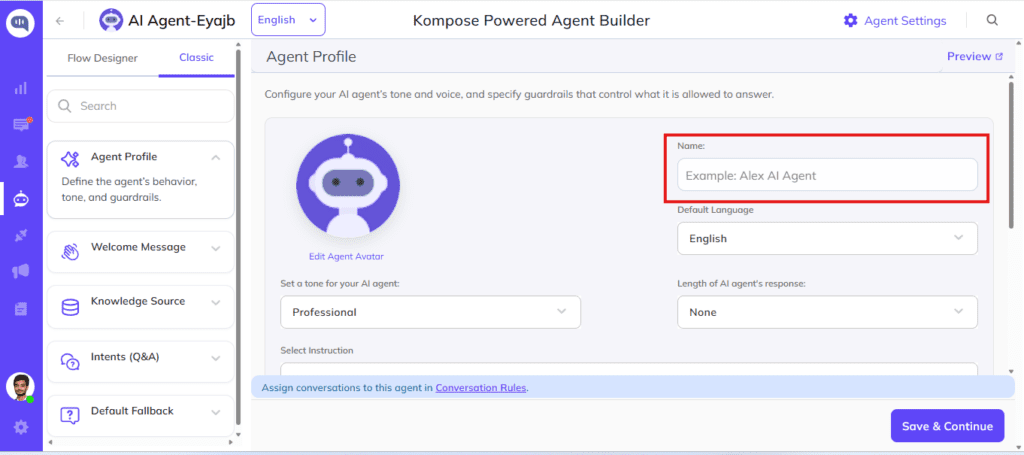
Then, set the welcome message for your chatbot. The welcome message is the first message that the chatbot sends to the user who initiates a chat.
Click the “Welcome Message” section. In the “Enter Welcome message – Bot’s Message” box, provide the message your chatbot should be shown to the users when they open the chat and then save the welcome intent.
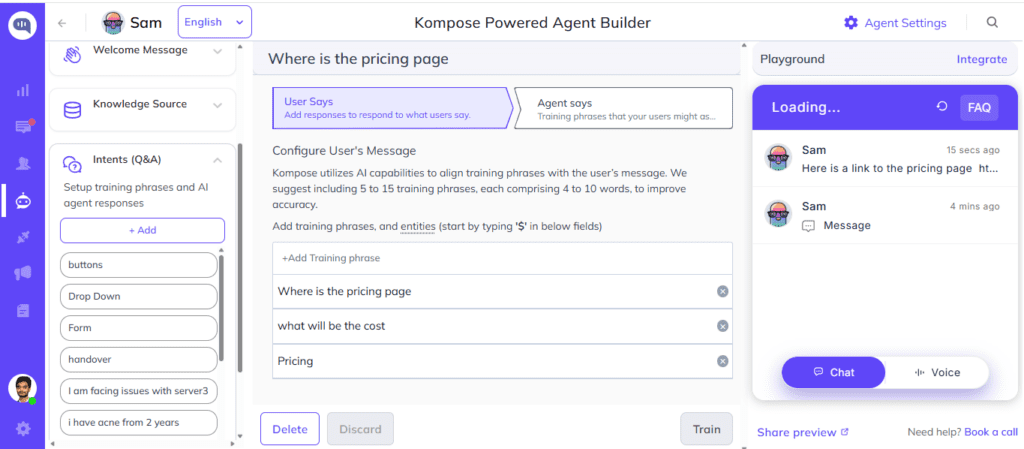
After creating the welcome message, the next step is to feed answers/intents. These answers/intents can be the common questions about your product and service.
The answers section is where you’ve to add all the user’s messages and the chatbot responses.
Go to the “Intents(Q&A)” section, click +Add, then give an ‘Intent name’
In the Configure user’s message section – you need to mention the phrases that you expect from the users that will trigger.
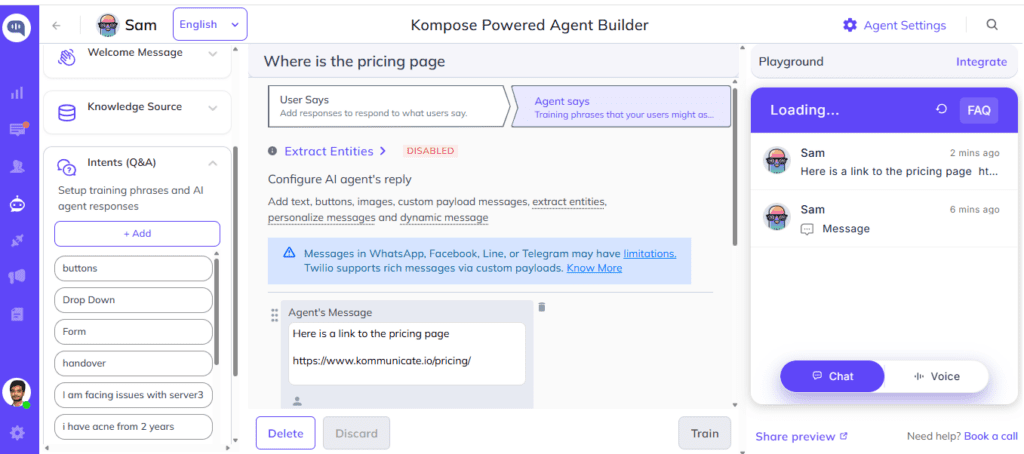
Configure the bot’s reply section – you need to mention the responses (Text or as Rich messages) the chatbot will deliver to the users for the particular message. You can add any number of answers and follow-up responses for the chatbot.
Once you have configured the responses, you need to click on “Train” which is at the button right and to the left of the preview screen. Once successfully trained, a toast “Answer training completed” will come at the top right corner.
Also Read: How to Add Chatbot to React Native
Phase 2: Add the created React JS chatbot to the website
Step 4: Create a React app
Create a new React app (my-app) by using the command in your terminal or Command Prompt:
npx create-react-app my-app
Step 5: Now, navigate to the my-app folder
cd my-app
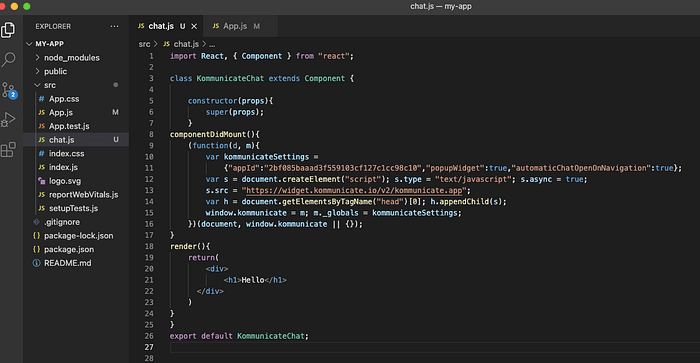
Step 6: Create a new file chat.js inside the src folder and install Komminicate Chatbot
Once you create the chat.js, add the below code in componentDidMount. The below code will launch a chat widget on your website with the integrated Dialogflow bot. Make sure to replace <YOUR_APP_ID> with your Kommunicate application ID.
import React, { Component } from “react”;

class KommunicateChat extends Component {
  constructor(props) {
    super(props);
  }

  componentDidMount() {
    (function (d, m) {
      var kommunicateSettings = {
        “appId”: ” <YOUR_APP_ID>″,
        ”popupWidget”: true,
        ”automaticChatOpenOnNavigation”: true
      };

      var s = document.createElement(“script”);
      s.type = “text/javascript”;
      s.async = true;
      s.src = “https://widget.kommunicate.io/kommunicate-widget-3.0.min.js“;

      var h = document.getElementsByTagName(“head”)[0];
      h.appendChild(s);

      window.kommunicate = m;
      m._globals = kommunicateSettings;
    })(document, window.kommunicate || {});
  }

  render() {
    return (
      <div>
        <h1>Hello</h1>
      </div>
    );
  }
}

export default KommunicateChat;
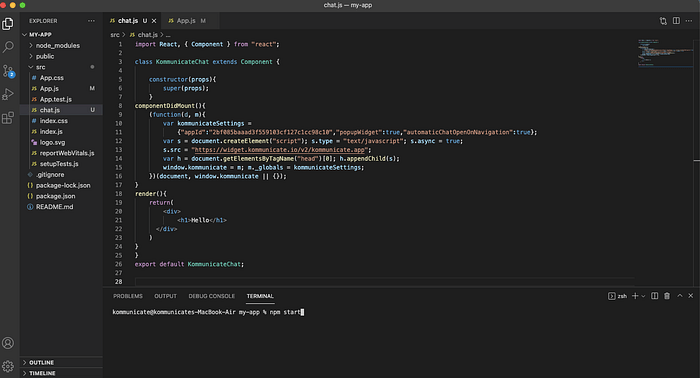
Here’s a screenshot of my code editor for the same:
Step 7: Start your app locally
Use the following command to start your newly created website with the installed Kompose bot.
npm start
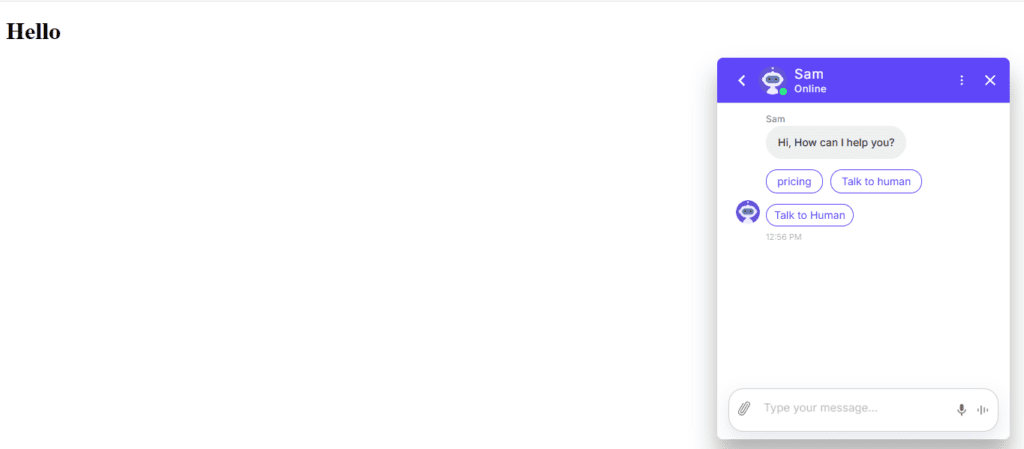
Voila! How simple was that? In these few simple steps, you could integrate the Kompose bot into React JS websites. This is how the chat widget looks on a website:
Conclusion
And there you have it! Following these steps, you’ve successfully integrated a chatbot into your React JS website, transforming it from a static site into a dynamic, engaging experience.
So, what are you waiting for? Start building your chatbot today and unleash the power of conversation in your React project!

Frequently Asked Questions (FAQ)
1. What is the benefit of integrating a chatbot into a React.js project?
Integrating a chatbot into a React.js project enhances user engagement by providing real-time and personalized interactions. It creates a dynamic user experience, improving customer satisfaction and the overall functionality of your web application.
2. Is it challenging to integrate chatbots into a React.js project for someone with limited coding experience?
Not at all! This guide is designed to be beginner-friendly, breaking down the integration process into simple steps. Even if you have limited coding experience, you can follow along and add chatbot functionality to your React.js project.
3. Can I customize the chatbot’s responses to match my project’s tone and style?
Absolutely. One of the advantages of integrating chatbots into React.js is the flexibility to customize responses. You can tailor the chatbot’s interactions to align with your project’s branding, tone, and overall user experience.
4. Are there specific tools or libraries recommended for integrating chatbots into React.js?
While there are various tools and libraries available, this guide focuses on a straightforward approach using widely adopted technologies. Feel free to explore more advanced tools based on your project’s requirements, but the provided steps should serve as a solid foundation.
5. How can a chatbot improve customer support on my React.js project?
Chatbots can enhance customer support by providing instant responses to common queries, freeing up human agents for more complex tasks. They can also assist in collecting information, guiding users through processes, and ensuring a more efficient support workflow.
6. Can I integrate multiple chatbots into a single React.js project?
You can integrate multiple chatbots into a React.js project based on your needs. Whether you want to handle different types of user inquiries or implement specific functionalities, the modular nature of React.js makes it conducive to integrating and managing multiple chatbots seamlessly.
7. How do I ensure the security of user data when implementing chatbots?
Security is crucial, and it’s essential to follow best practices when integrating chatbots. Ensure that communication with the chatbot is encrypted, and if the chatbot requires access to sensitive data, implement secure authentication and authorization mechanisms.

Adarsh Kumar is the CTO & Co-Founder at Kommunicate. As a seasoned technologist, he brings over 14 years of experience in software development, artificial intelligence, and machine learning to his role. His expertise in building scalable and robust tech solutions has been instrumental in the company’s growth and success.
At Kommunicate, we are envisioning a world-beating customer support solution to empower the new era of customer support. We would love to have you on board to have a first-hand experience of Kommunicate. You can signup here and start delighting your customers right away.


