Updated on February 12, 2025
Drupal is a free & open-source web content management framework. Drupal is released under the GNU Public license. Some of the most popular websites, such as Harvard, BBC News, Red Cross and Twitter are built on Drupal.
In this article, we are going to see how you can add a chatbot plugin to your Drupal websites.

Pre-Requisites
You should have a Drupal Admin account and you’ll need Kommunicate’s chatbot plugin for adding the chatbot to your Drupal website.
Now let’s jump into the steps to be followed to add chatbot to your Drupal website –
Step 1: Login to Your Drupal admin console
- The Drupal Administrator interface can be opened by appending the path where you have installed it to the URL of your Website or the Server IP.
- For example, http://example.com/drupal/
Step 2: Block Layout
- Click on the “Structure” menu at the top and then select the “Block Layout” option
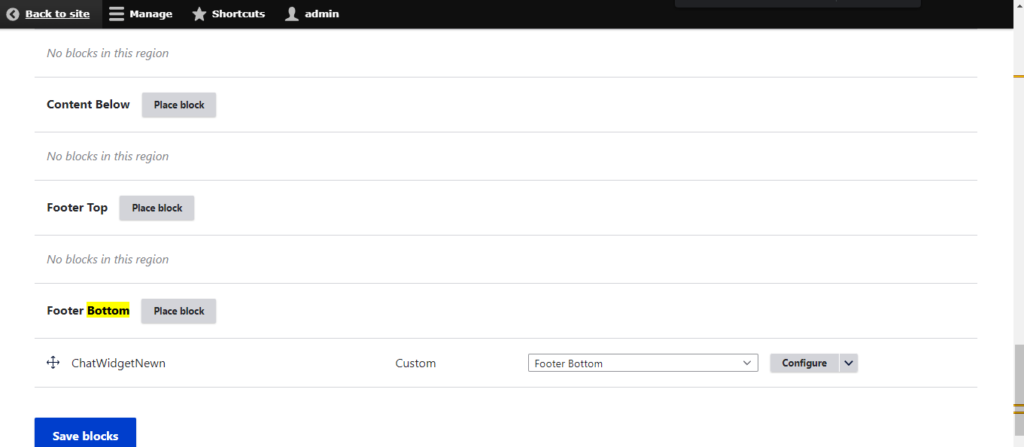
Step 3: Footer Bottom – Place Block Section
- In the block layout section, you have to configure what block content appears in your site’s sidebars and other regions.
- Navigate to the “Footer bottom” block and click on the “Place block” button.
Step 4: Adding the New Custom Block
- Now a box will be shown with all the block options where it needs to be placed.
- Click on the “Add custom block” button,
Step 5: Adding the Chatbot Script
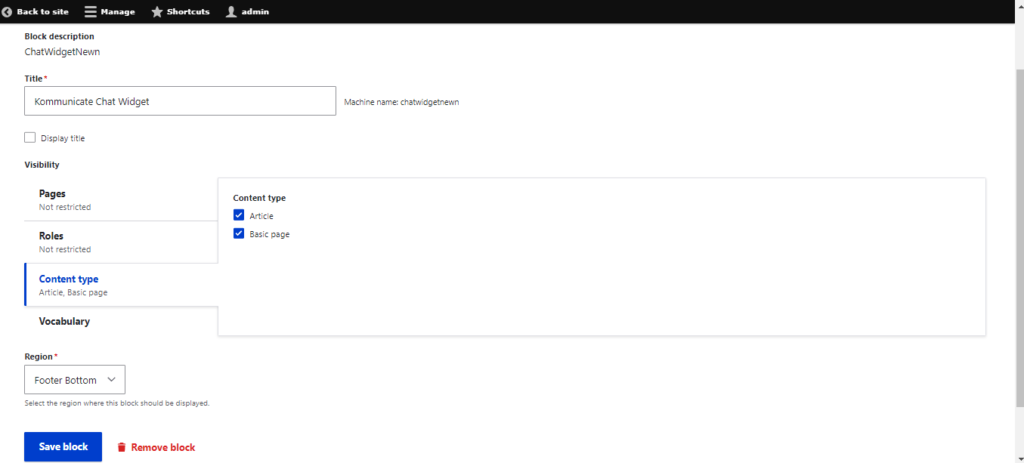
- The “Add custom block” page will appear – Provide a title to the “Block description”
- In the ‘Body’ section, click Source and paste your Kommunicate chatbot code snippet, then select the ‘Text format’ as `Full HTML` and save the custom block
Now let’s see how you can create a chatbot using Kommunicate’s Kompose Chatbot Builder –
Step 6: Go to the Bot Integrations Section
First, you need to login into your Kommunicate dashboard. If you do not have a Kommunicate account, you can sign up for free.
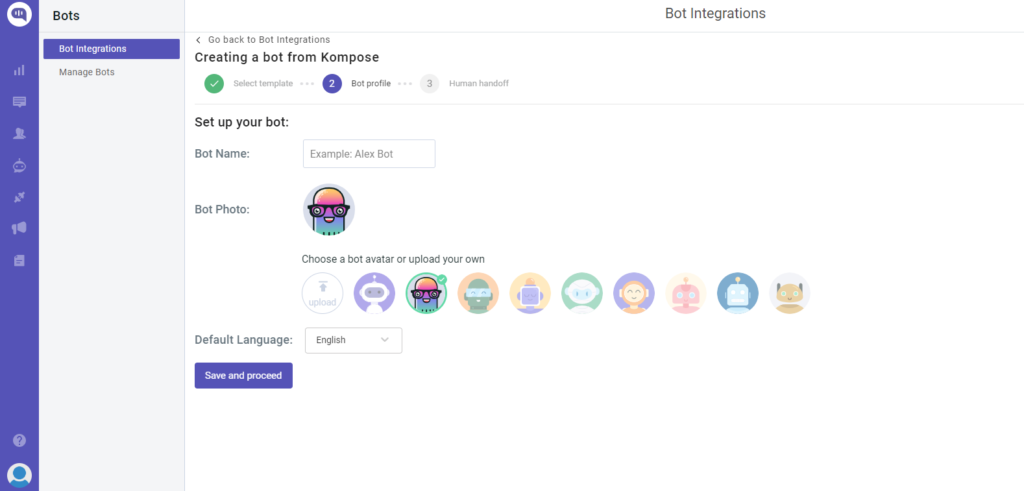
Navigate to the ‘Bot Integration‘ under the “Bot Integrations” section click “Create a bot with Kompose( Chatbot Builder)”.
In the ‘Bot profile’ page, Set up your Bot by providing Bot Name & Language then ‘Save and proceed”.
Once saved, it will be navigating to the next page ‘Human handoff’, enable or disable the “Automatic bot to human handoff:” setting, and click the ‘Finish bot setup’ button.
Step 7: Go to Kompose Section
After the bot setup is done, go to the Kompose section in the Bot Integration section. Select your bot from the ‘Select bot’ dropdown list.
Build Your Own AI Chatbot Without Signing upStep 8: Create a Welcome Message for Your Chatbot
The welcome message is the first message that the chatbot sends to the user who initiates a chat. The welcome messages create the first impression, but they also maintain customer engagement and make them feel valued.
An efficient bot greeting message also decides the conversational flow with visitors and gives a chance to explore the company’s products & features.
You can set an interactive greeting message using the Kompose builder with the help of the Texts, Buttons, Images, or any other rich media type.
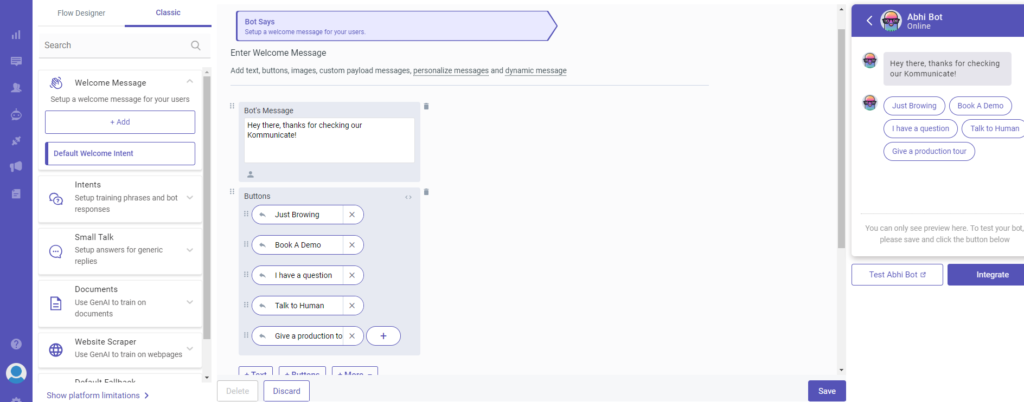
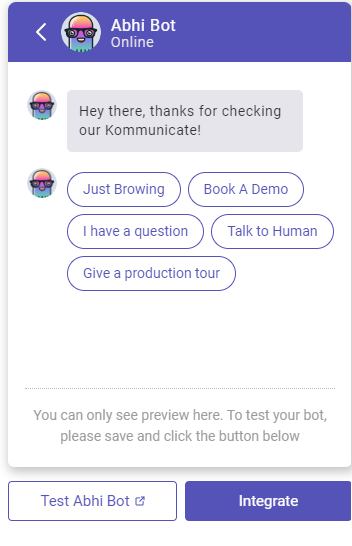
- Click the “Welcome Message” section, in the “Enter Welcome message – Bot’s Message” box provide the message your chatbot should be shown to the users when they open the chat and then save the welcome intent.
In the below example, we have added the welcome message using text and buttons. Added the text message “Hey there, thanks for checking our Kommunicate” and “5 buttons – Just Browsing, Book a Demo, I have a question, Talk to Human, Give me a product tour”. So when a user opens the chat widget the buttons will be shown along with the text to the user.
Step 9: Create Answers for Your Chatbot
Once the welcome message creation is completed, the next step is to create answers for your chatbot.
The answers section is where you’ve to add all the user’s messages and the chatbot responses.
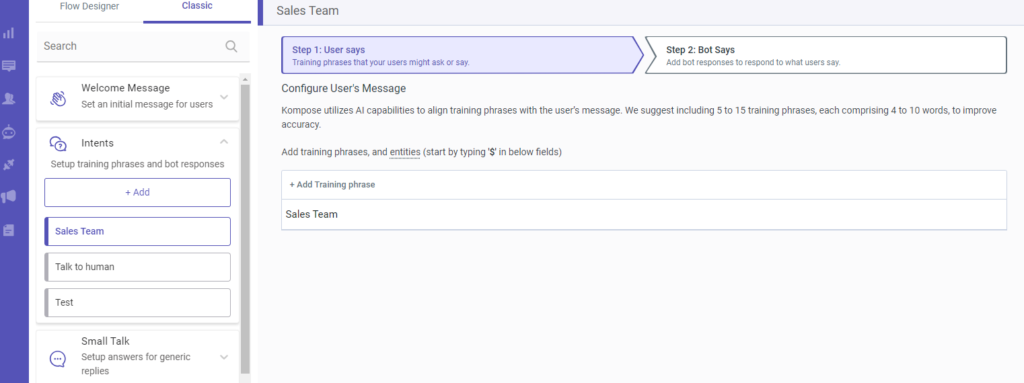
- In the “Answer” section, click +Add then give an ‘Intent name’
In the Configure user’s message section – you need to mention the phrases that you expect from the users that will trigger. Note that, Kompose runs on powerful NLP, so the bot will be able to match intents for similar phrases as well. But as you know – the more the data – the better the accuracy. So make sure you add more phrases to fine-tune the bot.
In the Configure bot’s reply section – you need to mention the responses (Text or as Rich messages) the chatbot will deliver to the users for the particular user’s message. You can add any number of answers and follow-up responses for the chatbot.
In the above welcome message example, we’ve added buttons ‘Book a Demo‘ and ‘Give me a product tour.’ So for these two buttons, we have added the same user message and answers as a text message to the bot reply section.
Supercharge your support team with AI-driven email ticketing – automate, organize, and resolve queries effortlessly!In the same way, you have to click +Add and add your possible user messages (training phrases) and the corresponding bot responses.
Step 10: Test Your Chatbot
Once you have completed the welcome message and answers setup, the final step is to test your chatbot.
Below the chatbot preview section, click the Test chatbot button.
Click the buttons – Book a Demo, Give me a product tour (or type Book a Demo, Give me a product tour) that we created in the previous step. It will show that particular answer as a chatbot response to the user.
That’s it, Your chatbot is ready to get to work.
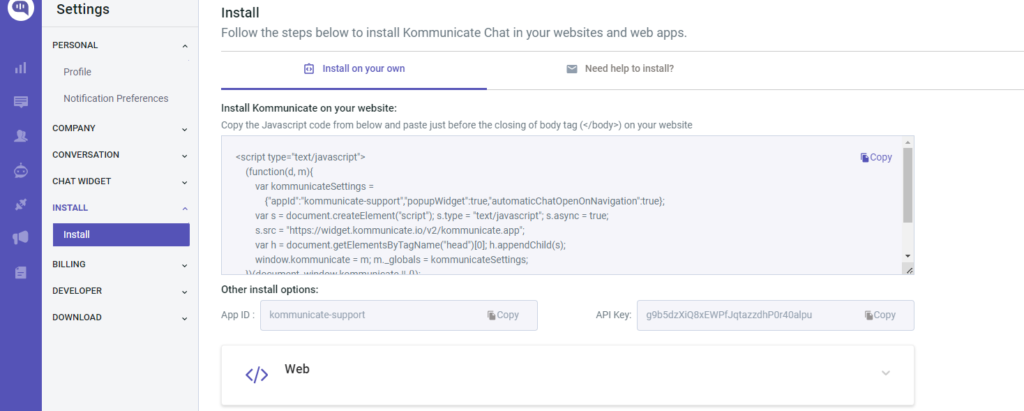
Step 11: Connect the Chatbot to Your Website
After creating the chatbot, the next step is to connect the chatbot to your website. You will get a short piece of Javascript code from the dashboard.
Navigate to Dashboard → Settings. Click on the Install section and click the Web tab and copy the JavaScript code.
Step 12: Selecting the Block Display Position
- Once the chatbot block has been saved, it will be forwarded to a page to select the content types, pages, and roles the chat widget should be shown.
- Check the ‘Content types’ boxes for Article & Basic page
- Select the ‘Region’ as Footer bottom where the block should be displayed and then Save the block.
Step 13: Viewing and Testing the Chatbot Block
Once the chatbot block is saved, you would be able to view it under the ‘Footer first’ section.
That’s it😍 Now, you would be able to view your Drupal website and test the Kommunicate chatbot widget.

Adarsh Kumar is the CTO & Co-Founder at Kommunicate. As a seasoned technologist, he brings over 14 years of experience in software development, artificial intelligence, and machine learning to his role. His expertise in building scalable and robust tech solutions has been instrumental in the company’s growth and success.
At Kommunicate, we are envisioning a world-beating customer support solution to empower the new era of customer support. We would love to have you on board to have a first-hand experience of Kommunicate. You can signup here and start delighting your customers right away.


