Updated on June 23, 2026
Dialogflow is one of the most popular chatbot builder platform known for its robustness in natural language understanding and ease of integration with various platforms. It comes in two editions – Dialogflow CX and Dialogflow ES. While Dialogflow CX is suited for building more complex and scalable conversational experiences, Dialogflow ES (Essentials) remains popular for its simplicity and efficiency in creating basic to intermediate chatbots.
In this blog, we will understand both the editions and their key differences. Here’s a quick outline –
- What is Dialogflow ES?
- Difference between DialogFlow ES and CX?
- Dialogflow ES pricing?
- Terms to know before building a chatbot
- How to build a bot using Dialogflow?
What is Dialogflow ES?
DialogFlow ES stands for DialogFlow Essentials, which is an offering by Google that helps you build chatbots. Dialogflow uses Google’s powerful Natural Language Understanding platform and then tries to understand your language, based on the training you give.
Google acquired Speaktoit, the company that built the earlier version of DialogFlow, which was then called api.ai, in September 2016. The project was then officially renamed as DialogFlow in October 2017.

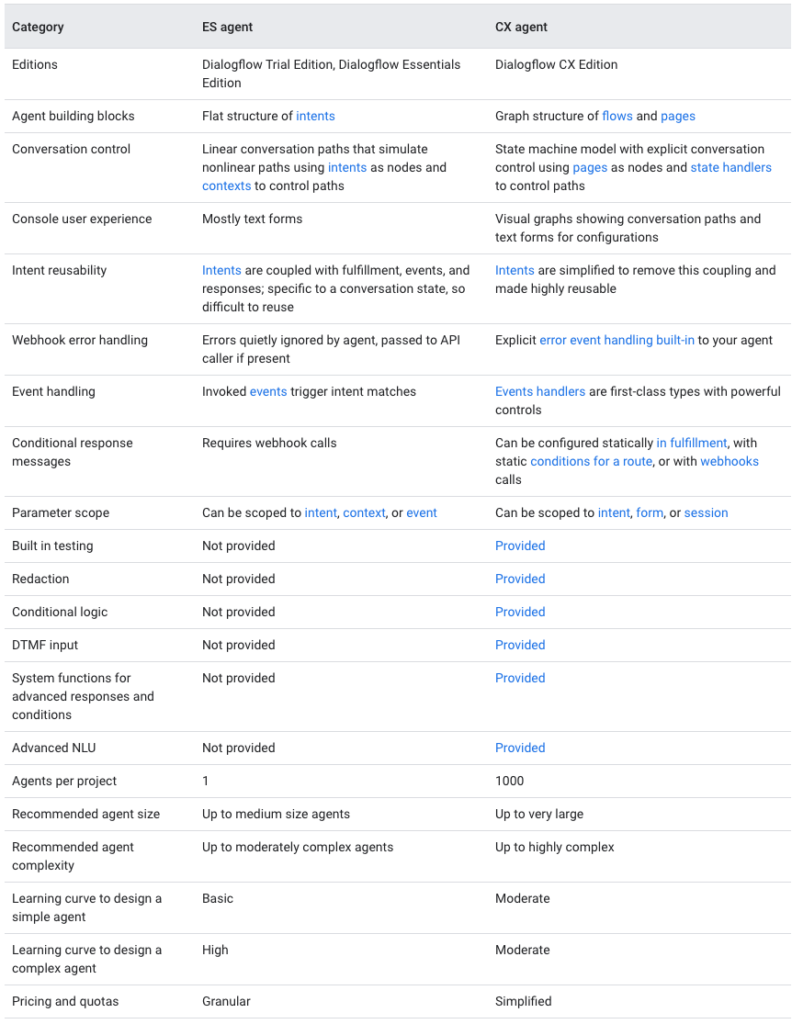
Difference Between Dialogflow ES and Dialogow CX?
Google offers DialogFlow in two versions – DialogFlow ES and CX. DialogFlow CX stands for Customer Experience, and is an advanced version of DialogFlow ES, supporting functionalities such as visualization builder and conditional controlling.
DialogFlow CX lets you build advanced bots, but is also on the pricier side, which brings us to the next aspect.
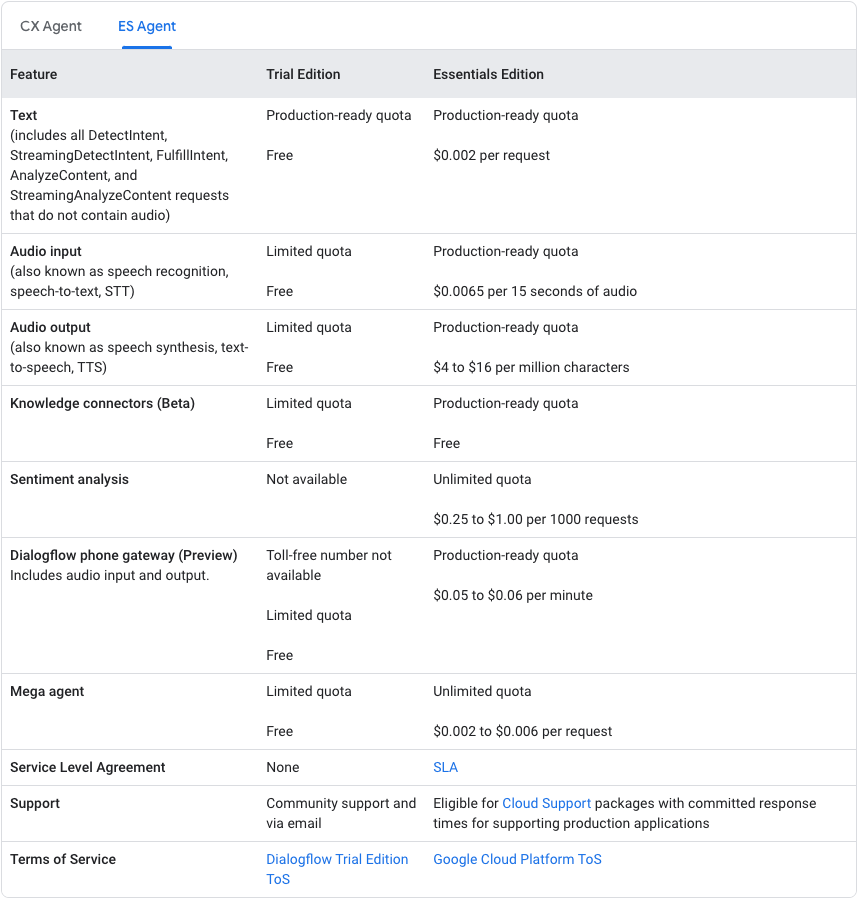
What is Dialogflow Pricing?
DialogFlow ES is close to the free version of DialogFlow, but it still comes with a small charge if you use it extensively.
Google charges you based on the number of text requests per minute, which is the maximum number of messages you send to and from the bot. DialogFlow ES is free for up to 180 text requests per minute. This means you can send close to 300,000 messages every month without any additional charge.
Any addition above the 180 requests per minute will cost you $0.002 per request. For details on DialogFlow CS pricing, check out the pricing page here.
DialogFlow CS is the more expensive counterpart, where you will be charged $20 for every 100 chat sessions. You also need to pay $45 for every 100 voice sessions. Follow the same link to know more about DialogFlow CX pricing.
In this post, we will teach you how to build a chatbot using Dialogflow (Google API). We will give you step by step instructions on how to build a chatbot, and, by the end of this tutorial, you will have a bot ready to do your bidding.
Before we Begin, Here are a Few Terms you Should be Familiar With –
- USER: A ‘user’ is any human being that builds a bot, trains a bot, interacts with a bot, or in general, uses a bot as a means to an end. Only human beings can be users, and chatbots cannot be ‘users.’
- AGENTS: Chatbots are also referred to as ‘agents.’ An ‘agent’ is usually the name given to a support agent, which is another way of calling a chatbot.
- EXPRESSIONS: Whatever you say to a bot is an expression. If you wish to interact with a bot, you would often ask it a question, such as “What are your pricing options?” or “When is the last train to Busan?” These sentences, in technical terms, are called Expressions, and we will be learning more about them as we progress.
- INTENTS: We know what ‘Expressions’ are, but how does a chatbot understand these expressions? This is where Intents come in. Different expressions can mean the same thing, and this meaning is called an ‘intent.’ For instance, a user query can range from “When will this model of phone launch?”or “ When will this model of phone be available?” We can easily say that the intent of the user here is ‘model availability.’ You can group various such expressions into intents, making it that much easier for the bot to respond.
- RESPONSES: This is the output by the chatbot when it receives a properly formatted input, which will satisfy the user’s query. For instance, when the user’s expressions trigger the intent ‘ model availability,’ the response will be something like “ The model will be available from the second week of February.” A good chatbot will give straightforward, simple responses.
- ENTITIES: Intents will help the chatbot understand the motivation behind each user query, but there is useful information present in the natural language input of the user. Dialogflow uses something called ‘entities’ to extract this useful information from the natural language input. Entities help in picking out specific pieces of information that your users mention, such as a product name or a street address.
- ACTIONS: Actions are Dialoglow mechanisms that help identify and annotate the keywords by connecting them with Entities. Actions also act as prompts that help extract useful information from the user.
How to Build Chatbot using Dialogflow
Now that you know most of the common terminologies that we are going to use, let us see them in action. We are going to build a simple TicketBot that will book tickets based on user inputs. Here we go:
Step 1: Setting up a Dialogflow account
Creating an Agent
Sign up for Dialogflow and open your dashboard. The first step is creating an agent, which essentially is the bot you are building.
You can create one through the console by following these instructions:
- Go to the Dialogflow ES Console.
- Click Create Agent in the left menu.
- Enter your agent’s name, default language, default time zone, and GCP project, then click the Create button.
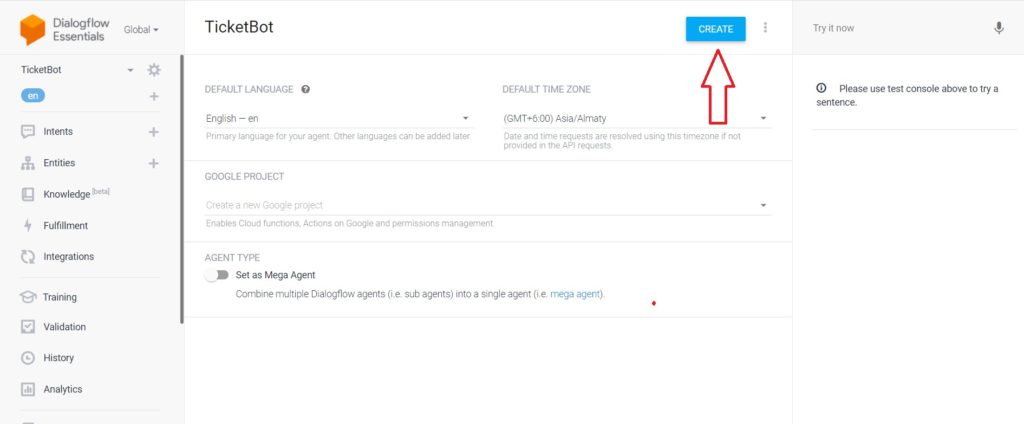
Create Agent
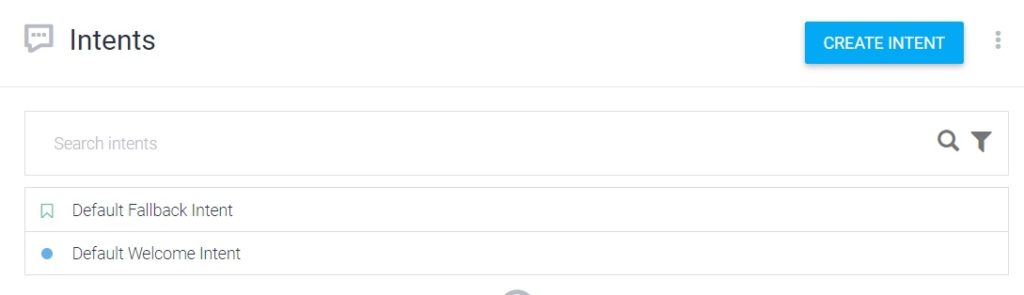
Step 2: Developing the Bot -Preset Intents
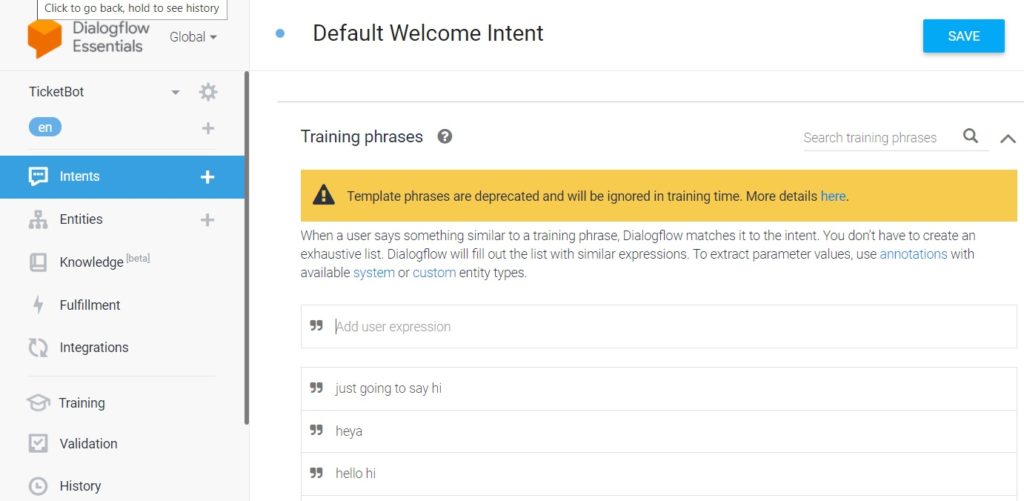
Dialogflow gives you access to basic intents such as the Default Welcome Intent and Default Fallback message. When the bot doesn’t know what to respond or when it needs to welcome someone on to your website, it uses the Default Welcome Intent.
To activate this, click on the Default Welcome Intent button. When you scroll to the ‘Training phrases’ section, you will see a list of expressions that a user may speak to your TicketBot. If you observe closely, you can get to know that all of them mean essentially the same thing, and have been clubbed under the ‘Default Welcome Intent.’
Default Welcome Intent
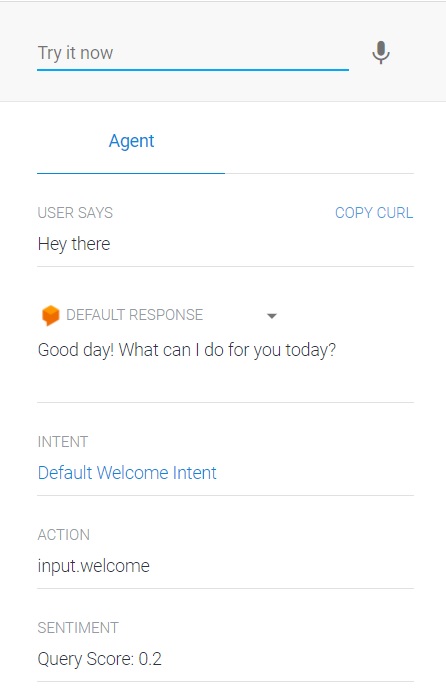
Almost everything that a user might say to start a conversation is covered in this section, so the next step is to test out our TicketBot to see how it is greeting the customers. Type in something to begin the conversation, like ‘Hi’ or ‘Hello’.
Greet customers
And that’s it!! Our TicketBot is now live. We will now see how we can make edits to these responses. The TicketBot will return a random response to other expressions.
Ticket Bot: Random Response
Step 3 – Modifying Default Welcome Intent – Creating Custom Responses
In the ‘Responses’ section, we can see the different welcome messages that our TicketBot will reply to when users enter certain expressions. What we are going to do is create a custom Welcome response for our movie theatre: RVR Cinemas.
Our message will go something like this:
“Hey there! Welcome to RVR Cinemas. My name is Ticket Bot.”
Delete the other redundant messages by clicking on the trashcan button on the right. And now, add another line to your Default Welcome message by clicking on the “Add Response” > “Text Response.”
Add Text Response
Make sure you insert text that reads like a human is typing from the other side. The conversation should flow smoothly. Type in something like, “How can I help you?”
And this is what your Welcome Message would look like:
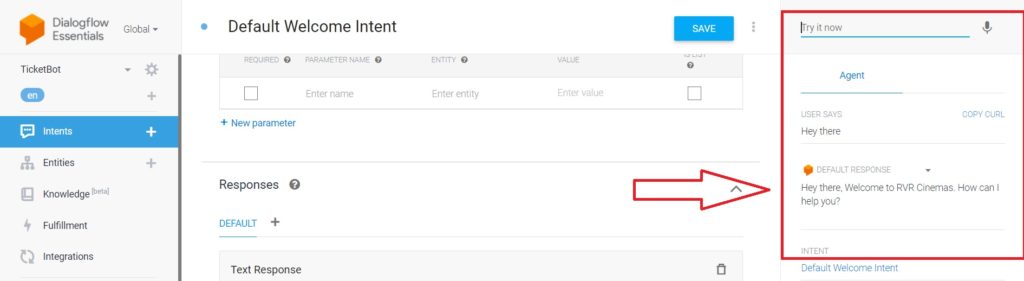
Welcome Message
Step 4 – Creating New Intents
Time to train our TicketBot to assist new visitors to your website with some common questions.
- “What are your show timings?”
- “Which movies are playing during the Matinee?”
We will create the intents for these questions, and train the bot to give us appropriate responses.
Start by creating a new intent, by clicking on the‘+’ sign next to the ‘Intents’ button. Make sure you name your intents clearly so that it is easier to decipher them in the future. Also, make sure to group various expressions clearly under well-defined intents. Make sure you keep your Responses accurate and to the point.
Let us now see how we can respond to the intent of the first question: Show timings.

Show Timings Intent
Now that you know how to create intents, let’s take things to the next level so that the TicketBot can actually book a ticket.
Step 5 : Working with Entities, Actions and Parameters
We are now going to train our TicketBot to book a movie ticket at RVR Cinemas. The process is pretty straightforward, provided you read carefully. Let’s go.
Click on the ‘+’ button next to the ‘Entities’ button in the left menu and make sure you are adding “ MovieNames” and “MovieTimings” separately. Corresponding to the movie names, make sure you add all the alternate names that the users might type when enquiring about a particular movie.
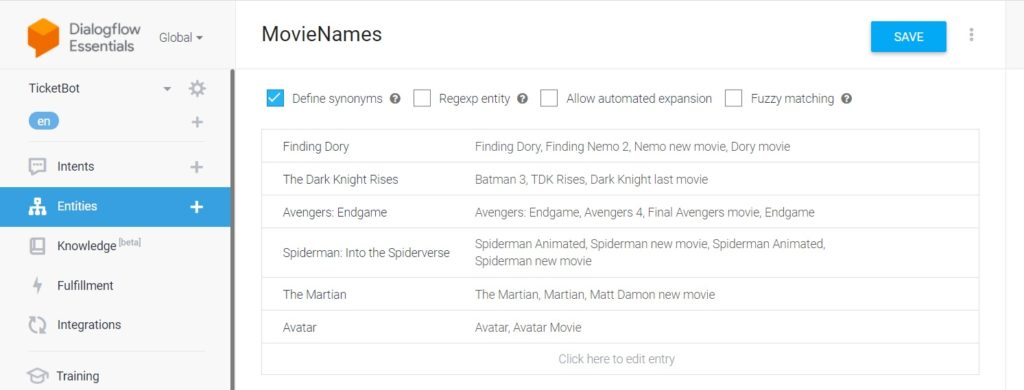
Entity: MovieNames
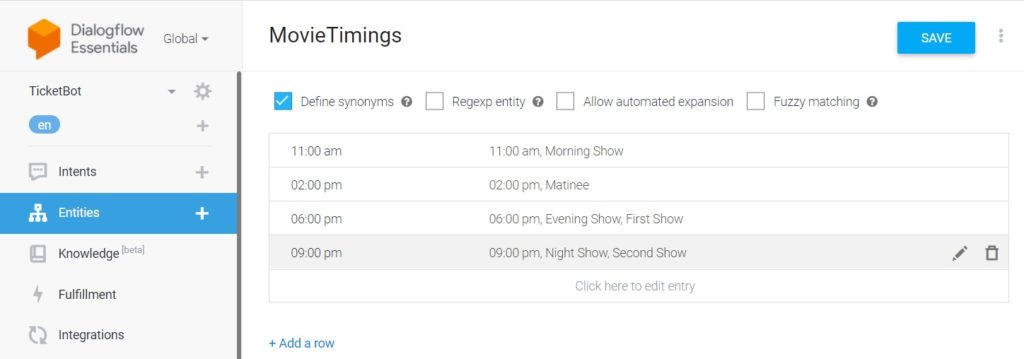
Entity: MovieTimings
MovieTimings Prompt
It is now time to create the Intent. You can give the intent a specific name such as “Book Ticket.”
The next step is to add Parameters in DialogFlow, naming them precisely so that you know which Parameter corresponds to which entity.
Next to the Parameter, enter the Entity that you have created with the “@” Symbol and enter the corresponding value that starts with the “$” sign. You need to enable Prompts for these bookings, so make sure you check the “Required” field.
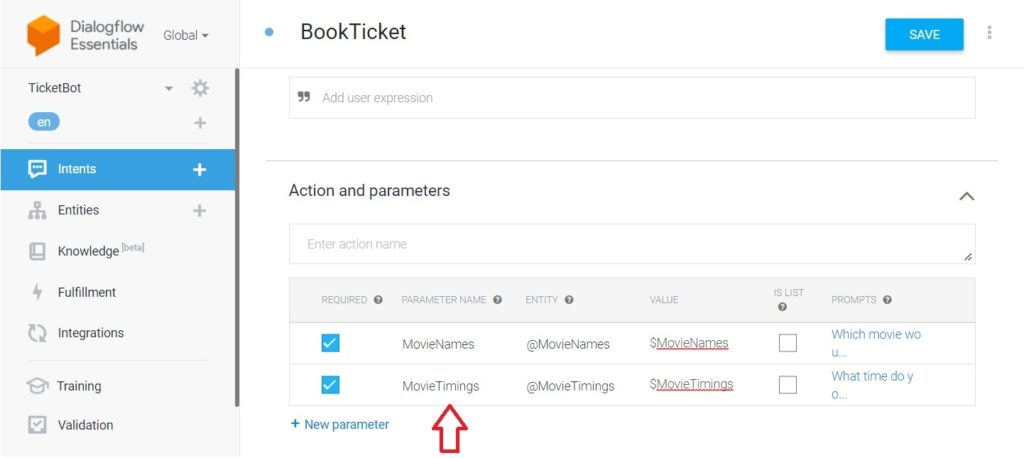
Intent: BookTicket
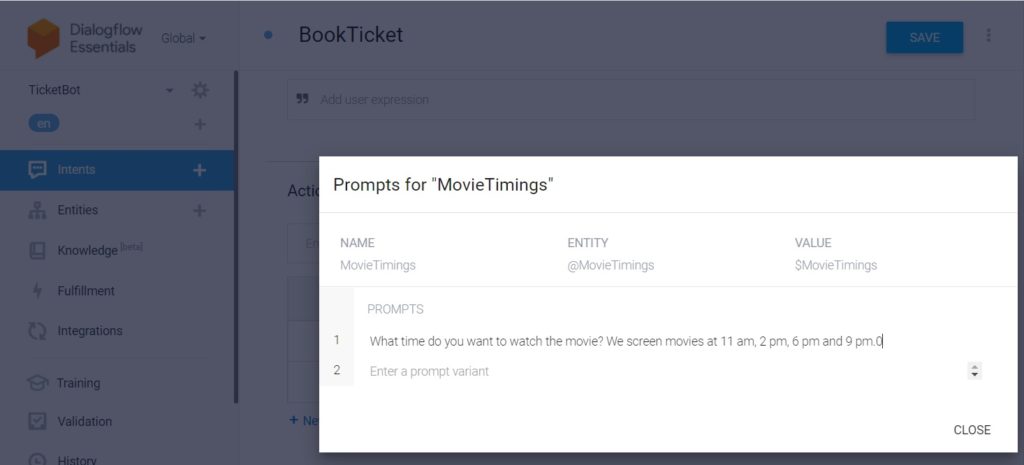
We need to ask the User which movie he/she would like to see, which we can do with the help of Prompt Messages. We can ask questions like:
“Which movie would you like to see? We are screening ‘Finding Dory,’ ‘The Dark Knight Rises,’ ‘Avengers Endgame,’ ‘Spiderman: Into the Spiderverse,’ ‘The Martian,’ and ‘Avatar.’”
“What time do you want to watch the movie? We screen movies at 11 am, 2 pm, 6 pm and 9 pm.”
It is now time to add Training phrases. This could range from “Book movie ticket,” to “Book Ticket,” encompassing all the questions that a possible user might ask to the bot.
Step 6: Add Concluding Response
It is now time to end the conversation that the website visitor has been having with the bot, with the help of concluding responses. If you wish, you could add the ‘$” value in the message. This will help the message be clearer, since it will extract useful information from the Parameters. There is a small toggle button at the bottom that will trigger that this is the end of the conversation.
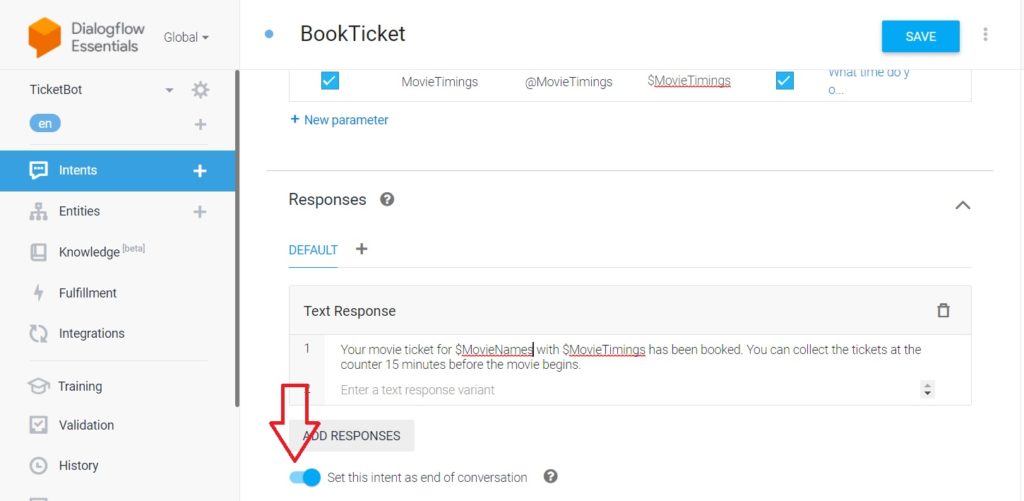
Concluding Response
“Your movie ticket for $MovieName with $MovieTimings has been booked. You can collect the tickets at the counter 15 minutes before the movie begins.”
Step 7: Add Dialogflow to Your Website
Kommunicate provides a no-code integration with Dialogflow. You can easily deploy your bot on websites, mobile apps, Facebook, or WhatsApp using Kommunicate.
Launch Your Own AI Chatbot Without Sign upHere are the steps to integrate Dialogflow with Kommunicate –
- Open Dialogflow agent settings (gear icon on the left panel)
- Click on the Google Cloud link, which is mentioned in the Google project bar
- On the Google Cloud page, navigate to the Credentials section by clicking on APIs & services
- Under the Credentials section, find the service account and click on edit for Dialogflow integrations
- At the bottom of the screen, click on the ADD key button and create a key option. Download the JSON key
- Now, open the Kommunicate dashboard and navigate to the Bot Integrations section.
- Choose Dialogflow ES
- Now, give your bot a name and choose an avatar
- In the next section, upload your JSON key, knowledge-base ID (optional), and choose the default language
- In the next step, select whether to enable chatbot to human hand-off or not
- Now, move to the Install section, and follow the instructions to integrate the Kommunicate chat widget into your website, mobile apps, and other platforms
For detail of how to integrate Dialogflow with the website click here.

Step 8: Training the Bot
Remember that your chatbot is an intelligent algorithm with machine learning capabilities, and you can refine it further by interactions and training. Training the bot also helps fix errors and improves accuracy.
To train the bot, navigate to the “Training” section in the left menu. What you see here are a series of conversations that are arranged in rows of data. You can view each session by clicking on it, and then, if there is an intent mismatch, you can go ahead and correct it.
Observe how we train the bot to give a response to a question that the bot is unfamiliar with, using a Fallback intent.
User: When do you screen The Hobbit: An Unexpected Journey?
Intent: Book ticket
User: I don’t see the listing of the new Hobbit movie.
Bot: Default Fallback intent
What?
Bot: Default Fallback intent
There will be instances where the bot does not know the response to a particular question. In this case, it does not know the answer to the question, “ When do you screen the movie, “The Hobbit: An Unexpected Journey.”
There could be other questions such as:
- “When do you screen the new Hobbit movie?”
- “Can I book all the tickets for a particular show?”
- “When will RVR Cinemas introduce midnight shows?”
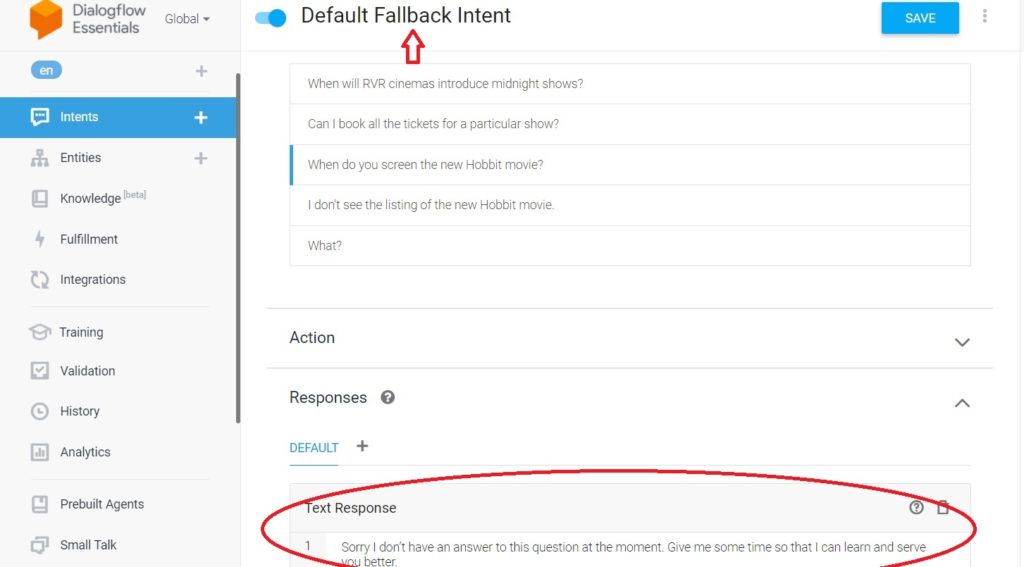
To answer these questions, use the Default Fallback intent so that you can give the user the answer to the questions they are looking for.

Default Fallback Intent
The bot is collecting all this information and storing it in the form of sessions. Training the bot involves collecting these new expressions and classifying them under intents. From the bot’s conversation history, you can find the list of questions that triggered Fallback Intents. You can continue adding these questions into new intents, and then train the bot using the steps mentioned above. The more intents you provide, the more trained your bot will be, which is sure to leave your user impressed.
<Kommunicate Dialogflow Dashboard showing the above conversation>
And before you know it, we have reached the end of the tutorial!!! Congratulations on creating a TicketBot that you can show off to your family and friends.
Parting Thoughts..
Before we let you go, Below is a video tutorial explaining how you can build a Dialogflow bot, in simple steps. Play around with actions, intents and parameters, and create different kinds of bots that serve different purposes. The more you train yourself and your bot, the smarter both of you get. Chatbots are going to dominate the customer service niche if they are not doing so already, and with a platform like Dialogflow to help you build the bot, there is no limit to the things you can do.

Devashish Mamgain is the CEO & Co-Founder of Kommunicate, with 15+ years of experience in building exceptional AI and chat-based products. He believes the future is human and bot working together and complementing each other.
Kommunicate is a modern customer messaging suite to add live chat and chatbot to your websites and social media pages. You can signup for free here and start delighting your customers right away.


1 Comment
I think this is one of the most vital information for
me. And i’m glad reading your article. But should remark on some
general things, The website style is great, the articles is really great :
D. Good job, cheers