Updated on May 28, 2026
The digital landscape continues to evolve at breakneck speed, and with the adoption of Conversational AI and chatbots, enterprises can accelerate this evolution. Conversational AI’s demand seems to surge everyday, as more and more enterprises recognize its true value to enhance customer engagement and streamline operations.
Enterprises are also increasingly adopting conversational AI powered chatbots on their websites to enhance website navigation and enhance customer service. When enterprises enable a chatbot on their website, they are opening the doors to seamless communication, giving organizations the ability to deliver exceptional user experiences.
One of the earliest ways to build these chatbots was Google’s Dialogflow platform, and, to this day, it remains popular among developers due to its ease of use and scalability.
We are going to see how you can integrate a dialogflow chatbot into a React JS website. But before we dive in, here are a few benefits of integrating a Dialogflow Chatbots with your ReactJS website.

Benefits of Integrating Dialogflow Chatbot into Reactjs Website
1. Natural Language Understanding (NLU)
Powered by Google’s NLU technology, Dialogflow enables Google to understand and interpret user queries in natural language. User experience is thus enhanced by providing more accurate and contextually relevant responses.
2. Modular Development
ReactJS’s component based architecture means developers can break down complex UI elements into reusable and modular components. Developers can easily maintain chatbot functionality side by side with other website components.
3. Google Cloud Integration
Dialogflow seamlessly integrates with Google Cloud Platform (GCP) offering additional features such as cloud storage, logging and analytics. Within ReactJS websites, Dialogflow chatbots can take advantage of GCP’s robust infrastructure and services to enhance security and reliability.
Enterprises can thus deliver exceptional conversational experiences to their customers by integrating Dialogflow chatbots with their ReactJS websites. How do you build one? We are going to explore that facet in detail in this next section.
Get ready to boost user engagement, improve customer satisfaction, and unlock the full potential of your website! Let’s dive in!
Prerequisites
To get started,
- You would need a Dialogflow bot or working knowledge of Dialogflow and React JS.
- To integrate the chatbots with React JS, you will need a Kommunicate account.
- All the aforementioned tools are free to try out. Additionally, Node should be installed in your system.
Choose Your Integration Method:
Now that you’re eager to bring your Dialogflow bot to life within your ReactJS website, it’s time to select the integration method that best suits your needs. Here’s a breakdown of the popular options, each with its advantages and considerations:
1. Kommunicate Platform
Pros
User-friendly interface, no coding required, pre-built chat UI, additional chatbot features (multilingual support, analytics).
Cons
Paid subscriptions for advanced features, and limited customization options.
2. Direct API Integration
Pros
Complete control and customization, flexible for complex applications, cost-effective.
Cons
Requires coding knowledge, steeper learning curve, needs backend server setup.
3. Third-Party Libraries
Pros
Faster development with pre-built components, community support, and various features depending on the library.
Cons
Potential bugs or limitations of libraries, dependence on third-party updates, might not cover all your needs.

Steps to Integrate Dialogflow Bot with React JS Websites
I am going to explain how I connected Dialogflow and React JS with the help of Kommunicate.
Note: To keep it very simple and straight this tutorial explains with really basic and plain code development. Also to mention, this project can be found on my Github.
🚀 Suggested Read: How to add Chatbot to Express Js
Step 1: Create Your Dialogflow Bot
To get started, you can easily create a chatbot in Dialogflow. It is a very intuitive yet powerful chatbot building tool. Here’s a sample available to help you get started with your Dialogflow bot. To go further, you can create your own Intents & Entities.
Step 2: Integrate Dialogflow Chatbot with Kommunicate
To integrate your Dialogflow bot in Kommunicate, log in to your Kommunicate dashboard and navigate to the Bot section. If you do not have an account, you can create one here. Locate the Dialogflow section and click on Integrate Bot.

Now, navigate to your Dialogflow console and download the service account key file. Here are the steps to locate the file:
- Open Dialogflow agent settings (gear icon on the left panel)
- Click on the Google Cloud link which is mentioned in the Google Project bar
- In the Google, cloud page navigate to the Credentials section by clicking on API’s & services
- Under the Credentials section find the service account and click on edit for Dialogflow integrations
- At the bottom of the screen click on ADD key button and create a key option, JSON key will be downloaded
- Now upload the Key file.

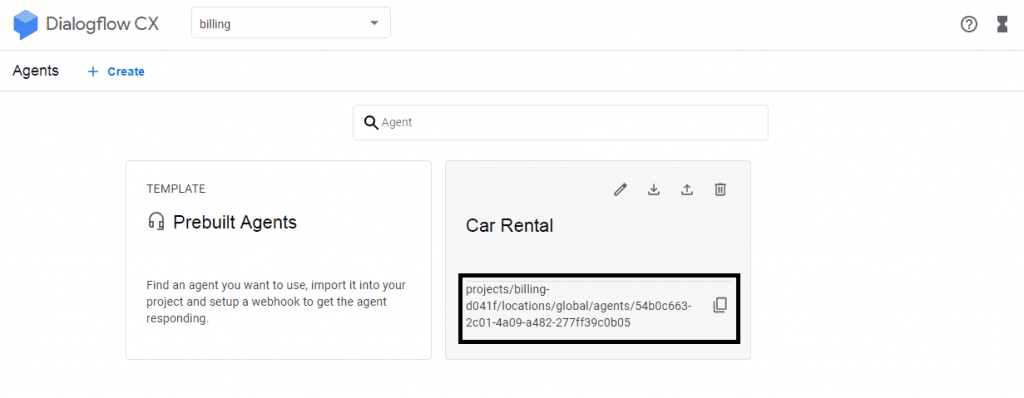
Step 3: Integrate Dialogflow CX into Kommunicate
To integrate Dialogflow CX into Kommunicate follow the same instructions to download the JSON key and mention the Agent ID in the kommunicate dashboard
To get the Agent ID: Go to Dialogflow CX console >> Select the Project >> In the Agent you have created ‘Copy the agent name to the clipboard will be in the format mentioned below, where the Agent ID is 54b0c663-2c01-4a09-a482-277ff39c0b05
In the bot profile section, you will be able to give your bot a name. This name will be visible to the users whenever they interact with the bot. Process further and fill the details.

In the last step, you will be asked to enable or disable the chatbot to human handoff. If enabled, the conversation will be passed on to a human in case the chatbot is not able to answer the question.

Complete the setup and then you can check and test your newly created bot in two places:
- Dashboard →Bot Integration → Manage Bots: You can check all your integrated bots here
- Dashboard → Bot Integration: Your Dialogflow icon should be green with the number of bots are you have successfully integrated. You will also have the option of testing your newly created bot here. (See image below)

Step 4: Create a React app
Create a new React app (my-app) by using the command:
npx create-react-app my-app
Step 5: Now, Navigate to the My-App Folder
cd my-app
Step 6: Create New File chat.js inside src Folder
Once you create the chat.js, add the below code in componentDidMount. The below code will launch a chat widget on your website with the integrated Dialogflow bot. Make sure to replace <YOUR_APP_ID> with your Kommunicate application ID.
You can get this code in the install section of Kommunicate as well.
    (function(d, m){
        var kommunicateSettings =
            {"appId":"kommunicate-support","popupWidget":true,"automaticChatOpenOnNavigation":true};
        var s = document.createElement("script"); s.type = "text/javascript"; s.async = true;
        s.src = "https://widget.kommunicate.io/v2/kommunicate.app";
        var h = document.getElementsByTagName("head")[0]; h.appendChild(s);
        window.kommunicate = m; m._globals = kommunicateSettings;
    })(document, window.kommunicate || {});
Here’s a screenshot of my code editor for the same:

Step 7: Import Kommunicate Chat Component in App.js
Import the Kommunicate Chat component in your App.js file. Here’s the screenshot of my code editor:

Step 8: Start Your App Locally
Use the following command to start your newly created website with the installed Dialogflow bot.
npm start
Voila! How simple was that? In these few simple steps, you could integrate Dialogflow bot with your React JS websites. This is how the chat widget looks on a website:

Here Is the Quick Video
Wrapping Up
Congratulations! You’ve successfully unlocked the potential of Dialogflow by seamlessly integrating it with your ReactJS website. Now, your users can enjoy 24/7 support, effortless navigation, and personalized interactions, leading to increased engagement, improved satisfaction, and valuable insights.
It is fairly simple to have a rich text-enabled chat widget with Dialogflow bot in your React JS websites. You can further customize the chat widget to match your website colors and theme.
Suggested Read: How to Add Chatbot in Vue.js Apps
Suggested Read: Integrate Dialogflow Chatbot with Angular JS
Suggested Read: How to Build Chatbot with React Native – A Step-by-Step Tutorial
Frequently Asked Questions
1. What Are the Benefits of Using Kommunicate Instead of Direct API Integration?
Kommunicate offers a user-friendly interface, no coding required, a pre-built chat UI, and additional chatbot features like multilingual support and analytics. However, it has paid subscriptions for advanced features and limited customization options.
2. Does My Dialogflow Agent Need Any Specific Setup for Integration?
Ensure your agent has well-defined intents and responses relevant to your website’s context. Consider using features like context handling and entity recognition for a more sophisticated bot.
3. Can I Use Dialogflow with Other Website Frameworks Besides Reactjs?
Yes, Dialogflow can be integrated with various website frameworks and platforms.
4. What Are Some Best Practices for Optimizing My Dialogflow Chatbot?
a) Keep intents and responses clear, concise, and natural-sounding.
b) Use context handling and entity recognition for more sophisticated interactions.
c) Gather user feedback and continuously refine your chatbot based on their needs.
5. What Customization Options Are Available for My Bot within Kommunicate?
You can customize language, name, welcome message, bot appearance, and more.
At Kommunicate, we are envisioning a world-beating customer support solution to empower the new era of customer support. We would love to have you on board to have a first-hand experience of Kommunicate. You can signup here and start delighting your customers right away.


