Updated on January 27, 2025
Many developers currently use NextJS because it is SEO-friendly and allows you to develop faster. With a NextJS, you get:
1. Essential features like Server Side Rendering (SSR), Incremental static regeneration (ISR), and integrated API routes.
2. Real-time updates when you code.
3. Data protection because NextJS protects sensitive data on the server side.
NextJS also handles tasks like data fetching and routing directly so that you can focus on core feature development.
Seeing it’s functionality, we at Kommunicate have also created a NextJS AI chatbot.
Just like NextJS helps developers remove blockers in their function, AI chatbots help customer service teams become more efficient.
That’s why, in this post, we’ll help you build an enterprise customer support chatbot for your NextJS website. We’ll take it step-by-step so you can follow along without coding experience.
Pre-Requisites
There are a few things you need to have on your computer before you get started:
- Node.js and NPM (You can find the installer on the Node.js website)
- A code editor of your choice (I am using Visual Studio Code)
- A Kommunicate account (You can start by signing up (It’s free!))
Also Read: How to Build Chatbots in React JS
Also Read: How to Integrate Dialogflow Chatbots with ReactJS Websites
Also Read: How to Build Enterprise WhatsApp Chatbots in Node.JS
Installation Happens in Two Phases
We’re going to follow two broad steps for this installation:
1. Creating an AI chatbot with Kommunicate
2. Integrating it with NextJS

Phase 1: Creating an AI Chatbot with Kommunicate
To start creating a NextJS AI Chatbot, you must sign up for Kommunicate. You can do it from our Dashboard.
- Navigate to the Bots Section
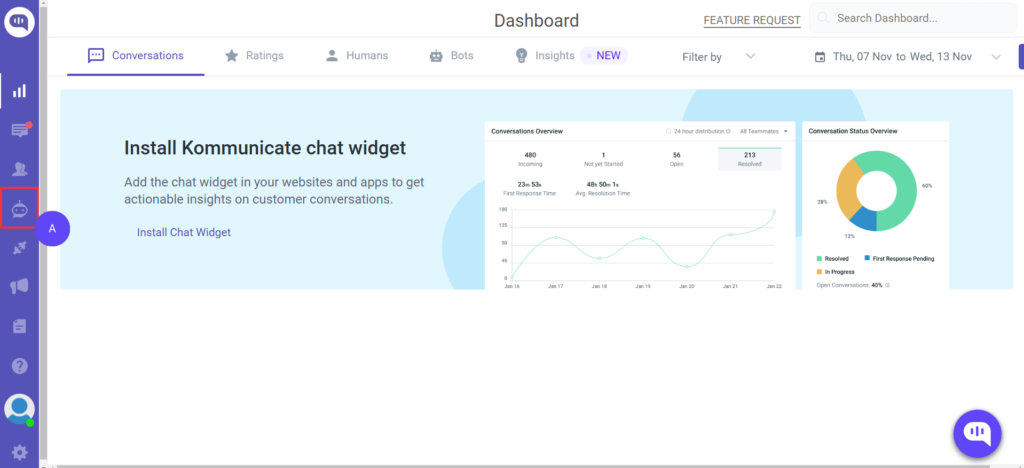
- On opening Kommunicate, you will be at the Dashboard.
- To create our AI chatbot, click the Bot icon on the left side (A).
- Navigate to the Bot Integrations Page
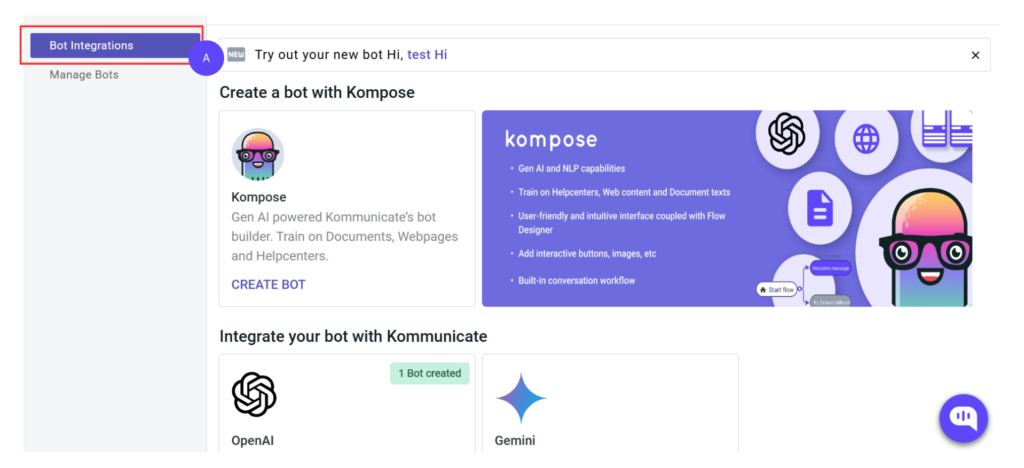
- You will land on the Manage Bots page if you’re already using a Kommunicate bot.
- To create a new chatbot, move onto the Bot Integrations page (A).
- Select the AI Model you want to Train Your AI Chatbot With
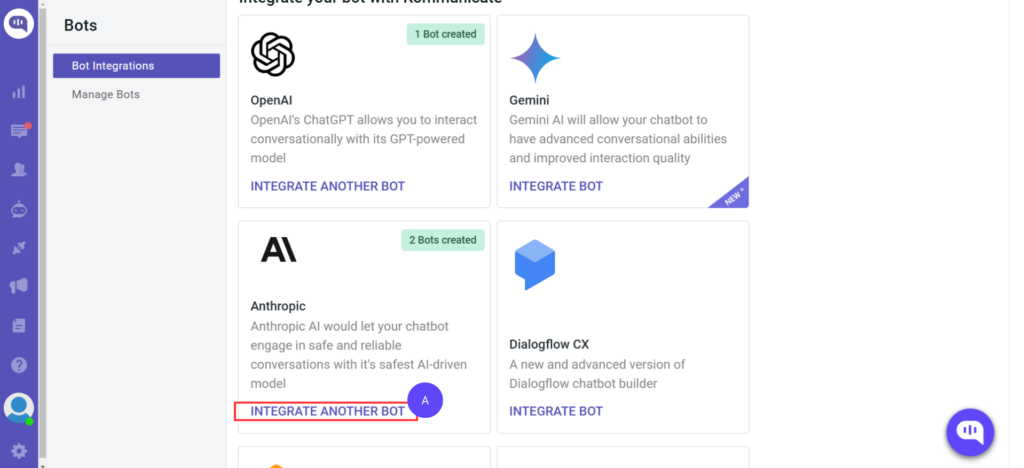
- When you scroll down, you will see a list of AI models you can use to create a chatbot.
- For this tutorial, we’re going to use Anthropic’s Claude models (A)
- Describe the Parameters
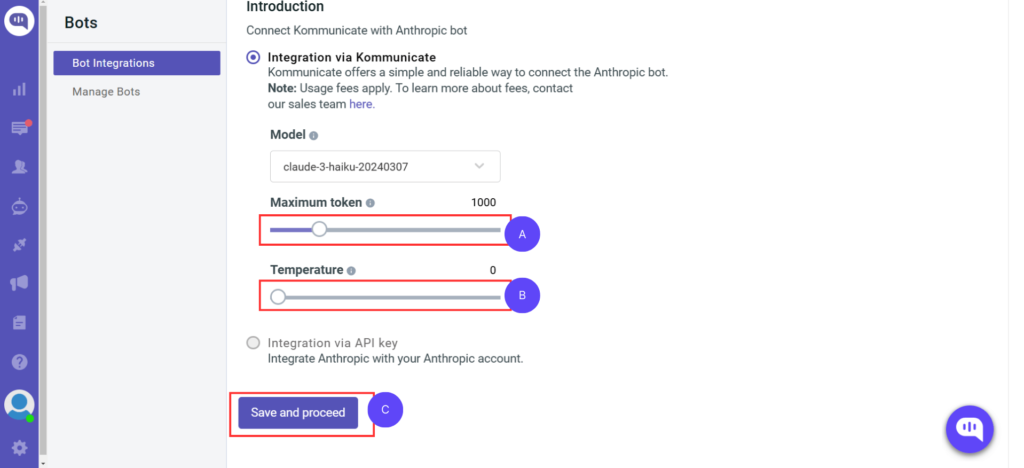
- Select the Maximum Tokens (or words) (A) your AI chatbot will use while answering. We’ll keep it at 1000.
- Select the Temperature (B) of the AI model that will be used. A higher temperature indicates that the model will give more creative answers. Since we’re building a factual and accurate NextJS chatbot, we will set this as 0.
- To continue, click on Save and Proceed (C ).
- Select an Avatar for Your Chatbot
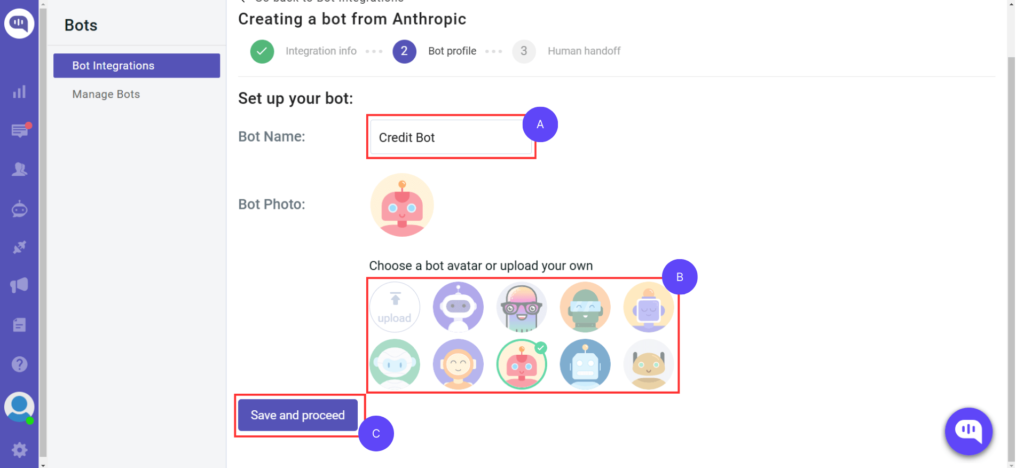
- Name your chatbot based on your preference; we will use Credit Bot (A).
- You can use one of our pre-defined avatars or upload your own Avatar for your AI chatbot (B).
- Once you’re satisfied with the looks of your chatbot, click on Save and Proceed (C ).
- Choose if You Want to Enable Human Handoff
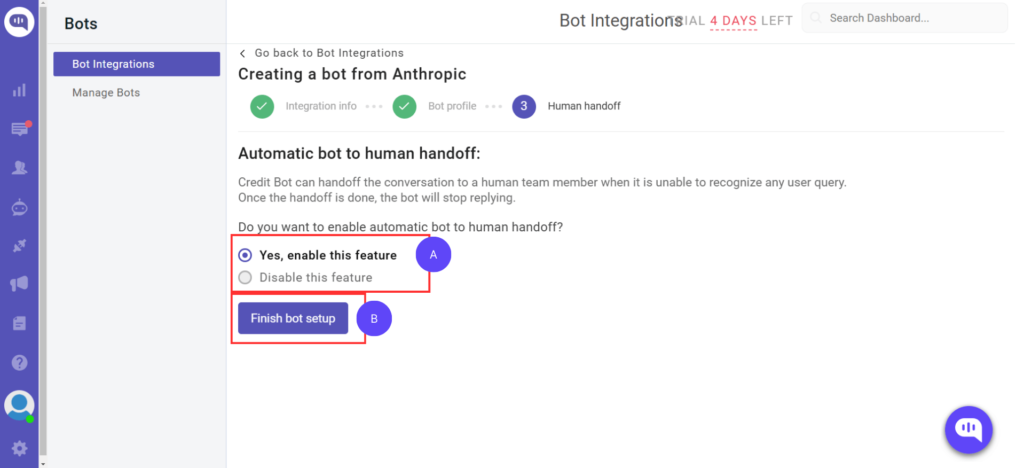
- The chatbot-human handoff feature lets you take control of a conversation when the chatbot fails to answer.
- You can enable this feature by selecting “Yes, enable this feature.” (A)
- After you’re done, finish the editing by clicking on “Finish Bot Setup.” (C )
- Congratulations! You’ve set up Your Chatbot
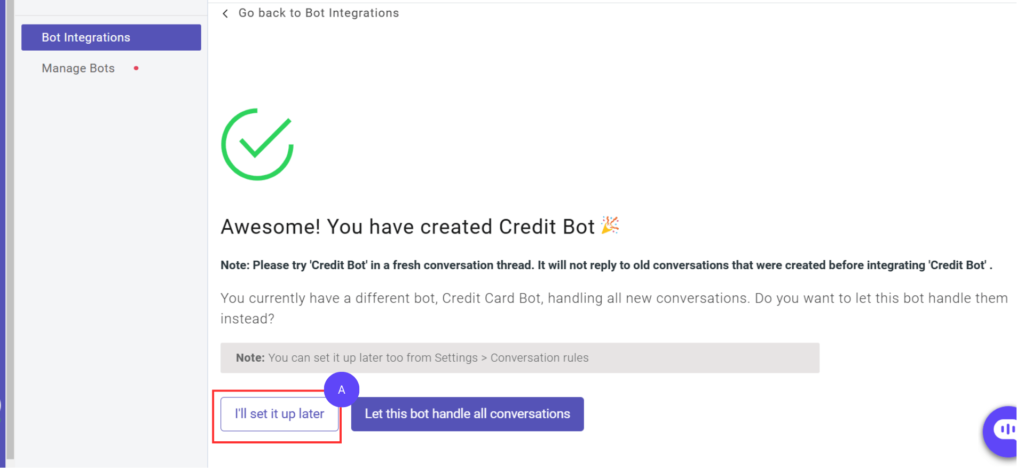
- You’ll get this screen once you set up the bot.
- Select “I’ll Set it Up Later” (A), and you’ll be redirected to training the bot.
- Setting Up Welcome Intent
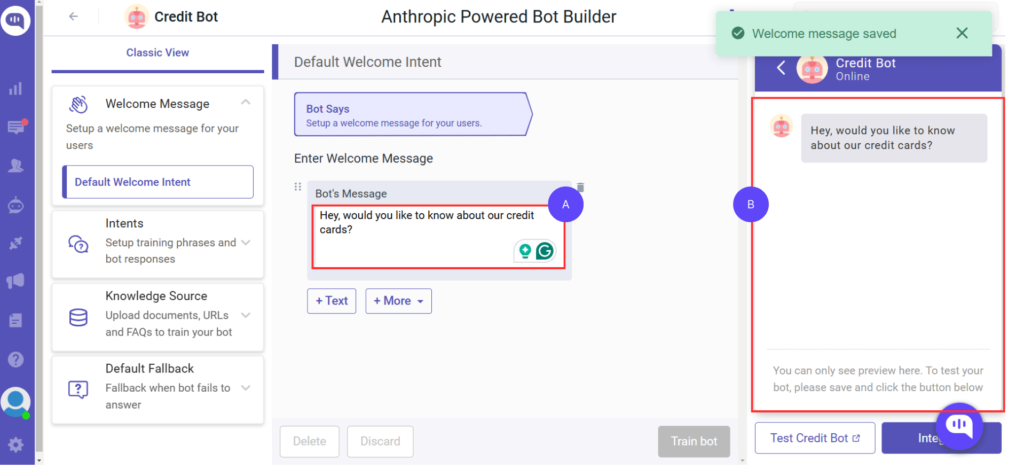
- What should your chatbot begin the conversation with? Set it up in the text box at (A).
- You will see how it will look on the test chatbot (B).
- Click on Train Bot at the button to train the chatbot.
- Giving Your Chatbot All the Required Information
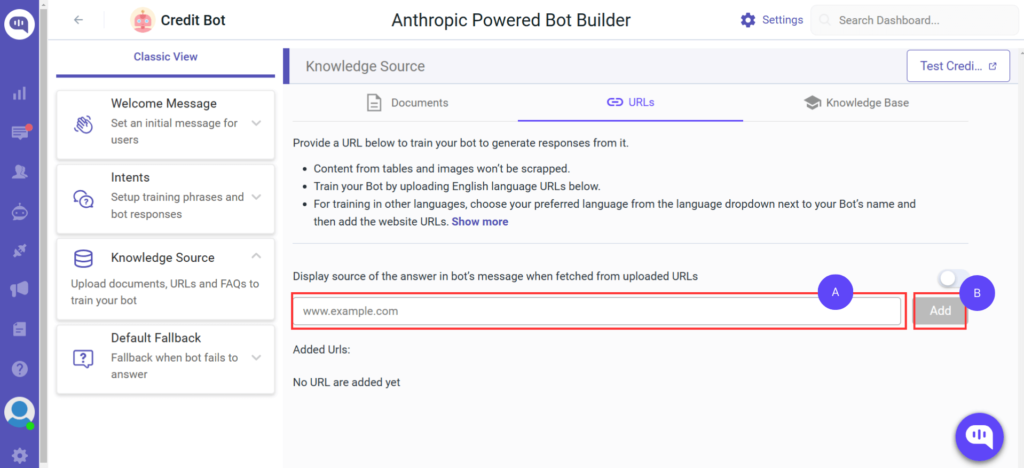
- Navigate to Knowledge Source on the left-hand side of the menu.
- Click on the URL tab at the top of the navigation. Enter the website URL you want to train the chatbot within the text box at (A).
- Click on Add (B).
- This will open the website’s sitemap, and you can select the specific URLs from which the chatbot can learn.
- Set Up Conversations (Intents)
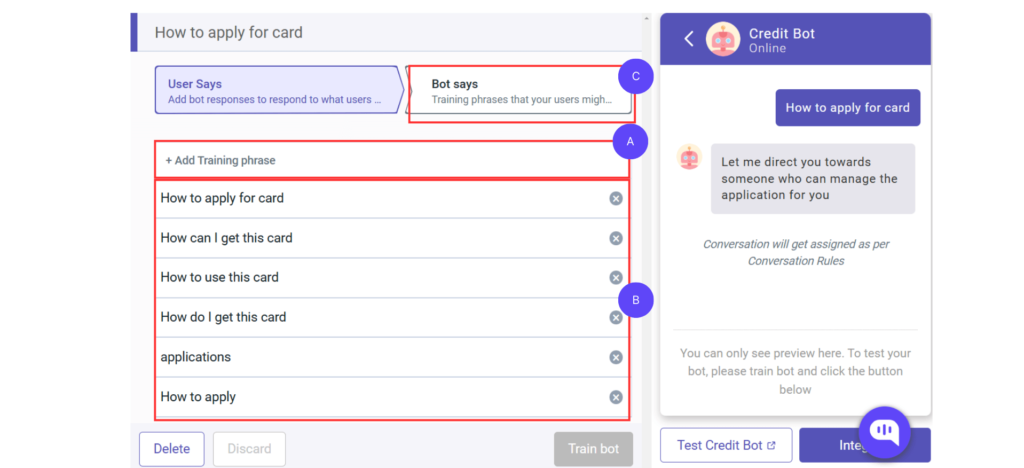
- Navigate to Intents on the left-hand side of the Menu.
- Enter the different variations of a particular question. Remember, this is how your AI will be trained. So, more variations of the questions are better. Use the (A) button to add cues and (B) to edit or delete cues.
- Once you’ve set up questions, you can set the Chatbot’s answer at Bot Says (C ).
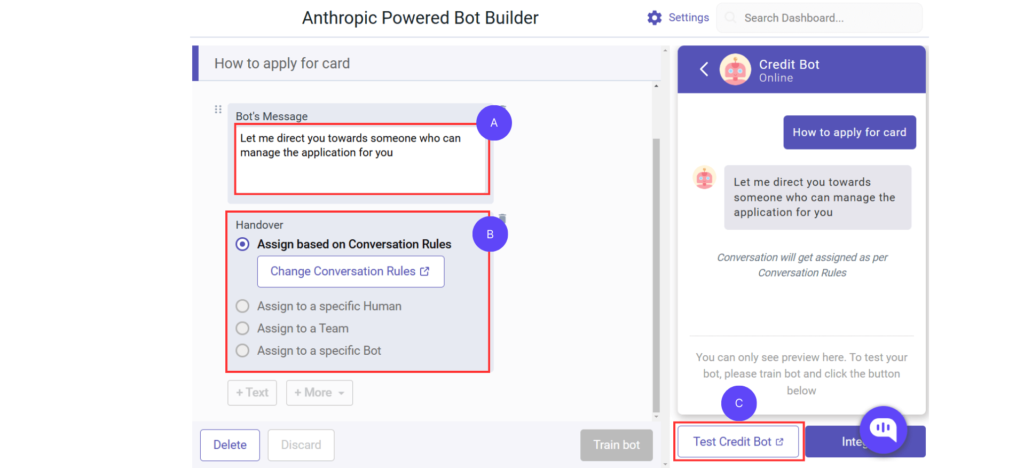
- Set up the answer the chatbot is supposed to give in the text box (A).
- You can choose to assign this conversation further by clicking on More+ and automatically transfer the conversation to one of your colleagues.
- Click on Train Bot to train the chatbot.
- Click on Test Chat Bot to see if the chatbot answers questions correctly.
Now that you have a trained chatbot ready to answer questions, let’s integrate it with NextJS.

Phase 2: Integrating AI Chatbot with NextJS
- Creating the Kommunicate Chatbot Component
- In the Components folder under your App folder, create a file called KommunicateChat.js.
- Enter the following code in the new file. Remember to replace the given AppID with your Kommunicate AppID (You can find it under INSTALL in Settings)
'use client';

import { useEffect } from 'react';

const KommunicateChat = () => {
  useEffect(() => {
    (function(d, m) {
      var kommunicateSettings = {
        "appId": "2ac6c5f9ec65dffb483de1e869fa2628f",
        "popupWidget": true,
        "automaticChatOpenOnNavigation": true
      };

      var s = document.createElement("script");
      s.type = "text/javascript";
      s.async = true;
      s.src = "https://widget.kommunicate.io/v2/kommunicate.app";
      var h = document.getElementsByTagName("head")[0];
      h.appendChild(s);

      window.kommunicate = m;
      m._globals = kommunicateSettings;
    })(document, window.kommunicate || {});
  }, []);

  return (
    <div>
      <h1>Hello</h1>
    </div>
  );
};

export default KommunicateChat;- Adding the Component to a Page
- Navigate to the page.js Document in your app folder and enter the following code
import KommunicateChat from './KommunicateChat';

export default function Page() {
  return (
    <main>
      <KommunicateChat />
    </main>
  );
}- Test the Chatbot in Action
- Run your app by entering the following code into the terminal:
npm run dev- Go to http://localhost:3000 to test your chatbot.
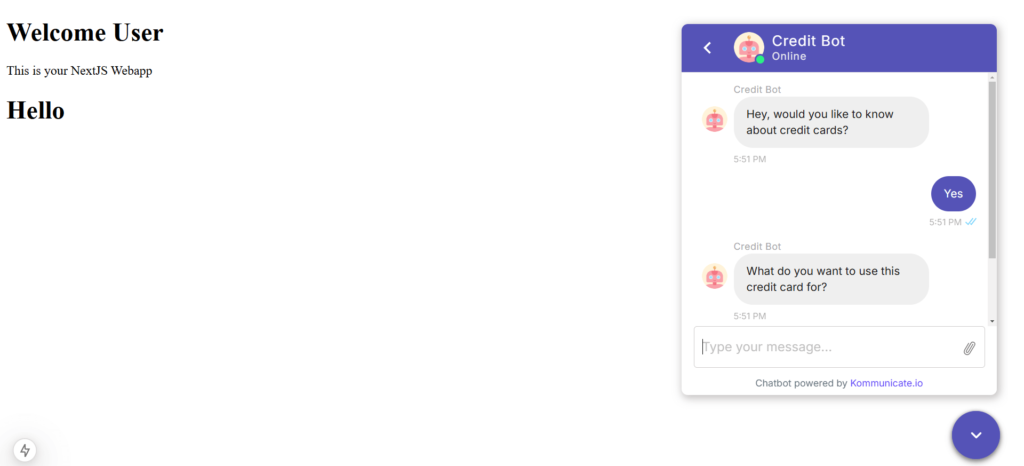
There you have it! A chatbot on your very own NextJS website!
Conclusion
Creating an AI chatbot in NextJS with Claude takes less than 10 minutes. You just need to train your chatbots with Kommunicate, and you will be ready to implement your chatbot for customer support in no time!
Considering the popularity of NextJS, we think this chatbot will benefit anyone who creates a webapp or website with the framework.
If you want state-of-the-art AI support for your NextJS-based website. Talk to us!

As a seasoned technologist, Adarsh brings over 14+ years of experience in software development, artificial intelligence, and machine learning to his role. His expertise in building scalable and robust tech solutions has been instrumental in the company’s growth and success.

