Updated on May 4, 2026
TL;DR — OpenAI Appointment Bot
- An OpenAI appointment bot automates scheduling using natural language conversations.
- It understands user intent, such as booking or rescheduling, and triggers backend workflows.
- It integrates with tools like Google Calendar to check availability and confirm appointment slots.
- It reduces manual coordination, missed calls, and response delays.
- It is especially effective in healthcare for handling patient scheduling at scale.
- It can manage appointment booking, cancellations, reminders, and basic patient intake.
- It can be deployed without heavy engineering using platforms like Kommunicate.
An OpenAI appointment bot is an AI-powered assistant that can understand natural language, check real-time availability, and automatically book appointments without human intervention. Instead of relying on static forms or manual scheduling, businesses can use OpenAI to create conversational booking experiences across chat, web, and messaging channels.
While this technology can be used across industries such as SaaS demos and salon bookings, it is especially impactful in healthcare, where missed calls, long wait times, and manual scheduling often lead to delayed care and poor patient experience. An OpenAI appointment bot can streamline patient intake, reduce front desk workload, and ensure faster access to care.
In this guide, you will learn how to build an OpenAI appointment bot step by step using conversational AI, backend workflows, and calendar integrations like Google Calendar. We will also cover how the system works, key components required, and how to deploy it without complex engineering.
Table of Content
- How It Works
- Pre-Requisites
- Part 1: Set Up Google OAuth Credentials
- Part 2: Build an AI Agent in Kompose
- Part 3: Enable OpenAI as the AI Model (Optional)
- Part 4: Add Bot-to-Human Handoff
- How to Use
- Customizing This Workflow
- Troubleshooting
- Wrapping Up
How it works
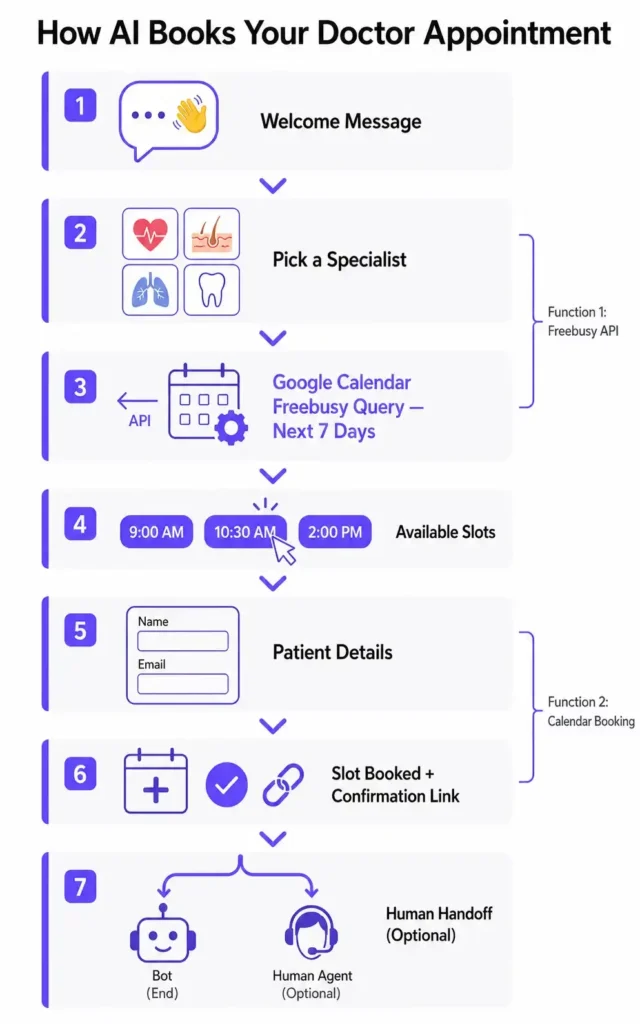
This workflow is built entirely inside the Kompose Bot Builder using Inline Code without any external webhook server. Here’s the high-level flow:
- The user opens the chat widget and is greeted with a welcome message.
- The AI agent asks the user to pick a specialist (Cardiology, Dermatology, etc.).
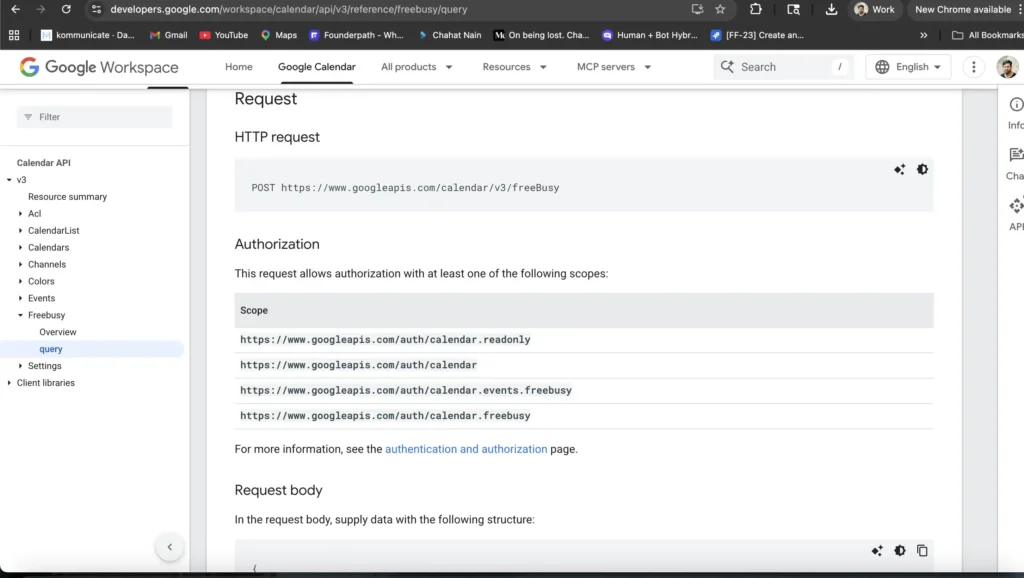
- A first Inline Code function queries the Google Calendar Freebusy API for that doctor’s calendar and calculates open 1-hour windows for the next 7 days.
- Available slots are shown as clickable buttons: the user simply taps one to select it.
- A form collects the remaining patient details: name and email.
- On form submission, a second Inline Code function books the chosen slot on Google Calendar and returns a confirmation link to the user.
- Optionally, the AI agent hands off to a human agent if the user needs further help.
This is what makes the appointment bot action-oriented: it can check availability, pass booking details to the right function, and confirm a slot through Google Calendar, which follows the same backend action pattern used in OpenAI function calling.
Now, before we start implementing this, you need some things.
Pre-Requisites
- A Kommunicate account (sign up free)
- A Google Cloud project with the Calendar API enabled
- OAuth 2.0 credentials (Client ID + Client Secret)
- An OpenAI API key (optional, we’ll give one to you if you don’t have one)
Next up, we will start setting up the AI agent.
Part 1: Set Up Google OAuth Credentials
Before writing any bot logic, you need two sets of credentials from Google.
Step 1: Create an OAuth Client ID
- Go to Google Cloud Console → Credentials
- Click Create Credentials → OAuth Client ID
- Select Web Application as the application type
- Add https://developers.google.com/oauthplayground as an Authorized Redirect URL
Save and note down your Client ID and Client Secret.
Step 2: Enable the Google Calendar API
In the same Google Cloud project, navigate to APIs & Services → Library and enable the Google Calendar API.
Step 3: Generate Access & Refresh Tokens
- Open Google OAuth Playground.
- Click the ⚙️ settings icon and check “Use your own OAuth credentials“. Enter your Client ID and Secret.
- In Step 1, find and select https://www.googleapis.com/auth/calendar, then click Authorize APIs. This scope covers both reading free/busy data and creating events.
- In Step 2, click Exchange authorization code for tokens.
- Copy the Access Token and Refresh Token — you’ll use both in the inline code.
Part 2: Build an AI Agent in Kompose
Step 1: Create a New Bot
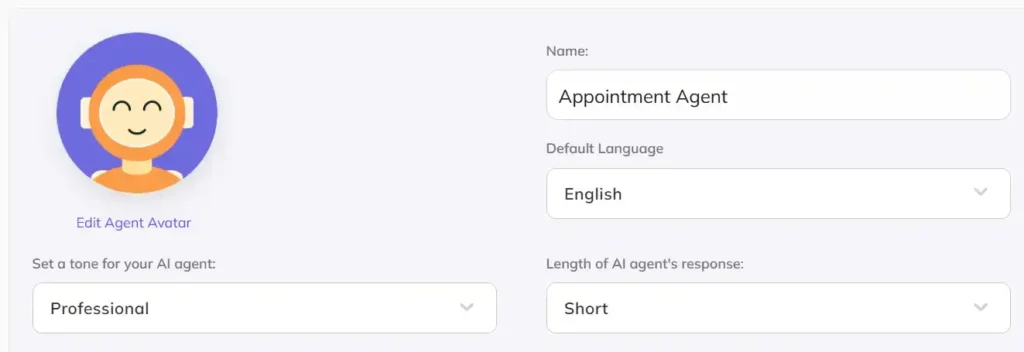
- Log in to your Kommunicate Dashboard.
- Navigate to Agent Integrations → Create AI Agent → Kompose.
- Name it something like Appointment Agent.
- Under Custom Instructions, add guidance like: “You are a friendly medical appointment assistant. Be concise, empathetic, and professional. Always guide users toward booking an appointment or talking to an agent.“
Step 2: Create a Welcome Message
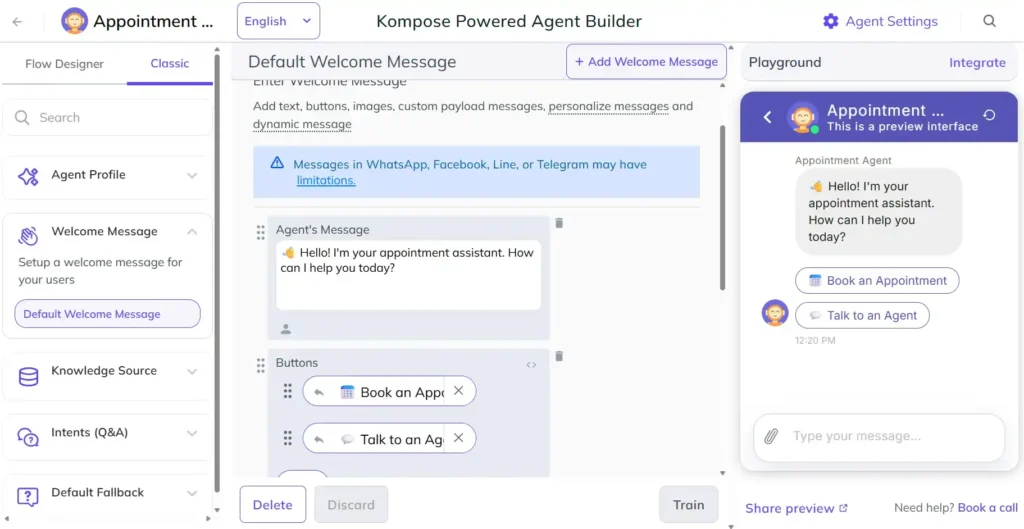
In the Welcome Message, set a greeting message and add two rich message buttons using a Custom Payload:
Step 3: Create the Specialist Selection Function
When the user taps “Book an Appointment”, this intent fires and asks them to pick a specialist, whose Google Calendar will then be checked for free slots.
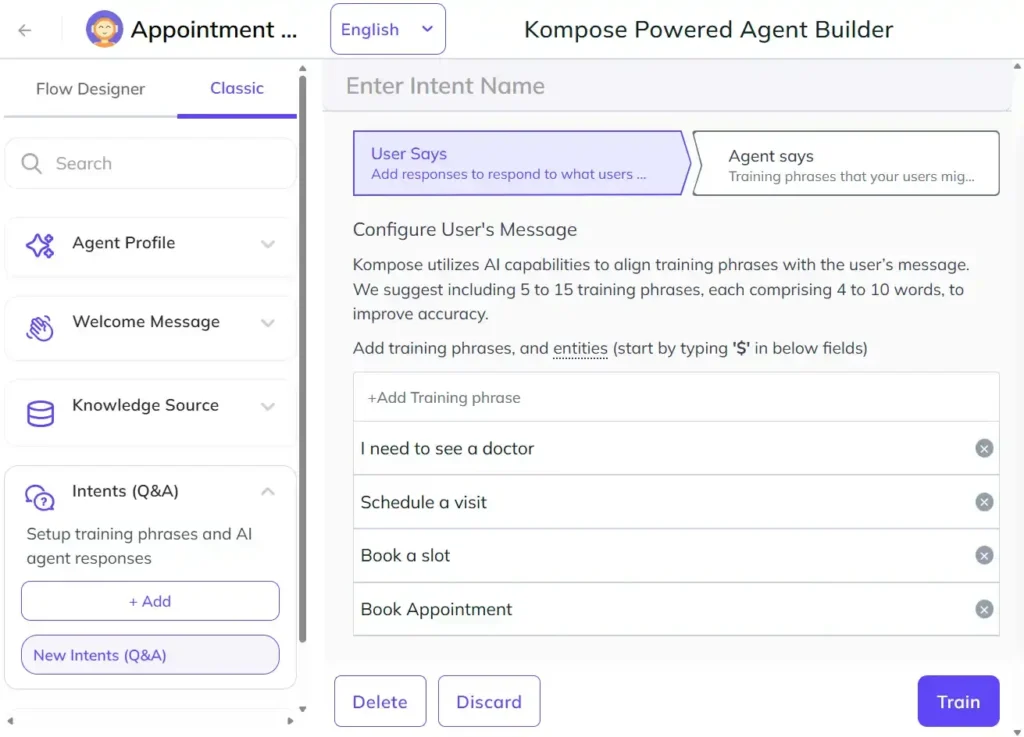
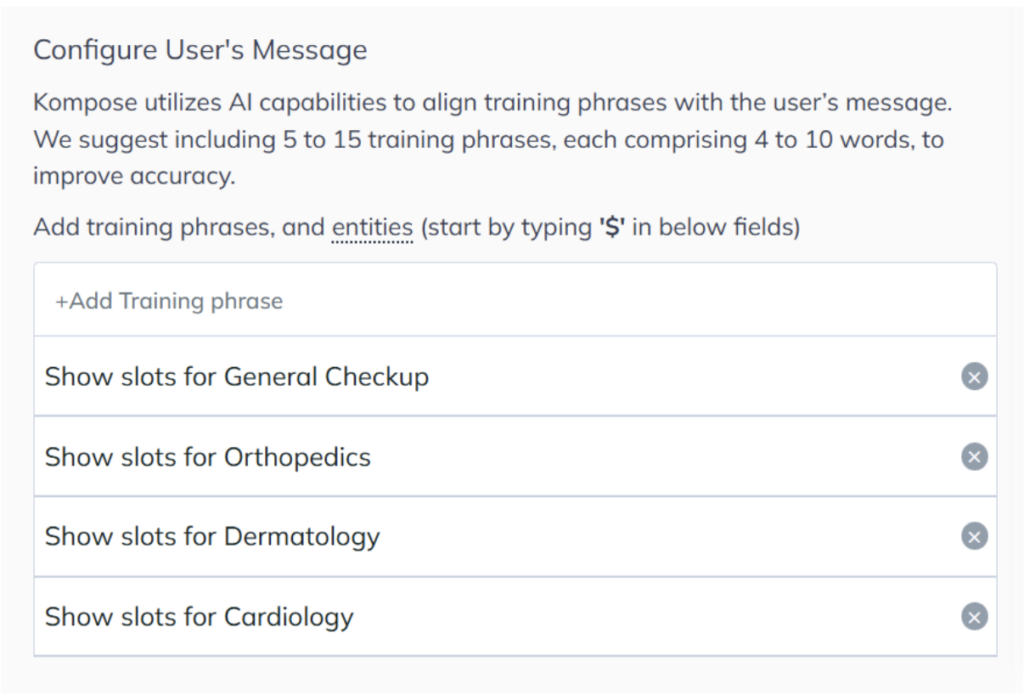
- Click Intents (Q&A) and name it Book Appointment.
- Add training phrases: Book Appointment, Book a slot, Schedule a visit, I need to see a doctor.
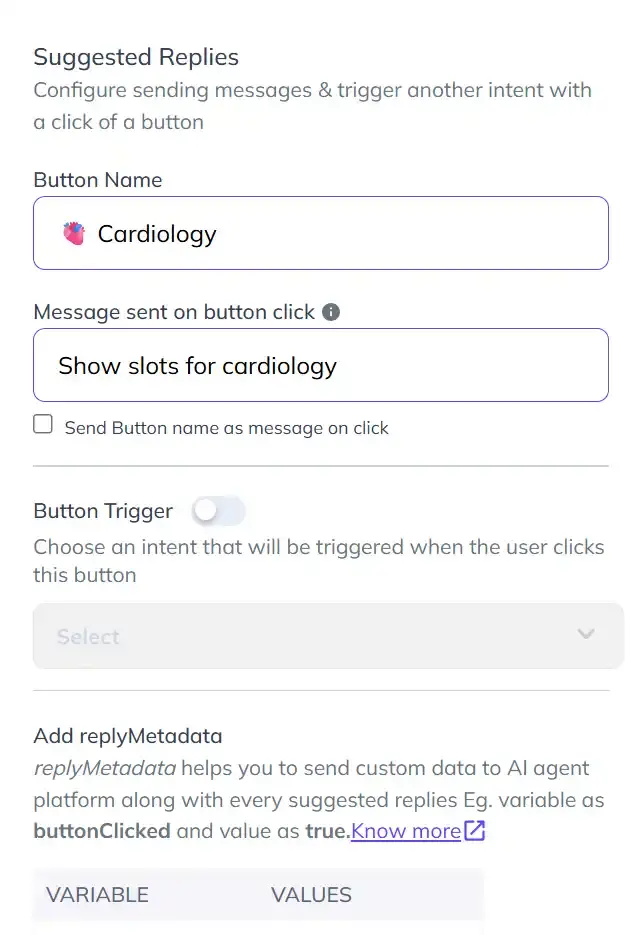
- In Agent Says, add this Custom Payload to show specialty buttons:
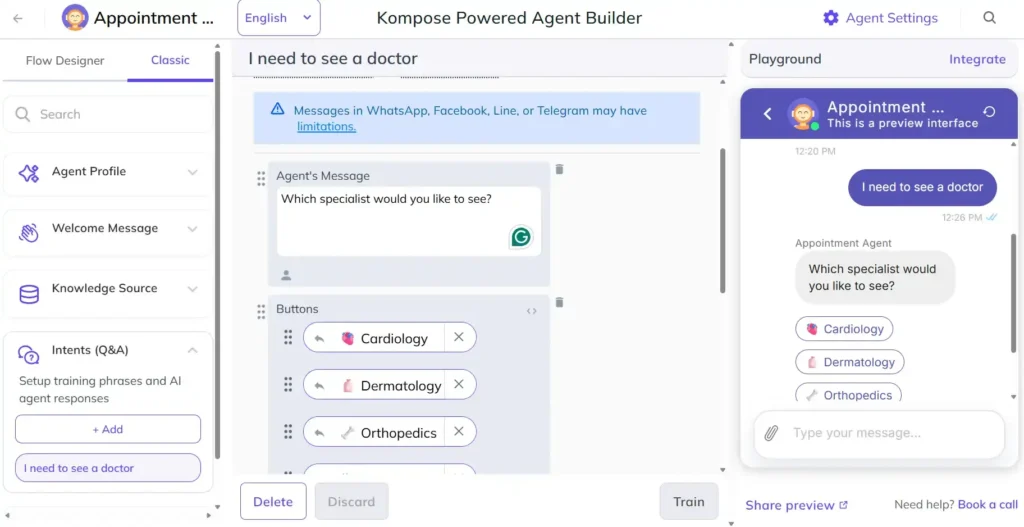
For each button here, we will send a message like “Show slots for Cardiology”.
The next intent catches this, runs the availability check, and replies with free time slots as buttons. When the user taps a slot, the booking intent fires.
Step 4: Create the Inline Code to Fetch Available Slots
This is the core of the availability feature. The function authenticates with the Google Calendar API, calls the Freebusy API to find blocked times for the selected doctor’s calendar over the next 7 days, then calculates free 1-hour windows during clinic hours (9 AM – 5 PM) and returns them as clickable buttons.
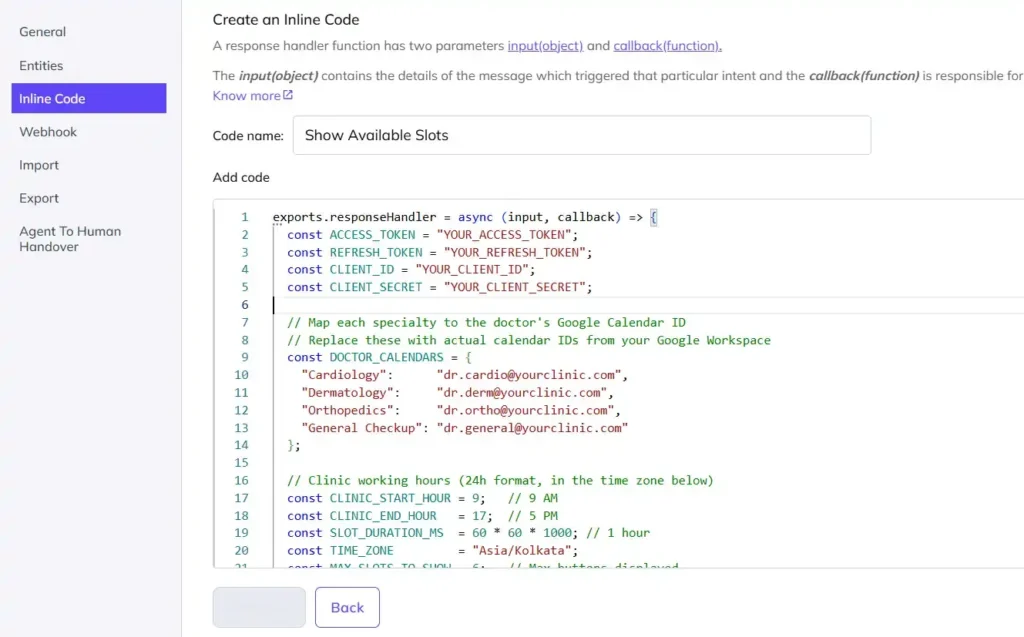
- Go to Agent Settings → Inline Code → Create Inline Code.
- Name it ShowAvailableSlots and paste the following:
- Click Deploy once code is pasted
exports.responseHandler = async (input, callback) => {
  const ACCESS_TOKEN = "YOUR_ACCESS_TOKEN";
  const REFRESH_TOKEN = "YOUR_REFRESH_TOKEN";
  const CLIENT_ID = "YOUR_CLIENT_ID";
  const CLIENT_SECRET = "YOUR_CLIENT_SECRET";

  // Map each specialty to the doctor's Google Calendar ID
  // Replace these with actual calendar IDs from your Google Workspace
  const DOCTOR_CALENDARS = {
    "Cardiology":      "dr.cardio@yourclinic.com",
    "Dermatology":     "dr.derm@yourclinic.com",
    "Orthopedics":     "dr.ortho@yourclinic.com",
    "General Checkup": "dr.general@yourclinic.com"
  };

  // Clinic working hours (24h format, in the time zone below)
  const CLINIC_START_HOUR = 9;   // 9 AM
  const CLINIC_END_HOUR   = 17;  // 5 PM
  const SLOT_DURATION_MS  = 60 * 60 * 1000; // 1 hour
  const TIME_ZONE         = "Asia/Kolkata";
  const MAX_SLOTS_TO_SHOW = 6;   // Max buttons displayed

  try {
    // Extract the specialty from the user's message
    // User message arrives as e.g. "Show slots for Cardiology"
    const userMessage = input.message || "";
    const specialtyMatch = userMessage.match(/Show slots for (.+)/i);
    const specialty = specialtyMatch ? specialtyMatch[1].trim() : "General Checkup";
    const calendarId = DOCTOR_CALENDARS[specialty] || DOCTOR_CALENDARS["General Checkup"];

    const oauth2Client = new google.auth.OAuth2(CLIENT_ID, CLIENT_SECRET);
    oauth2Client.setCredentials({
      access_token: ACCESS_TOKEN,
      refresh_token: REFRESH_TOKEN,
      scope: "https://www.googleapis.com/auth/calendar",
      token_type: "Bearer"
    });

    const calendar = google.calendar({ version: "v3", auth: oauth2Client });

    // Query freebusy for the next 7 days
    const now = new Date();
    const weekLater = new Date(now.getTime() + 7 * 24 * 60 * 60 * 1000);

    const freebusyResponse = await new Promise((resolve, reject) => {
      calendar.freebusy.query(
        {
          requestBody: {
            timeMin: now.toISOString(),
            timeMax: weekLater.toISOString(),
            timeZone: TIME_ZONE,
            items: [{ id: calendarId }]
          }
        },
        (err, res) => {
          if (err) reject(err);
          else resolve(res);
        }
      );
    });

    const busyPeriods = freebusyResponse.data.calendars[calendarId]?.busy || [];

    // Build a set of busy period timestamps for quick lookup
    const busyRanges = busyPeriods.map(b => ({
      start: new Date(b.start).getTime(),
      end:   new Date(b.end).getTime()
    }));

    // Walk through clinic hours day by day and find free 1-hour slots
    const freeSlots = [];
    const cursor = new Date(now);
    cursor.setMinutes(0, 0, 0); // snap to the top of the hour

    while (freeSlots.length < MAX_SLOTS_TO_SHOW && cursor < weekLater) {
      const hour = cursor.getHours();

      // Skip outside clinic hours
      if (hour < CLINIC_START_HOUR || hour >= CLINIC_END_HOUR) {
        cursor.setHours(hour < CLINIC_START_HOUR ? CLINIC_START_HOUR : CLINIC_START_HOUR + 24, 0, 0, 0);
        continue;
      }

      const slotStart = cursor.getTime();
      const slotEnd   = slotStart + SLOT_DURATION_MS;

      // Check if this slot overlaps with any busy period
      const isBlocked = busyRanges.some(b => slotStart < b.end && slotEnd > b.start);

      if (!isBlocked) {
        // Format for display: "Mon 23 Apr · 10:00 AM"
        const label = cursor.toLocaleString("en-IN", {
          weekday: "short",
          day: "numeric",
          month: "short",
          hour: "numeric",
          minute: "2-digit",
          hour12: true,
          timeZone: TIME_ZONE
        });
        freeSlots.push({ label, isoStart: cursor.toISOString() });
      }

      cursor.setTime(cursor.getTime() + SLOT_DURATION_MS);
    }

    if (freeSlots.length === 0) {
      callback([{ message: `😔 No available slots found for ${specialty} in the next 7 days. Please try another specialist or contact us directly.` }]);
      return;
    }

    // Return free slots as clickable buttons
    // Each button's message carries the ISO timestamp so the next intent can read it
    const slotButtons = freeSlots.map(slot => ({
      type: "link",
      name: `🕐 ${slot.label}`,
      message: `Book slot: ${specialty} | ${slot.isoStart}`
    }));

    callback([{
      message: `Here are the available slots for ${specialty}. Tap one to book it:`,
      platform: "kommunicate",
      metadata: {
        contentType: "300",
        templateId: "3",
        payload: slotButtons
      }
    }]);

  } catch (error) {
    callback([{ message: `❌ Could not fetch availability: ${error.message}` }]);
  }
};
Step 5: Create the Show Slots Intent
This intent catches the user’s specialty button tap and triggers ShowAvailableSlots.
- Add a new intent named Show Available Slots.
- Add training phrases: Show slots for Cardiology, Show slots for Dermatology, Show slots for Orthopedics, Show slots for General Checkup.
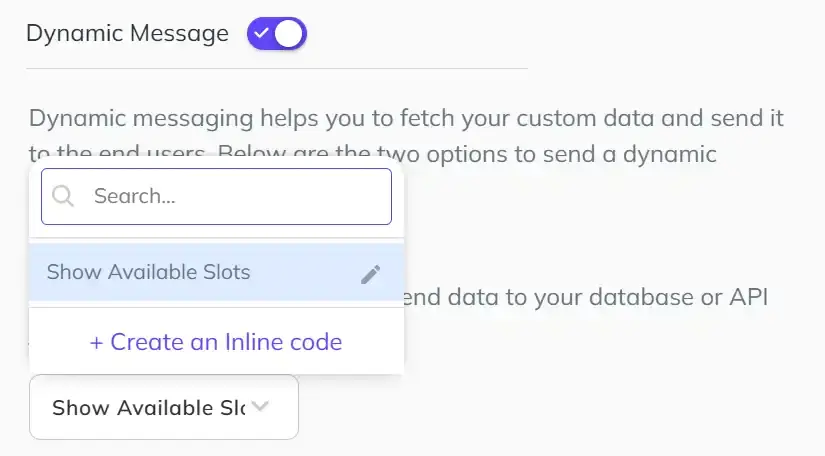
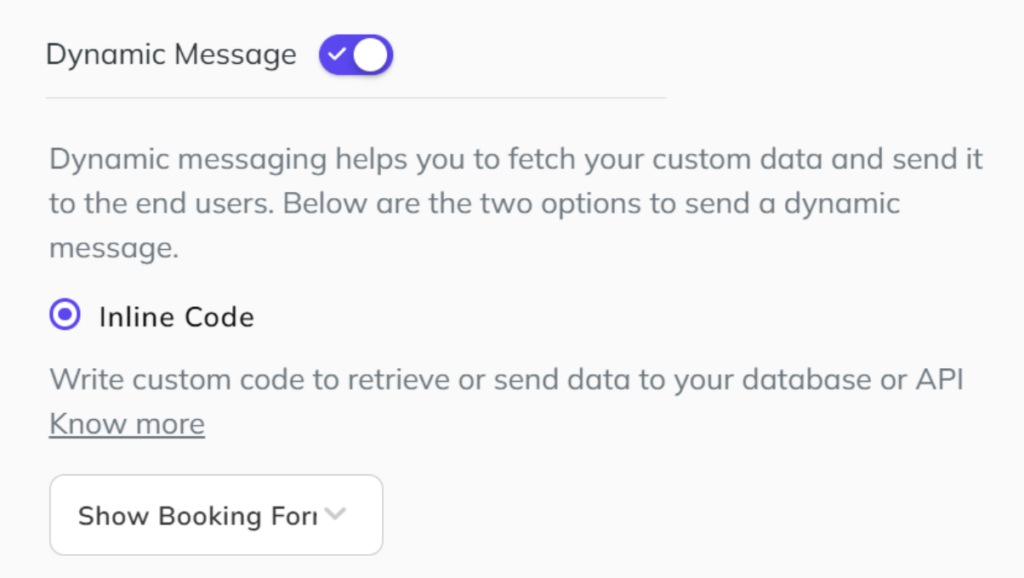
- In Agent Says, enable Dynamic Message → Inline Code → select ShowAvailableSlots.
- Click Train Bot.
Step 6: Create the Inline Code for Calendar Booking
When the user taps a time slot button, its message is formatted as “Book slot: Cardiology | 2025-04-25T09:00:00.000Z”. This inline code parses that, collects remaining details via a quick form, and creates the Google Calendar event.
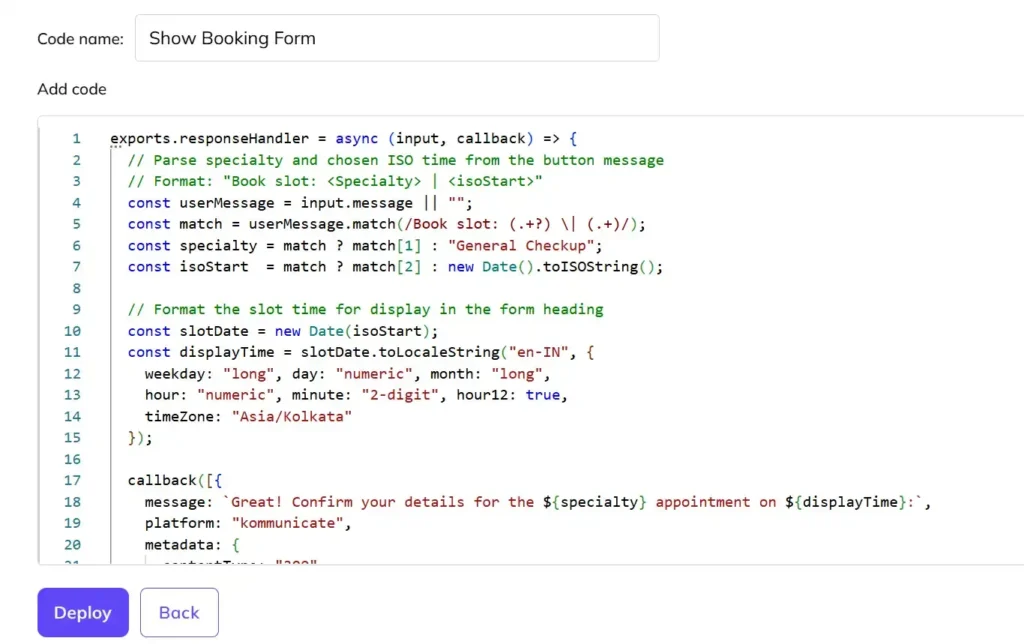
- Go to Agent Settings → Inline Code → Create Inline Code.
- Name it ShowBookingForm and paste the code provided below.
- Click Deploy.
exports.responseHandler = async (input, callback) => {
  // Parse specialty and chosen ISO time from the button message
  // Format: "Book slot: <Specialty> | <isoStart>"
  const userMessage = input.message || "";
  const match = userMessage.match(/Book slot: (.+?) \| (.+)/);
  const specialty = match ? match[1] : "General Checkup";
  const isoStart  = match ? match[2] : new Date().toISOString();

  // Format the slot time for display in the form heading
  const slotDate = new Date(isoStart);
  const displayTime = slotDate.toLocaleString("en-IN", {
    weekday: "long", day: "numeric", month: "long",
    hour: "numeric", minute: "2-digit", hour12: true,
    timeZone: "Asia/Kolkata"
  });

  callback([{
    message: `Great! Confirm your details for the ${specialty} appointment on ${displayTime}:`,
    platform: "kommunicate",
    metadata: {
      contentType: "300",
      templateId: "12",
      payload: [
        {
          type: "text",
          data: { label: "Full Name", placeholder: "Enter your full name" }
        },
        {
          type: "text",
          data: { label: "Email", placeholder: "Enter your email address" }
        },
        // Hidden fields carry the slot data through to the booking step
        {
          type: "hidden",
          data: { name: "specialty", value: specialty }
        },
        {
          type: "hidden",
          data: { name: "slotStart", value: isoStart }
        },
        {
          type: "submit",
          data: {
            name: "Confirm Booking",
            action: {
              requestType: "postBackToBotPlatform",
              message: "Confirming appointment..."
            },
            type: "submit"
          }
        }
      ]
    }
  }]);
};
Step 7: Create the Select Slot Intent
- Add a new intent named Select Slot.
- Add training phrases: Book slot: Cardiology, Book slot: Dermatology, Book slot: Orthopedics, Book slot: General Checkup.
- In Agent Says, enable Dynamic Message → Inline Code → select Show Booking Form.
- Click Train Agent.
Step 8: Create the Final Booking Inline Code
This function reads the confirmed form data (name, email, hidden specialty and slot time) and creates the Google Calendar event.
- Go to Agent Settings → Inline Code → Create Inline Code.
- Name it Book Appointment and paste the code provided below.
- Click Deploy.
exports.responseHandler = async (input, callback) => {
  const ACCESS_TOKEN = "YOUR_ACCESS_TOKEN";
  const REFRESH_TOKEN = "YOUR_REFRESH_TOKEN";
  const CLIENT_ID = "YOUR_CLIENT_ID";
  const CLIENT_SECRET = "YOUR_CLIENT_SECRET";

  const DOCTOR_CALENDARS = {
    "Cardiology":      "dr.cardio@yourclinic.com",
    "Dermatology":     "dr.derm@yourclinic.com",
    "Orthopedics":     "dr.ortho@yourclinic.com",
    "General Checkup": "dr.general@yourclinic.com"
  };

  try {
    const formData  = input.metadata?.KM_CHAT_CONTEXT?.formData || {};
    const patientName  = formData["Full Name"] || "Patient";
    const patientEmail = formData["Email"] || "";
    const specialty    = formData["specialty"] || "General Checkup";
    const isoStart     = formData["slotStart"] || new Date().toISOString();
    const doctorEmail  = DOCTOR_CALENDARS[specialty] || DOCTOR_CALENDARS["General Checkup"];

    const startTime = new Date(isoStart);
    const endTime   = new Date(startTime.getTime() + 60 * 60 * 1000);

    const oauth2Client = new google.auth.OAuth2(CLIENT_ID, CLIENT_SECRET);
    oauth2Client.setCredentials({
      access_token: ACCESS_TOKEN,
      refresh_token: REFRESH_TOKEN,
      scope: "https://www.googleapis.com/auth/calendar",
      token_type: "Bearer"
    });

    const calendar = google.calendar({ version: "v3", auth: oauth2Client });

    const event = {
      summary: `Appointment: ${specialty} -- ${patientName}`,
      location: "Kommunicate Health Clinic, 123 Main St",
      description: `Patient: ${patientName}\nSpecialty: ${specialty}`,
      start: { dateTime: startTime.toISOString(), timeZone: "Asia/Kolkata" },
      end:   { dateTime: endTime.toISOString(),   timeZone: "Asia/Kolkata" },
      attendees: [
        { email: doctorEmail },
        ...(patientEmail ? [{ email: patientEmail }] : [])
      ],
      reminders: { useDefault: true }
    };

    calendar.events.insert(
      { calendarId: "primary", resource: event },
      (err, res) => {
        if (err) {
          callback([{ message: `❌ Could not book your appointment: ${err.message}` }]);
          return;
        }
        const displayTime = startTime.toLocaleString("en-IN", {
          weekday: "long", day: "numeric", month: "long",
          hour: "numeric", minute: "2-digit", hour12: true,
          timeZone: "Asia/Kolkata"
        });
        callback([{
          message: `✅ Appointment confirmed for ${patientName}!\n\n🩺 Specialist: ${specialty}\n📅 Date & Time: ${displayTime}\n🔗 View your event: ${res.data.htmlLink}`
        }]);
      }
    );
  } catch (error) {
    callback([{ message: `Something went wrong: ${error.message}` }]);
  }
};
Step 9: Create the Submit Intent
- Add a new intent named Submit Appointment.
- Add training phrases: Confirming appointment…, Submit, Confirm Booking.
- In Agent Says, enable Dynamic Message → Inline Code → select Book Appointment.
- Click Train Agent.
Part 3: Enable OpenAI as the AI Model (Optional)
To give your bot smarter fallback responses and more natural conversation:
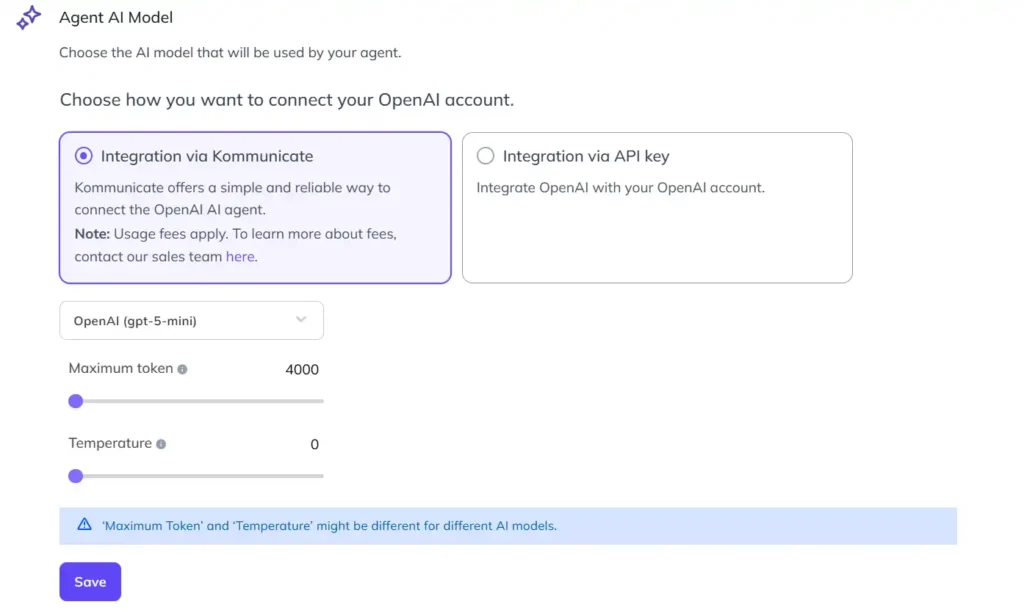
- In the Agent Builder, go to Agent Settings → Agent AI Model.
- Select OpenAI from the model list.
- Enable Contextual Understanding to allow multi-turn conversations (e.g., if a user asks follow-up questions about their booking).
Part 4: Add Bot-to-Human Handoff
If a user needs to speak with a real agent, configure the fallback:
- Open the Default Fallback Intent.
- In Agent Says, click More → Handover.
How to Use
Once your bot is set up:
- Test in the agent preview — Click Test your Agent in the Bot Builder and walk through the full flow: pick a specialist → view slots → tap a slot → fill details → confirm.
- Verify your doctor calendar IDs — in ShowAvailableSlots and BookAppointment, make sure DOCTOR_CALENDARS maps each specialty to a real Google Calendar ID (found in each calendar’s Settings page).
- Activate the AI Agent— Assign it to your Kommunicate widget from the Agent Integration panel.
- Embed the widget on your website using the Kommunicate install script.
- Message your AI Agent — It should greet users, show specialty options, display real free slots as buttons, collect patient details, and book the event on Google Calendar.
Customizing This Workflow
- Change the slot duration — Update SLOT_DURATION_MS in ShowAvailableSlots to 30 * 60 * 1000 for 30-minute appointments.
- Adjust clinic hours — Change CLINIC_START_HOUR and CLINIC_END_HOUR to match your actual opening times.
- Show more or fewer slots — Increase or decrease MAX_SLOTS_TO_SHOW (default 6) to control how many buttons appear.
- Send confirmation emails — After the calendar.events.insert call in BookAppointment, call an email API (e.g., SendGrid) using patientEmail to send a booking receipt.
- Persist bookings to a Google Sheet — Append a row to a spreadsheet inside BookAppointment using the Google Sheets API to maintain a front-desk log.
- Add WhatsApp support — Connect your Kommunicate bot to WhatsApp Cloud API. The slot button flow works identically on WhatsApp; extract the user’s phone number via input.metadata.KM_CHAT_CONTEXT.from for SMS reminders.
- Multi-doctor per specialty — Extend DOCTOR_CALENDARS to an array of calendar IDs per specialty and query freebusy for all of them, merging results into a unified list of free slots.
Troubleshooting
Slots are showing times that are already booked — Double-check that the calendar IDs in DOCTOR_CALENDARS exactly match the doctor’s Google Calendar ID (found under Calendar Settings → Integrate Calendar → Calendar ID). A typo will cause the freebusy query to return an empty busy list, making all slots appear free.
No slots are returned even though the calendar is free — The freebusy API only reports busy times; an empty busy list means the calendar is entirely free. If you’re getting zero slots, the issue is likely in the working-hours filter. Confirm that CLINIC_START_HOUR, CLINIC_END_HOUR, and TIME_ZONE are set correctly.
The bot creates an event but the time zone is wrong — Update timeZone in both ShowAvailableSlots (for display formatting) and BookAppointment (for the calendar event) to match your clinic’s location, e.g., “America/New_York” or “Europe/London”.
OAuth token expired — Access tokens expire after ~1 hour. The refresh_token handles automatic renewal as long as it’s included. If both expire, re-run the OAuth Playground flow to generate fresh tokens.
Hidden form fields (specialty, slotStart) are arriving as undefined — Make sure the form’s submit action uses “requestType”: “postBackToBotPlatform” and that the Submit intent training phrase exactly matches the form’s submit message value (“Confirming appointment…”).
Inline code deployment fails — Do not rename the responseHandler function or its arguments. Kompose requires this exact signature to execute the function correctly.
Wrapping Up
And you now have a fully functional appointment booking bot that talks to Google Calendar in real time, all without spinning up a single backend server. By combining Kompose’s Inline Code with the Calendar API, you’ve built something that would typically require a developer, a hosting provider, and a webhook handler. Your patients get a smooth, conversational booking experience, and your front desk gets fewer phone calls to juggle.
The same pattern extends well beyond healthcare. Swap doctor calendars for consultant schedules, salon stylists, tutors, or property agents, and the workflow holds up. Once you’re comfortable with this foundation, the customisation ideas in the section above are a great place to push it further: confirmation emails, WhatsApp delivery, multi-doctor pooling, or front-desk logging in Google Sheets.
If you want to build your own appointment-booking AI agent, feel free to sign up for Kommunicate. If you’d rather see it in action first, book a demo and our team will walk you through what’s possible with Kompose and AI-powered chat.


