Updated on July 20, 2026
TL;DR: A Webflow AI chatbot can do more than answer questions. It can trigger backend actions and return account-specific information. In this tutorial, we will build an ecommerce chatbot that calculates shipping costs for US customers.
- The customer provides an order ID and destination state through the chat.
- A Kommunicate inline code function sends those details to a secure backend endpoint.
- The backend retrieves the package weight from your CRM or order system, calculates the shipping cost, and sends the quote back to the chatbot.
- The Kommunicate widget is added to Webflow through the website’s Footer code section.
A basic chatbot can tell a customer where you ship. A more useful chatbot can tell the customer exactly how much their order will cost to ship.
That requires the chatbot to combine conversational understanding with live business data.
In this tutorial, we will build a Webflow AI chatbot for an e-commerce website. When a customer asks about shipping costs, the chatbot will:
- Recognize that the customer wants a shipping quote.
- Collect the customer’s order ID and US destination state.
- Call an inline code function.
- Send the order ID and state to a backend shipping endpoint.
- Retrieve the package weight from the CRM or order management system.
- Calculate the shipping charge on the backend.
- Return the final shipping cost in the Webflow chat widget.
The package weight and CRM credentials never need to be exposed in Webflow. Webflow only loads the chat widget (You can read this guide about Webflow chatbot installation), while the sensitive lookup and calculation happen behind your backend API.
In this article, we will cover:
- Prerequisites
- How to add the AI chatbot to a Webflow website
- How to make an e-commerce AI chatbot for shipping cost calculation
- Conclusion
Prerequisites
Before starting, make sure you have the following:
- A Webflow website – You need access to the site’s Custom Code settings. Webflow code embeds are available on paid Site plans and eligible paid Workspace plans. See the Kommunicate Webflow integration page for a full overview of what the integration supports.
- A Kommunicate account – Create a Kommunicate account and obtain the installation script from the Install section of the dashboard.
- A CRM or order management system – Each order record should contain a unique order ID, package weight in pounds, and any other information required by your shipping calculation.
- A backend shipping endpoint – The backend must accept an order ID and US state, retrieve the package weight from the CRM, and return a shipping quote.
- An API credential for the shipping endpoint – Use a limited-scope service token or API key. Do not put CRM credentials, shipping-provider credentials, or other private secrets inside the Webflow installation script.
- Test order records – Keep a few test orders with known package weights available so that you can verify the final calculation.
How to add the AI chatbot to a Webflow website
Let us first add the Kommunicate widget to the Webflow website. We will build the shipping workflow after confirming that the widget loads correctly. This section walks through the same base installation covered in our Webflow chatbot setup guide, with the e-commerce workflow layered on top.
Step 1: Copy the Kommunicate installation script
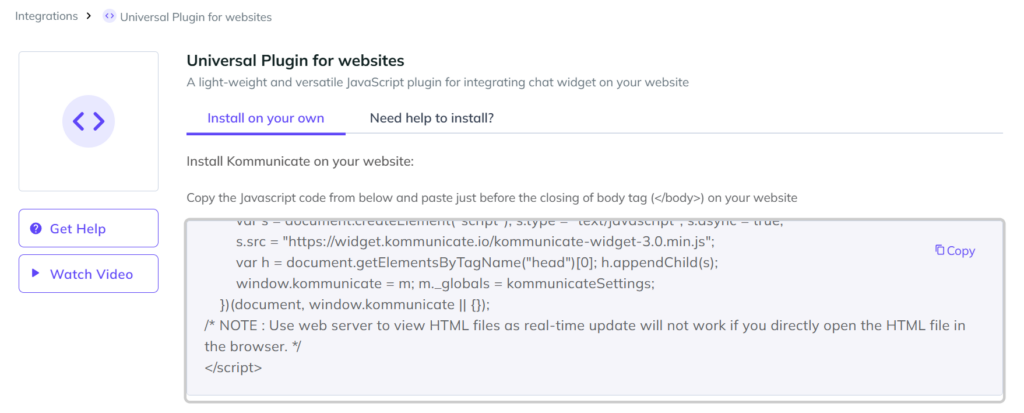
- Log in to the Kommunicate dashboard and open the Install section.
- Copy the JavaScript installation script generated for your application. It will contain your Kommunicate application ID and the code required to load the widget.
- Use the script generated in your own dashboard rather than copying an application ID from another tutorial.
Step 2: Open the Webflow Custom Code settings
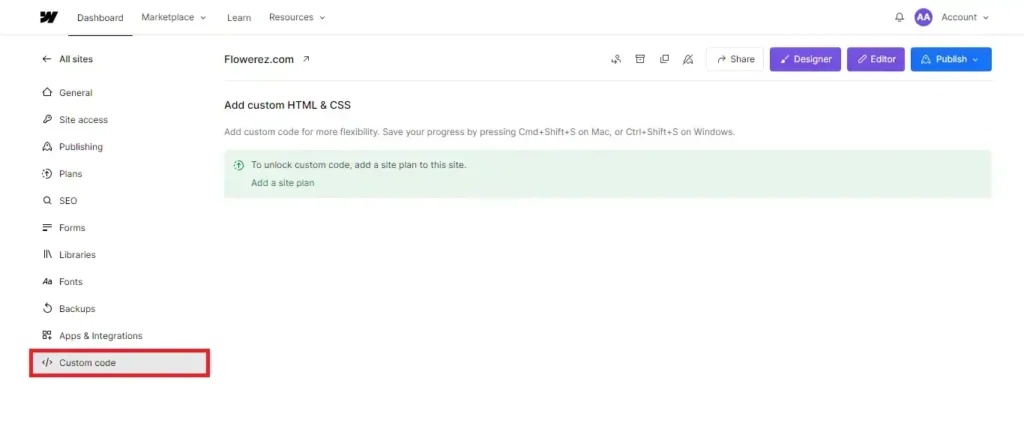
Open the relevant Webflow project and go to:
Site Settings → Custom Code
Webflow provides separate areas for head code and footer code. Add the Kommunicate installation script to the Footer code section.
Code added here applies to the entire website.
Step 3: Paste the installation script
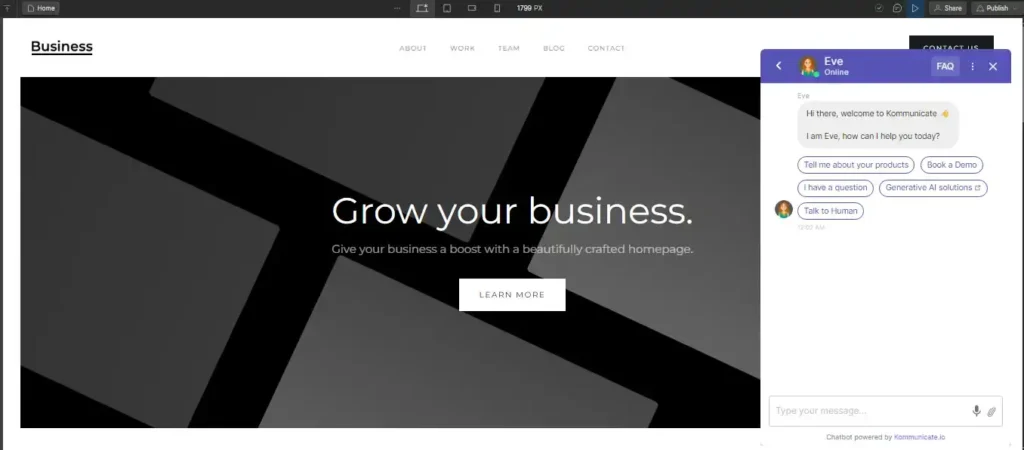
Paste the complete Kommunicate installation script into the Footer code field.
Any JavaScript delivered through Webflow can be inspected by a site visitor, so this field should only ever contain the public widget script, not private credentials.
Click Save changes after adding the code.
Step 4: Publish the Webflow site
Publish the website to your selected staging and production domains.
Enable Run custom code in Preview in Webflow if you want to test the widget in preview mode. The integration will not appear on the live site until you publish the changes. Because external scripts can behave differently in preview environments, complete the final test on the published staging or production domain.
The Kommunicate chat widget should now appear on the website.
Step 5: Add the chatbot only to selected pages, if needed
For an e-commerce chatbot, you may want the widget only on pages such as:
- Product pages
- Cart pages
- Shipping information pages
- Order confirmation pages
- Customer account pages
To limit the widget to a specific page:
- Open the page in the Webflow Designer.
- Open the page settings.
- Find the Custom Code section.
- Add the installation script before the closing body tag.
- Publish the page.
Code entered in page-level settings applies only to that page rather than the complete website.
Step 6: Confirm that the widget works
Open the published site in an incognito window and verify that:
- The widget launcher appears.
- The chat window opens.
- A new conversation can be created.
- Messages appear in the Kommunicate dashboard.
- The widget does not cover important cart or checkout controls on mobile.
At this stage, the widget is installed, but it does not yet know how to calculate shipping. We will build that workflow next.
How to make an e-commerce AI chatbot for shipping cost calculation
What are we building?
Assume a customer enters the following message:
“How much will shipping cost for order ORD-1042 to California?”
The chatbot needs two customer-provided values:
- Order ID: ORD-1042
- Destination state: CA
The package weight is not requested from the customer. It is retrieved from the company’s CRM or order management system.
The complete workflow looks like this:
- The customer asks about shipping.
- The AI agent recognizes the Shipping Cost intent.
- The chatbot asks for the order ID and the two-letter US state code.
- The customer submits the information through a form.
- A second intent triggers the shipping inline code.
- Inline code sends the order ID and state to the backend.
- The backend finds the order in the CRM.
- The backend reads the package weight.
- The backend calculates the shipping cost.
- The chatbot returns the price and estimated delivery window.
Using two intents keeps the workflow reliable. The first intent identifies what the customer wants. The second intent runs only after the required information has been collected.
Step 1: Define the backend shipping endpoint
The chatbot should not contain your complete shipping-rate logic. Its job is to collect the required information and call a controlled backend service.
Your backend endpoint could use the following contract:
- POST /api/shipping/quote
- Authorization: Bearer YOUR_SERVICE_TOKEN
- Content-Type: application/json
Request:
| { “orderId”: “ORD-1042”, “state”: “CA” } Successful response: { “orderId”: “ORD-1042”, “destinationState”: “CA”, “packageWeightLb”: 4.2, “shippingCost”: 12.75, “currency”: “USD”, “serviceLevel”: “Ground”, “estimatedBusinessDays”: “3-5” } Order not found: { “error”: “ORDER_NOT_FOUND”, “message”: “No order was found with that ID.” } Invalid state: { “error”: “INVALID_STATE”, “message”: “Enter a valid two-letter US state code.” } |
What should the backend function do?
The backend should complete the following operations:
| async function createShippingQuote({ orderId, state }) { // 1. Validate and normalize the destination state. const destinationState = state.trim().toUpperCase(); // 2. Retrieve the order from your CRM or order management system. const order = await getOrderFromCRM(orderId); if (!order) { const error = new Error(“Order not found”); error.code = “ORDER_NOT_FOUND”; throw error; } // 3. Read the package weight from the CRM record. const packageWeightLb = Number(order.packageWeightLb); if (!Number.isFinite(packageWeightLb) || packageWeightLb <= 0) { const error = new Error(“Package weight is missing”); error.code = “PACKAGE_WEIGHT_MISSING”; throw error; } // 4. Calculate the quote through your rate table or shipping provider. const quote = await calculateShippingRate({ destinationState, packageWeightLb }); // 5. Return only the information the chatbot needs. return { orderId, destinationState, packageWeightLb, shippingCost: quote.amount, currency: quote.currency || “USD”, serviceLevel: quote.serviceLevel, estimatedBusinessDays: quote.estimatedBusinessDays }; } |
The getOrderFromCRM function should use server-side CRM credentials. The calculateShippingRate function can use:
- Your internal state-based rate table
- A warehouse or fulfillment system
- A carrier-rating API
- A shipping aggregation platform
- Custom commercial rules
The rates used in production should come from your actual shipping policy. Do not hardcode demonstration prices into a live chatbot.
Step 2: Create the e-commerce AI agent
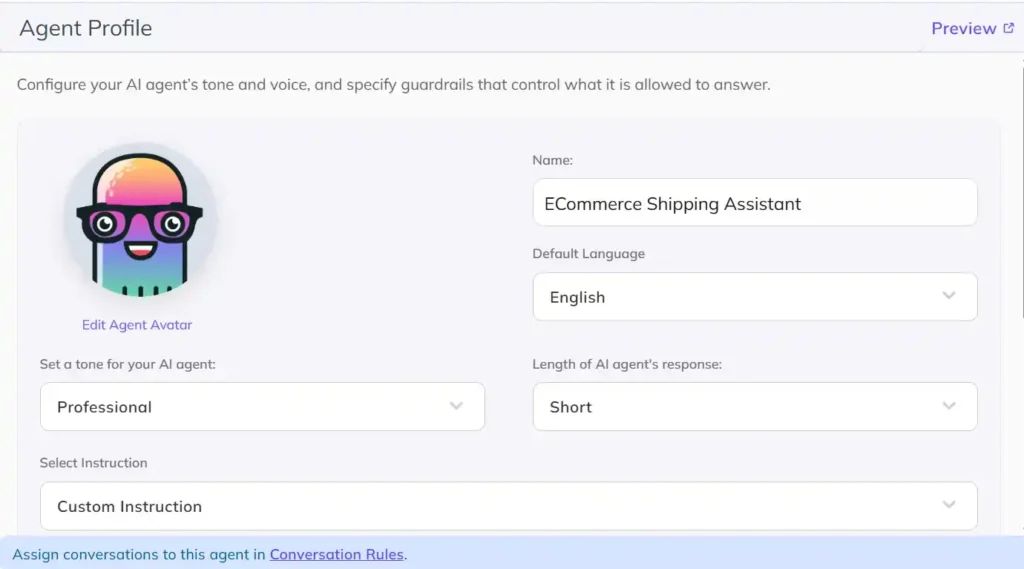
In the Kommunicate dashboard:
- Open Agent Integrations.
- Select Create AI Agent.
- Choose Kompose.
- Name the agent Ecommerce Shipping Assistant.
- Set the default language to English.
- Choose a concise and helpful tone.
Add the following custom instruction:
“You are an e-commerce customer service assistant. Help customers understand shipping, delivery, orders, and returns. When a customer asks for an order-specific shipping cost, collect their order ID and two-letter US destination state. Never ask the customer for package weight because it is retrieved securely from the company CRM. Do not estimate or invent a shipping price. Only provide a price returned by the approved shipping calculation function.”
This instruction prevents the generative model from making up a shipping quote when the backend is unavailable.
Step 3: Create the Shipping Cost intent
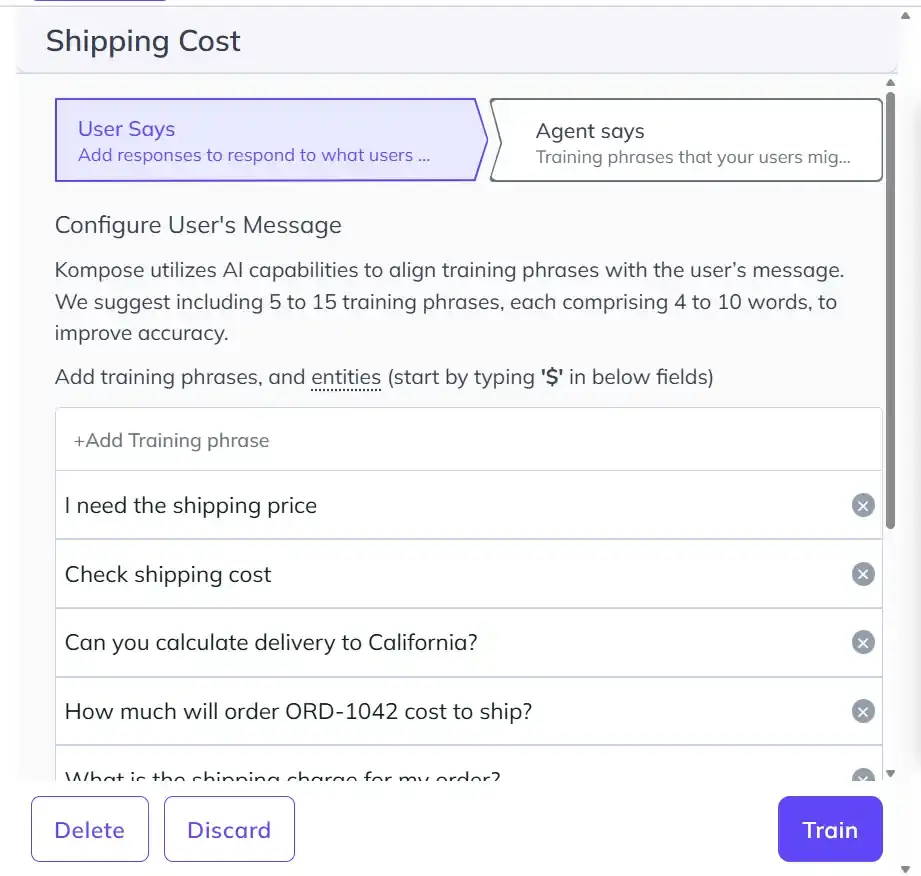
Open Intents (Q&A) and create an intent named: Shipping Cost
Add training phrases such as:
- How much does shipping cost?
- Calculate shipping for my order
- What will delivery cost?
- Give me a shipping quote
- How much to ship my package?
- What is the shipping charge for my order?
- Can you calculate delivery to California?
- How much will order ORD-1042 cost to ship?
- I need the shipping price
- Check shipping cost
Kompose uses these phrases to recognize different ways customers may express the same intent. Kommunicate recommends using several focused training phrases and supports extracting values such as tracking numbers or product types as entities.
Step 4: Add a form to collect the order ID and state
In the Agent Says section of the Shipping Cost intent:
- Click More.
- Delete the Text section and add a Custom Payload section.
- Add the following form payload:
| { “platform”: “kommunicate”, “message”: “I can calculate that. Enter your order ID and the two-letter state code for the shipping destination.”, “metadata”: { “templateId”: “12”, “contentType”: “300”, “payload”: [ { “type”: “text”, “data”: { “label”: “Order ID”, “placeholder”: “Example: ORD-1042”, “validation”: { “regex”: “^[A-Za-z0-9_-]{3,40}$”, “errorText”: “Enter a valid order ID.” } } }, { “type”: “text”, “data”: { “label”: “State”, “placeholder”: “Example: CA”, “validation”: { “regex”: “^[A-Za-z]{2}$”, “errorText”: “Enter a two-letter US state code.” } } }, { “type”: “submit”, “data”: { “name”: “Calculate shipping”, “type”: “submit”, “action”: { “message”: “Calculate shipping cost”, “requestType”: “postBackToBotPlatform” } } } ] } } |
When the customer submits the form, the values are sent back to the AI agent and made available inside KM_CHAT_CONTEXT.formData. Kommunicate forms support sending collected information back to the bot platform through postBackToBotPlatform.
4. Click Train Agent after saving the intent.
Step 5: Create the Calculate Shipping Cost intent
Create a second intent named:
Calculate Shipping Cost
Add this training phrase:
- Calculate shipping cost
This phrase must match the message in the form’s submit action.
The first intent displays the form. The second receives the submitted form data and runs the backend lookup.
Step 6: Create the shipping inline code
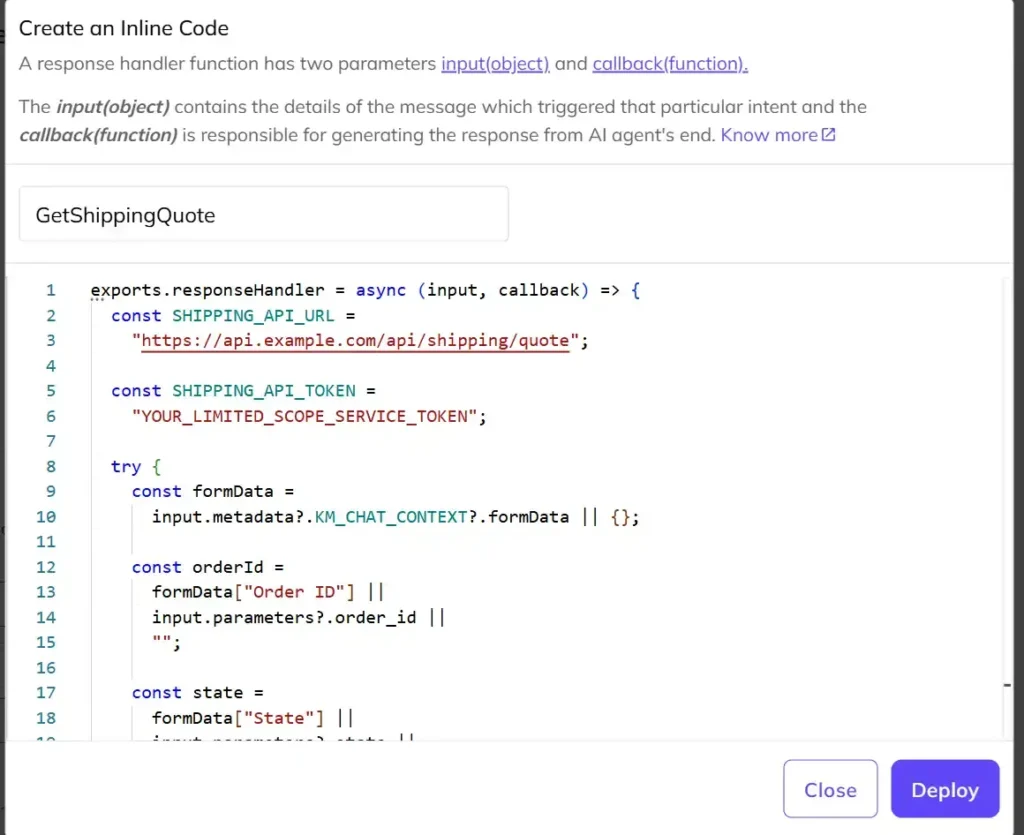
In the Calculate Shipping Cost intent:
- Open the Agent Says section.
- Enable Dynamic Message.
- Select Inline Code.
- Click Create Inline Code.
- Name it GetShippingQuote.
- Paste the following code:
| exports.responseHandler = async (input, callback) => { const SHIPPING_API_URL = “https://api.example.com/api/shipping/quote”; const SHIPPING_API_TOKEN = “YOUR_LIMITED_SCOPE_SERVICE_TOKEN”; try { const formData = input.metadata?.KM_CHAT_CONTEXT?.formData || {}; const orderId = formData[“Order ID”] || input.parameters?.order_id || “”; const state = formData[“State”] || input.parameters?.state || “”; const normalizedOrderId = String(orderId).trim(); const normalizedState = String(state).trim().toUpperCase(); if (!normalizedOrderId) { callback([ { message: “I need your order ID before I can calculate shipping.” } ]); return; } if (!/^[A-Z]{2}$/.test(normalizedState)) { callback([ { message: “Please enter the destination as a two-letter US state code, such as CA or NY.” } ]); return; } const response = await axios.post( SHIPPING_API_URL, { orderId: normalizedOrderId, state: normalizedState }, { headers: { Authorization: `Bearer ${SHIPPING_API_TOKEN}`, “Content-Type”: “application/json” }, timeout: 8000 } ); const quote = response.data || {}; const shippingCost = Number(quote.shippingCost); const packageWeightLb = Number(quote.packageWeightLb); if (!Number.isFinite(shippingCost)) { throw new Error( “The shipping API returned an invalid quote.” ); } const formattedCost = new Intl.NumberFormat(“en-US”, { style: “currency”, currency: quote.currency || “USD” }).format(shippingCost); const weightText = Number.isFinite(packageWeightLb) ? ` The package weight on file is ${packageWeightLb} lb.` : “”; const serviceText = quote.serviceLevel ? ` Service: ${quote.serviceLevel}.` : “”; const deliveryText = quote.estimatedBusinessDays ? ` Estimated delivery: ${quote.estimatedBusinessDays} business days.` : “”; callback([ { message: `Shipping for order ${normalizedOrderId} to ` + `${normalizedState} is ${formattedCost}.` + weightText + serviceText + deliveryText } ]); } catch (error) { const status = error.response?.status; const errorCode = error.response?.data?.error; if (status === 404 || errorCode === “ORDER_NOT_FOUND”) { callback([ { message: “I could not find an order with that ID. Check the order number and try again, or ask to speak with a support agent.” } ]); return; } if (status === 400 || errorCode === “INVALID_STATE”) { callback([ { message: “I could not use that destination. Enter a valid two-letter US state code, such as CA, TX, or NY.” } ]); return; } if (errorCode === “PACKAGE_WEIGHT_MISSING”) { callback([ { message: “The package weight is not available for this order yet, so I cannot calculate an accurate shipping cost. A support agent can help you review the order.” } ]); return; } callback([ { message: “I could not calculate the shipping cost right now. Please try again shortly or ask to speak with a support agent.” } ]); } }; |
Kompose inline code runs in a sandboxed Node environment, provides axios, and uses an exported responseHandler function with input and callback arguments. The input can contain the customer’s message, extracted parameters, and chat-context form data. The callback must return an array of message objects.
Replace:
https://api.example.com/api/shipping/quoteWith your backend endpoint.
Replace:
YOUR_LIMITED_SCOPE_SERVICE_TOKEN
With the service token you provisioned in the prerequisites, scoped to this endpoint only. The inline code should call your own controlled endpoint rather than the CRM directly, so the CRM and shipping-provider credentials stay stored server-side, never inside Kompose or Webflow.
Step 7: Deploy the inline code
After adding the function:
- Click Deploy.
- Select GetShippingQuote as the dynamic message for the Calculate Shipping Cost intent.
- Save the intent.
- Click Train Agent.
The intent will now execute the function whenever the form posts the message Calculate shipping cost.
Step 8: Assign Webflow conversations to the AI agent
Go to:
Settings → Conversation Routing
Enable Assign new conversations to AI agent and select the Ecommerce Shipping Assistant.
Kommunicate’s conversation-routing settings determine whether new website conversations are handled by an AI agent, a human agent, or a team.
Keep a default human agent or support team configured for conversations that require escalation.
Step 9: Test the complete Webflow chatbot flow
Test the agent from both the Kommunicate test panel and the published Webflow website.
1. Successful quote
Customer:
How much will shipping cost?
Chatbot:
I can calculate that. Enter your order ID and the two-letter state code for the shipping destination.
Customer submits:
Order ID: ORD-1042
State: CA
Chatbot:
Shipping for order ORD-1042 to CA is $12.75. The package weight on file is 4.2 lb. Service: Ground. Estimated delivery: 3–5 business days.
2. Invalid order
The customer submits an unknown order ID.
Expected response:
I could not find an order with that ID. Check the order number and try again, or ask to speak with a support agent.
3. Missing package weight
The CRM order exists, but its weight field is empty.
Expected response:
The package weight is not available for this order yet, so I cannot calculate an accurate shipping cost. A support agent can help you review the order.
4. Backend unavailable
Temporarily disable the test endpoint or use an invalid URL.
Expected response:
I could not calculate the shipping cost right now. Please try again shortly or ask to speak with a support agent.
Also test:
- Lowercase state codes such as ca
- Invalid values such as California123
- Order IDs containing hyphens or underscores
- Slow backend responses
- Duplicate form submissions
- Mobile Webflow pages
- New and returning chat sessions
Step 10: Add human handoff
In the Fallback/Handover section of the Agent Builder, choose between the two options:
- Automatic AI to human handover
- Restricted handover depending on business hours
Here, you can also give the AI a default message that it sends before the handover happens. We used “I don’t have that information; I’ll pass this on to a specialist.”
Conclusion
Adding a chatbot to Webflow is straightforward. Building a useful Webflow AI chatbot requires connecting that interface to the systems where customer and order information already lives.
In this example, Webflow provides the storefront, Kommunicate manages the conversation, Kompose identifies the shipping-cost intent, and inline code connects the chatbot to a secure backend workflow.
The most important architectural decision is keeping the shipping logic out of the Webflow page. The website should load the chat widget, but your backend should remain responsible for CRM access, package-weight retrieval, rate calculation, authentication, and validation.
Start with one controlled use case:
- Detect shipping-cost questions.
- Collect the order ID and destination state.
- Retrieve package weight from the CRM.
- Calculate the quote on the backend.
- Return the result in chat.
- Escalate exceptions to a human agent.
Once that flow is reliable, the same architecture can support order tracking, delivery-date changes, return eligibility, refund status, inventory checks, and other e-commerce workflows. If you want to see this pattern applied to a different backend action, our guide on building an OpenAI appointment booking bot walks through a similar intent-and-inline-code structure for scheduling instead of shipping.
Sign up for Kommunicate to create your Webflow AI chatbot and connect your first backend e-commerce workflow.

Devashish Mamgain is the CEO & Co-Founder of Kommunicate, with 15+ years of experience in building exceptional AI and chat-based products. He believes the future is human and bot working together and complementing each other.