Updated on August 4, 2026
TL;DR
To connect an AI chatbot with HubSpot CRM for a B2B SaaS sales workflow:
- Create a pricing intent in Kommunicate that identifies visitors asking about plans, quotes, enterprise pricing, or volume discounts.
- Collect the visitor’s work email, company, pricing requirement, and preferred sales language through a short in-chat form.
- Create or update the contact in HubSpot with the captured lead data.
- Check whether a salesperson who speaks the selected language is online in the Kommunicate dashboard.
- If someone is available, route the conversation to that language-specific sales team.
- If nobody is available, show a language-specific HubSpot meeting link so the visitor can book a detailed pricing discussion.
This creates a sales workflow that can convert a pricing inquiry even when the right salesperson is not immediately available.
Most chatbot and CRM integrations stop after creating a contact. That is useful, but it does not solve the more important problem: deciding what should happen next.
A visitor asking about pricing is usually showing stronger buying intent than someone asking a general product question. For a B2B SaaS company, the right next step may be a conversation with Sales, especially when the visitor wants enterprise pricing, usage-based pricing, volume discounts, or a custom quote.
The routing becomes more complicated when the company sells across regions. A Spanish-speaking visitor may want to discuss pricing in Spanish, while a German-speaking visitor may need a German sales representative. Sending both visitors to a general queue creates delays and forces them to repeat information.
In this tutorial, we will build an AI chatbot that:
- Detects pricing-related buying intent
- Collects the lead’s details and preferred language
- Creates or updates the contact in HubSpot CRM
- Checks the relevant sales team’s availability
- Routes the conversation to the correct language team
- Offers a demo-booking link when that team is unavailable
The chatbot handles the qualification and routing, while HubSpot remains the system of record for the lead. We’re going to talk about:
- What are we building?
- Prerequisites
- How to connect an AI chatbot to HubSpot using Kommunicate?
- Security and production considerations
- Conclusion
What are we building?
The complete workflow looks like this:
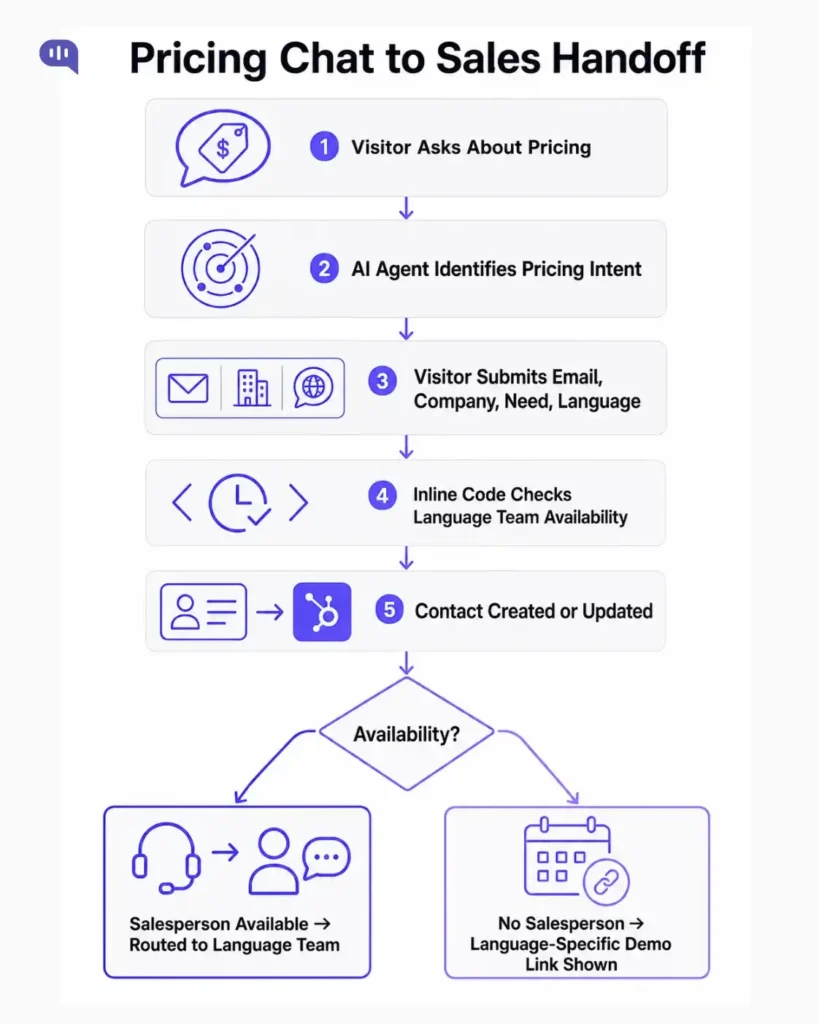
For example, suppose a visitor asks:
“We need pricing for around 50 support agents. Can someone explain it in Spanish?”
The chatbot should not send that conversation to a generic support queue. It should collect the lead’s details, save the request in HubSpot, and check the Spanish sales team.
| Sales-team status | Chatbot action | HubSpot outcome |
|---|---|---|
| A Spanish-speaking salesperson is online | Transfer the conversation to the Spanish sales team |
live_sales_handoff
|
| The Spanish sales team is offline | Show the Spanish demo-booking link |
demo_link_offered
|
| The availability request fails | Use the safer demo-booking fallback |
demo_link_offered
|
This article focuses on sending qualified conversation data into HubSpot. That is different from using HubSpot data to personalize a support conversation. For the reverse workflow, where the AI agent retrieves CRM data and changes its answer based on the contact’s lifecycle stage, see How to Personalize an AI Agent With Live HubSpot CRM Data.
Prerequisites
Before starting, you will need:
- A Kommunicate account (Sign up here)
- A HubSpot account
- Permission to create HubSpot contact properties
- A HubSpot private or static-auth app token
- A Kommunicate API key
- Separate Kommunicate teams for the supported sales languages
- The Kommunicate user IDs for each salesperson
- A HubSpot meeting link for each supported language
The example in this tutorial uses English, Spanish, French, and German. You can add or remove languages based on your sales coverage.
How to connect an AI chatbot to HubSpot using Kommunicate?
Step 1: Create the required HubSpot contact properties
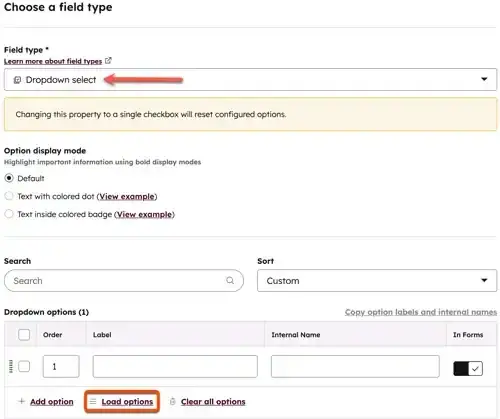
HubSpot provides default contact properties such as email, firstname, and company. The language-routing workflow also needs a few custom properties.
In HubSpot, go to Settings > Properties, select Contact properties, and create the following fields. HubSpot’s property documentation explains how to create basic and advanced custom properties.
| Property label | Suggested internal name | Field type | Example value |
|---|---|---|---|
| Preferred Sales Language | preferred_sales_language |
Dropdown select | spanish |
| Pricing Interest | pricing_interest |
Multi-line text | Enterprise pricing for 50 agents |
| Chatbot Lead Source | chatbot_lead_source |
Single-line text or dropdown | ai_chatbot |
| Chatbot Handoff Outcome | chatbot_handoff_outcome |
Dropdown select | live_sales_handoff |
For the handoff outcome property, add at least these internal options:
- live_sales_handoff
- demo_link_offered
For the language property, use stable internal values such as english, spanish, french, and german. HubSpot requires integrations to send internal property and option names, not only the labels shown in the CRM interface.
Do not automatically change the contact’s lifecycle stage in this tutorial. An existing customer or active opportunity may also ask about pricing, and forcing every pricing inquiry back to the lead stage could damage existing CRM data. Your HubSpot workflows can decide when a new chatbot lead should become an MQL, SQL, or opportunity.
Step 2: Create a HubSpot access token
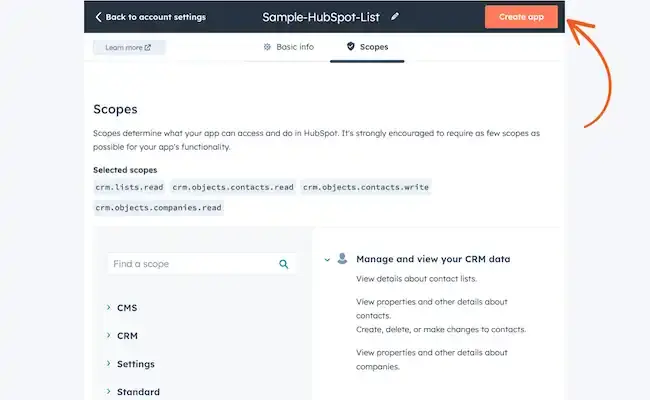
The inline code needs permission to find, create, and update contacts.
For a connection used with one HubSpot account, create a private or static-auth app and grant only these scopes:
| crm.objects.contacts.read crm.objects.contacts.write |
HubSpot’s authentication overview explains static authentication and Bearer tokens. HubSpot also documents how to configure and use a private app access token.
Copy the access token after creating the app. The code will send it in the Authorization header:
| Authorization: Bearer YOUR_HUBSPOT_ACCESS_TOKEN |
The read scope is used to check whether the email already exists. The write scope is used to create a new contact or update the existing record.
For an integration that will be installed across multiple customers’ HubSpot accounts, use OAuth instead of one shared static token.
Step 3: Create language-specific sales teams
Create a separate Kommunicate team for every language that requires dedicated routing. For example:
| Language | Kommunicate team | Example team ID |
|---|---|---|
| English | Sales – English |
TEAM_ENGLISH
|
| Spanish | Sales – Spanish |
TEAM_SPANISH
|
| French | Sales – French |
TEAM_FRENCH
|
| German | Sales – German |
TEAM_GERMAN
|
Add the appropriate salespeople to each team. A bilingual salesperson can belong to more than one team.
Kommunicate supports assigning a conversation to a team by returning the KM_ASSIGN_TEAM metadata property. The conversation-assignment documentation also explains where to find the team ID in the dashboard.
You will also need the user IDs of the individual salespeople in each team. The availability check does not accept only a team name. It sends a list of user IDs to Kommunicate’s Get user detail endpoint, which returns a connected value for each user.
Store the language, team ID, agent user IDs, and demo link together in the inline-code configuration:
Replace every placeholder with values from your own Kommunicate and HubSpot accounts.
Step 4: Create the language-specific demo links in HubSpot
The demo link works as the conversion path for visitors who arrive outside the selected team’s working hours, not simply as an error message.
Create a HubSpot scheduling page for each supported language. HubSpot’s Meetings Scheduler documentation covers one-to-one, group, and round-robin scheduling pages.
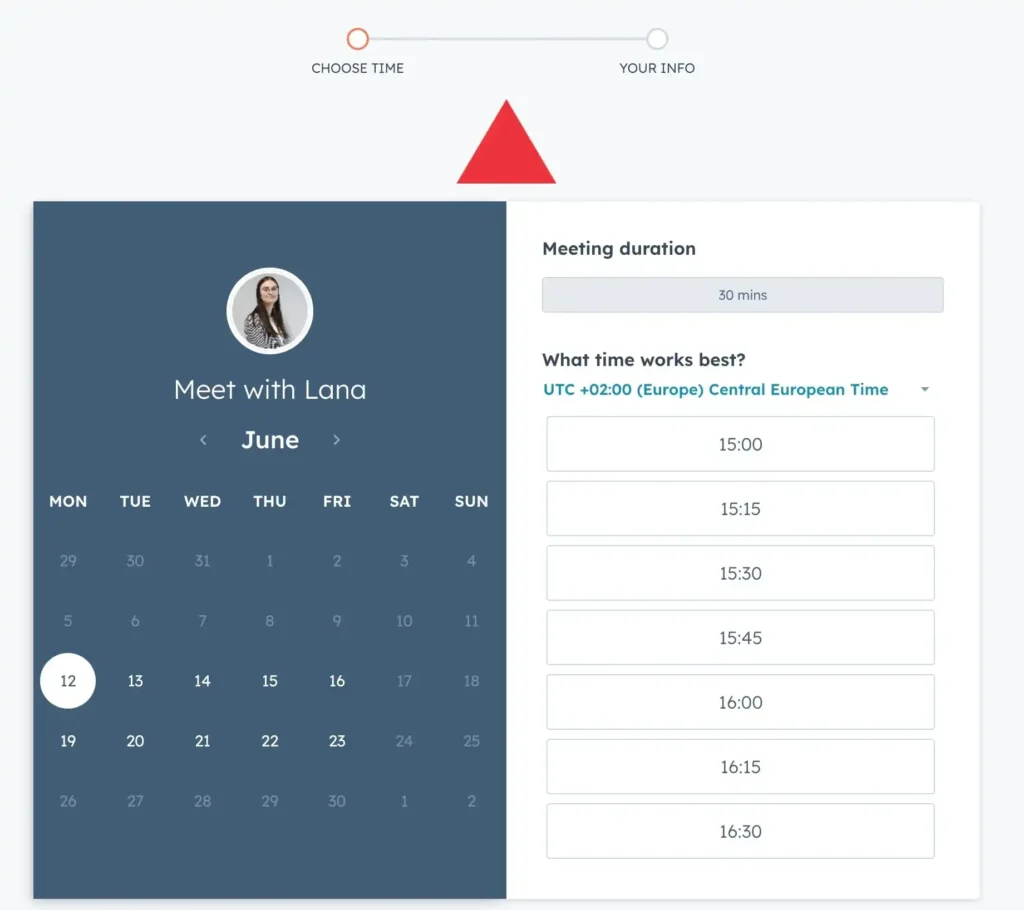
For a language team with several salespeople, use a round-robin scheduling page. HubSpot will show availability across the selected team members and assign the meeting according to the scheduling configuration.
Examples:
- English pricing discussion
- Spanish pricing discussion
- French pricing discussion
- German pricing discussion
Use the same language on the booking page as the language selected in the chatbot. Also, connect each salesperson’s calendar so that unavailable time slots do not appear as bookable.
Step 5: Create the Pricing Inquiry Intent
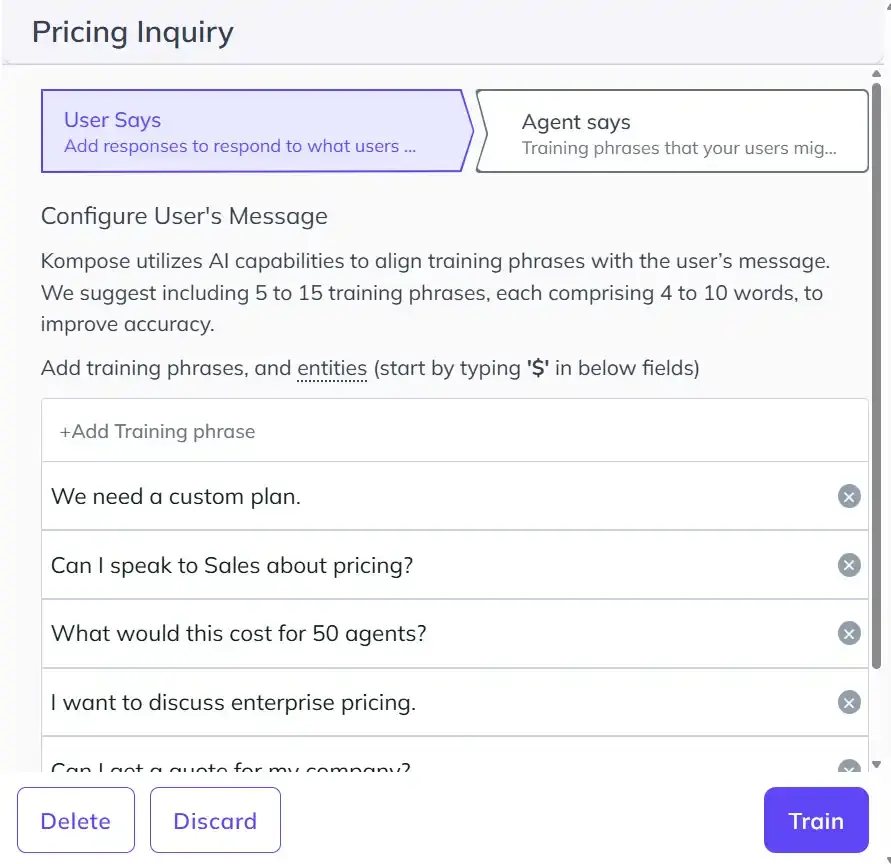
Open your Kompose AI agent and create an intent called Pricing Inquiry.
Add training phrases such as:
- How much does your product cost?
- Can I get a quote for my company?
- I want to discuss enterprise pricing.
- Do you offer volume discounts?
- What would this cost for 50 agents?
- Can I speak to Sales about pricing?
- We need a custom plan.
Kompose recommends using several distinct training phrases and avoiding overlapping phrases across intents. The Kompose AI agent documentation covers intents, training phrases, rich messages, entities, and intent-driven handoffs.
Only trigger this sales workflow when the visitor asks for a custom quote, enterprise pricing, volume pricing, procurement details, or a detailed commercial discussion.
Add a Short Lead Form
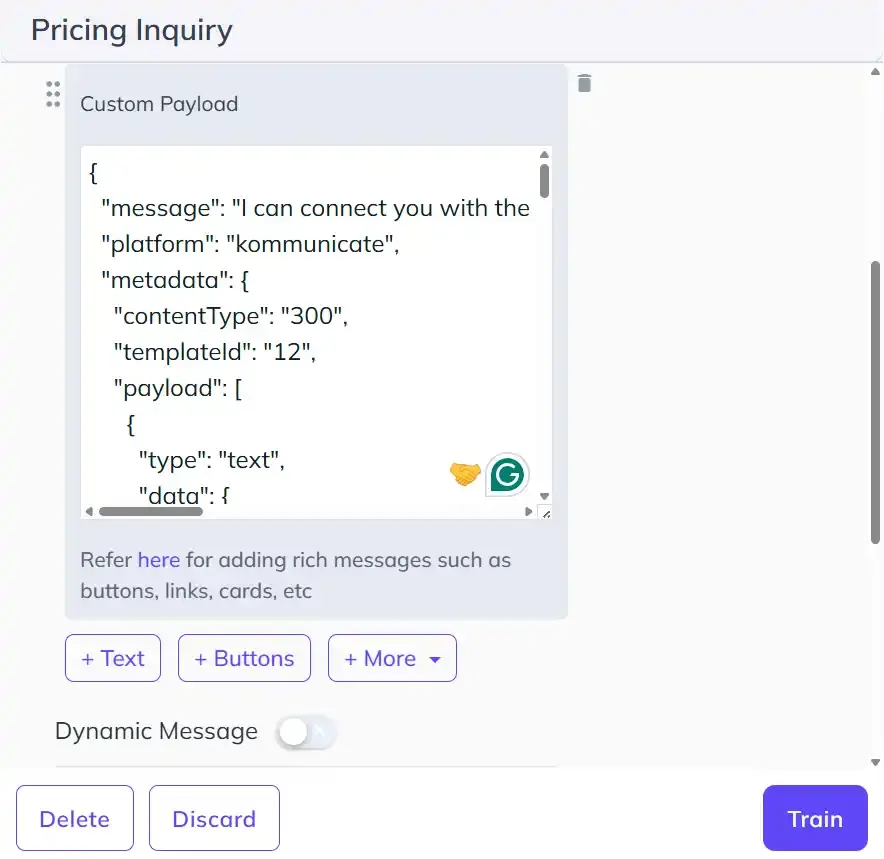
Under Agent Says, select More > Custom Payload and add a form that collects:
- First name
- Work email
- Company
- Preferred language
- Pricing requirement
Kommunicate’s rich-message form documentation explains the form template, dropdown fields, validation, and sending form data back to the AI agent.
Use this payload as the starting point:
| { “message”: “I can connect you with the right sales specialist. Share a few details first.”, “platform”: “kommunicate”, “metadata”: { “contentType”: “300”, “templateId”: “12”, “payload”: [ { “type”: “text”, “data”: { “name”: “first_name”, “label”: “First name”, “placeholder”: “Enter your first name” } }, { “type”: “text”, “data”: { “name”: “work_email”, “label”: “Work email”, “placeholder”: “name@company.com”, “validation”: { “regex”: “^(([^<>()\\[\\]\\.;:\\s@\\\”]+(\\.[^<>()\\[\\]\\.,;:\\s@\\\”]+)*)|(\\\”.+\\\”))@((\\[[0-9]{1,3}\\.[0-9]{1,3}\\.[0-9]{1,3}\\.[0-9]{1,3}\\])|(([a-zA-Z\\-0-9]+\\.)+[a-zA-Z]{2,}))$”, “errorText”: “Enter a valid work email” } } }, { “type”: “text”, “data”: { “name”: “company”, “label”: “Company”, “placeholder”: “Enter your company name” } }, { “type”: “dropdown”, “data”: { “name”: “preferred_language”, “title”: “Preferred language”, “options”: [ { “selected”: true, “disabled”: true, “label”: “Select a language” }, { “value”: “english”, “label”: “English” }, { “value”: “spanish”, “label”: “Spanish” }, { “value”: “french”, “label”: “French” }, { “value”: “german”, “label”: “German” } ], “validation”: { “errorText”: “Select a preferred language” } } }, { “type”: “textarea”, “data”: { “name”: “pricing_interest”, “title”: “What would you like to discuss?”, “placeholder”: “For example: enterprise pricing for 50 support agents”, “rows”: 3, “cols”: 20 } }, { “type”: “submit”, “data”: { “name”: “Submit”, “type”: “submit”, “action”: { “message”: “Submit pricing request”, “requestType”: “postBackToBotPlatform”, “postBackToKommunicate”: true, “formAction”: “” } } } ] } } |
When the visitor submits the form, the message Submit pricing request should trigger the next intent. The form values are made available to the agent payload as form data.
Step 6: Create the pricing request submission intent
Create another intent called Submit Pricing Request and add this training phrase:
- Submit pricing request
In Agent Says:
- Remove any static response.
- Enable Dynamic Message.
- Select Inline Code.
- Create an inline-code function called HubSpot Sales Routing.
Kompose’s Inline Code documentation explains how the responseHandler receives the triggering message and returns one or more chatbot messages through the callback.
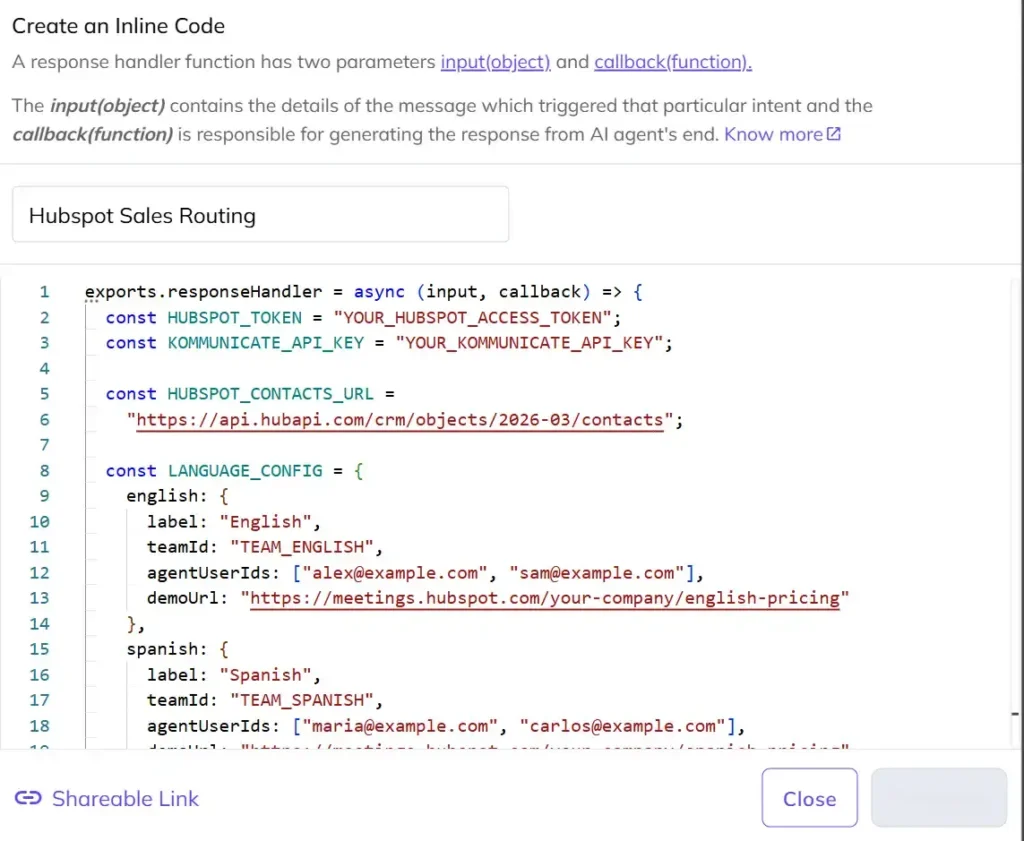
The function below performs four jobs:
- Reads the submitted lead form.
- Checks whether anyone in the selected language team is online.
- Creates or updates the contact in HubSpot.
- Returns either a team-assignment payload or a demo-booking button.
| exports.responseHandler = async (input, callback) => { const HUBSPOT_TOKEN = “YOUR_HUBSPOT_ACCESS_TOKEN”; const KOMMUNICATE_API_KEY = “YOUR_KOMMUNICATE_API_KEY”; const HUBSPOT_CONTACTS_URL = “https://api.hubapi.com/crm/objects/2026-03/contacts”; const LANGUAGE_CONFIG = { english: { label: “English”, teamId: “TEAM_ENGLISH”, agentUserIds: [“alex@example.com”, “sam@example.com”], demoUrl: “https://meetings.hubspot.com/your-company/english-pricing” }, spanish: { label: “Spanish”, teamId: “TEAM_SPANISH”, agentUserIds: [“maria@example.com”, “carlos@example.com”], demoUrl: “https://meetings.hubspot.com/your-company/spanish-pricing” }, french: { label: “French”, teamId: “TEAM_FRENCH”, agentUserIds: [“camille@example.com”], demoUrl: “https://meetings.hubspot.com/your-company/french-pricing” }, german: { label: “German”, teamId: “TEAM_GERMAN”, agentUserIds: [“lena@example.com”], demoUrl: “https://meetings.hubspot.com/your-company/german-pricing” } }; const hubspotHeaders = { Authorization: `Bearer ${HUBSPOT_TOKEN}`, “Content-Type”: “application/json” }; const getField = (formData, …keys) => { for (const key of keys) { const value = formData?.[key]; if (Array.isArray(value) && value.length) return String(value[0]).trim(); if (value !== undefined && value !== null && String(value).trim()) { return String(value).trim(); } } return “”; }; const normalizeLanguage = (value) => String(value || “”) .trim() .toLowerCase() .replace(/[^a-z]/g, “”); const upsertHubSpotContact = async (email, properties) => { const lookupUrl = `${HUBSPOT_CONTACTS_URL}/${encodeURIComponent(email)}` + “?idProperty=email”; try { const existingContact = await axios.get(lookupUrl, { headers: hubspotHeaders }); await axios.patch( `${HUBSPOT_CONTACTS_URL}/${existingContact.data.id}`, { properties }, { headers: hubspotHeaders } ); return “updated”; } catch (error) { if (error.response?.status !== 404) throw error; await axios.post( HUBSPOT_CONTACTS_URL, { properties }, { headers: hubspotHeaders } ); return “created”; } }; try { const formData = input.metadata?.KM_CHAT_CONTEXT?.formData || input.metadata?.formData || {}; const firstName = getField( formData, “first_name”, “First name”, “First Name” ); const email = getField( formData, “work_email”, “Work email”, “Work Email”, “email” ).toLowerCase(); const company = getField(formData, “company”, “Company”); const pricingInterest = getField( formData, “pricing_interest”, “What would you like to discuss?”, “Pricing interest” ); const language = normalizeLanguage( getField( formData, “preferred_language”, “Preferred language”, “Preferred Language” ) ); const selectedTeam = LANGUAGE_CONFIG[language]; const emailIsValid = /^[^\s@]+@[^\s@]+\.[^\s@]+$/.test(email); if (!emailIsValid || !selectedTeam) { callback([ { message: “I could not read the email or preferred language. Please submit the pricing form again.” } ]); return; } let salespersonAvailable = false; try { const availabilityResponse = await axios.post( “https://services.kommunicate.io/rest/ws/user/v2/detail” + “?fetchLatestMessageTime=true”, { userIdList: selectedTeam.agentUserIds }, { headers: { “Content-Type”: “application/json”, “API-key”: KOMMUNICATE_API_KEY } } ); const users = Array.isArray(availabilityResponse.data) ? availabilityResponse.data : []; salespersonAvailable = users.some( (user) => user.connected === true && user.deactivated !== true ); } catch (availabilityError) { console.log( “Kommunicate availability check failed:”, availabilityError.message ); // Use the scheduled-demo path when availability cannot be confirmed. salespersonAvailable = false; } const handoffOutcome = salespersonAvailable ? “live_sales_handoff” : “demo_link_offered”; const properties = { email, firstname: firstName, company, preferred_sales_language: language, pricing_interest: pricingInterest, chatbot_lead_source: “ai_chatbot”, chatbot_handoff_outcome: handoffOutcome }; // Do not overwrite existing HubSpot fields with empty strings. Object.keys(properties).forEach((key) => { if (properties[key] === “”) delete properties[key]; }); try { await upsertHubSpotContact(email, properties); } catch (hubspotError) { console.log(“HubSpot contact sync failed:”, hubspotError.message); // Continue the customer-facing sales flow even if CRM sync fails. } if (salespersonAvailable) { callback([ { platform: “kommunicate”, message: `Thanks${firstName ? `, ${firstName}` : “”}. ` + `I am connecting you with our ${selectedTeam.label}-speaking sales team.`, metadata: { KM_ASSIGN_TEAM: selectedTeam.teamId } } ]); return; } callback([ { platform: “kommunicate”, message: `Our ${selectedTeam.label}-speaking sales team is not available right now. ` + “Choose a convenient time for a detailed pricing discussion.”, metadata: { contentType: “300”, templateId: “3”, payload: [ { type: “link”, url: selectedTeam.demoUrl, name: “Book a Pricing Demo” } ] } } ]); } catch (error) { console.log(“Sales-routing function failed:”, error.message); callback([ { message: “I could not complete the sales handoff. Please try again or use our demo-booking page.” } ]); } }; |
You can get your Kommunicate API key in the Install section on your dashboard.
Replace the access tokens, user IDs, team IDs, and scheduling URLs before deploying the function.
HubSpot’s Contacts API documentation covers creating contacts, retrieving a contact by email, and updating contacts. The code first retrieves the contact using idProperty=email. If HubSpot returns a 404, it creates a new contact. Otherwise, it updates the record that already exists.
How does the availability check work?
Kommunicate’s user-detail endpoint accepts a list of user IDs:
| POST https://services.kommunicate.io/rest/ws/user/v2/detail?fetchLatestMessageTime=true |
The request body contains the salespeople assigned to the selected language:
| { “userIdList”: [ “maria@example.com”, “carlos@example.com” ] } |
The Kommunicate API endpoint documentation returns a connected Boolean for every user. In this workflow, a team is considered available when at least one active user has connected: true.
This is different from Kompose’s global Restrict Human Handover if all agents are Away/Offline setting. That setting checks whether the overall human team is unavailable. It cannot confirm that the specific Spanish, French, or German sales team has someone online.
A language-specific check is necessary when other teams may still be online.
Also, remember that connected: true indicates online presence. It does not guarantee that the salesperson has no active conversations. Kommunicate’s team routing rules should decide which available team member receives the handoff.
How does the HubSpot contact sync work?
The function stores the following information in HubSpot:
| HubSpot property | Value from the chatbot |
|---|---|
| Work email submitted by the visitor | |
| firstname | Visitor’s first name |
| company | Visitor’s company |
| preferred_sales_language | Selected language |
| pricing_interest | Pricing need described in the form |
| chatbot_lead_source | ai_chatbot |
| chatbot_handoff_outcome | Live handoff or demo link |
The contact lookup prevents a new duplicate record from being created every time an existing lead returns to the chatbot. HubSpot recommends including email when creating contacts because it is the primary unique identifier used to avoid duplicates.
The code also avoids overwriting existing fields with empty strings. For example, if the visitor leaves the company field blank, the function will not erase a company value already stored in HubSpot.
You can extend the workflow later by:
- Associating the contact with an existing company
- Creating a deal for qualified enterprise opportunities
- Adding a note with the conversation summary
- Triggering a HubSpot workflow based on the handoff outcome
- Assigning a HubSpot contact owner based on language or region
HubSpot’s associations documentation covers connecting contacts with companies, deals, notes, and other CRM objects.
How does the live sales handoff work?
When a salesperson is available, the function returns this structure:
| { “platform”: “kommunicate”, “message”: “I am connecting you with our Spanish-speaking sales team.”, “metadata”: { “KM_ASSIGN_TEAM”: “TEAM_SPANISH” } } |
KM_ASSIGN_TEAM sends the conversation to the selected language team. The team’s routing configuration then determines which salesperson receives the conversation.
Do not route the conversation before capturing the work email. If the handoff fails, the visitor leaves, or the salesperson replies later, the lead should still exist in HubSpot with enough context for follow-up.
How the Demo Fallback Works
When no matching salesperson is online, the chatbot returns a link button instead of a dead-end message:
| { “platform”: “kommunicate”, “message”: “Our Spanish-speaking sales team is not available right now. Choose a convenient time for a detailed pricing discussion.”, “metadata”: { “contentType”: “300”, “templateId”: “3”, “payload”: [ { “type”: “link”, “url”: “SPANISH_HUBSPOT_MEETING_LINK”, “name”: “Book a Pricing Demo” } ] } } |
Kommunicate’s link-button documentation explains the templateId: “3” payload used here.
A language-specific meeting page is better than one generic demo link. It ensures the meeting is booked with a salesperson who can continue the discussion in the requested language.
The code also uses the demo path when the availability API cannot be reached. This is safer than claiming that a salesperson is available and then sending the lead to an unattended queue.
Step 7: Test the Complete Workflow
Test the agent before publishing it. Use real test contacts and sales users rather than checking only whether the code deploys.
| Test scenario | Expected result |
|---|---|
| New English-speaking lead, English rep online | Contact created and conversation routed to English Sales |
| Existing Spanish-speaking contact, Spanish rep online | Contact updated and conversation routed to Spanish Sales |
| French-speaking lead, no French rep online | Contact created or updated, and French demo link displayed |
| The German team user is marked offline | German demo link displayed |
| General public-pricing question | AI agent answers without forcing a sales handoff |
| Enterprise quote request | Pricing lead form displayed |
| Invalid email | Form validation or retry message displayed |
| Existing HubSpot contact with company data, company left blank in chat | Existing company value remains unchanged |
| HubSpot API fails, but the salesperson is online | Visitor is still routed; sync error is logged |
| Availability API fails | Demo-booking fallback displayed |
| Unsupported language value | The visitor is asked to submit the form again |
Also, verify the resulting HubSpot record. The contact should contain the selected language, pricing request, lead source, and final handoff outcome.
Common Mistakes to Avoid
| Mistake | Better approach |
|---|---|
| Routing every mention of price to Sales | Let the AI agent answer basic published pricing questions and route custom commercial requests |
| Detecting language only from the browser | Ask which language the visitor wants for the pricing discussion |
| Sending all languages to one general queue | Use language-specific teams and team IDs |
| Checking whether any company agent is online | Check only the users assigned to the selected language team |
| Attempting the handoff before capturing an email | Save the lead first so Sales can follow up if the live transfer fails |
| Creating a new HubSpot contact for every chat | Retrieve the contact by email and update it when it already exists |
| Updating HubSpot fields with blank values | Remove empty properties before sending the update |
| Using one generic meeting link | Create language-specific one-to-one or round-robin scheduling pages |
| Blocking the customer flow when HubSpot fails | Log the CRM error, but continue with the live handoff or booking path |
| Treating online presence as unlimited capacity | Let the team routing distribute the conversation and monitor the queue load separately |
Security and production considerations
This tutorial uses Kompose Inline Code because it keeps the workflow in one place and does not require you to host a separate server. Kompose documents Inline Code as a way to run custom functions and API calls directly when an intent is triggered.
However, both the HubSpot token and Kommunicate API key are secrets. Keep the following controls in place:
- Grant only the HubSpot contact read and write scopes required by this workflow.
- Restrict who can edit or export the AI agent configuration.
- Rotate the token and API key if an exported configuration is shared outside the authorized team.
- Do not print access tokens in logs.
- Move the logic to a secured backend or webhook if your security policy requires managed secrets, centralized monitoring, IP controls, or more advanced retry handling.
- Use OAuth when building a HubSpot integration that will be installed for multiple customers.
For a production deployment, also monitor failures from the HubSpot and Kommunicate APIs. The customer-facing fallback prevents a broken experience, but the operations team still needs visibility when leads are not written to the CRM.
Conclusion
Connecting an AI chatbot to HubSpot should do more than copy a transcript into the CRM. The integration should decide how to move a high-intent visitor toward the right commercial conversation.
In this workflow, the AI agent:
- Identifies a pricing or quote request.
- Captures the lead’s work email, company, requirements, and preferred language.
- Checks whether the matching language team is online.
- Creates or updates the HubSpot contact.
- Routes the conversation to Sales when someone is available.
- Offers a language-specific demo link when the team is offline.
The visitor does not have to find the correct regional sales page, repeat their requirements, or wait in the wrong queue. Sales receives a HubSpot record with the context needed to continue the discussion.
You can sign up for Kommunicate to build this workflow with Kompose and adapt the language map, HubSpot fields, and routing rules to your sales process.

Adarsh Kumar is the CTO & Co-Founder at Kommunicate. As a seasoned technologist, he brings over 14 years of experience in software development, artificial intelligence, and machine learning to his role. His expertise in building scalable and robust tech solutions has been instrumental in the company’s growth and success.